
An overview of Full stack development - (Part II)

📖 Table of contents
Part 2:
- Application setup
- Security
- Continous Integration and Delivery
- Loggins and redirection
- Subdomains
- Databases
- HTTPS and
- Containers
- Load balancer
Application setup
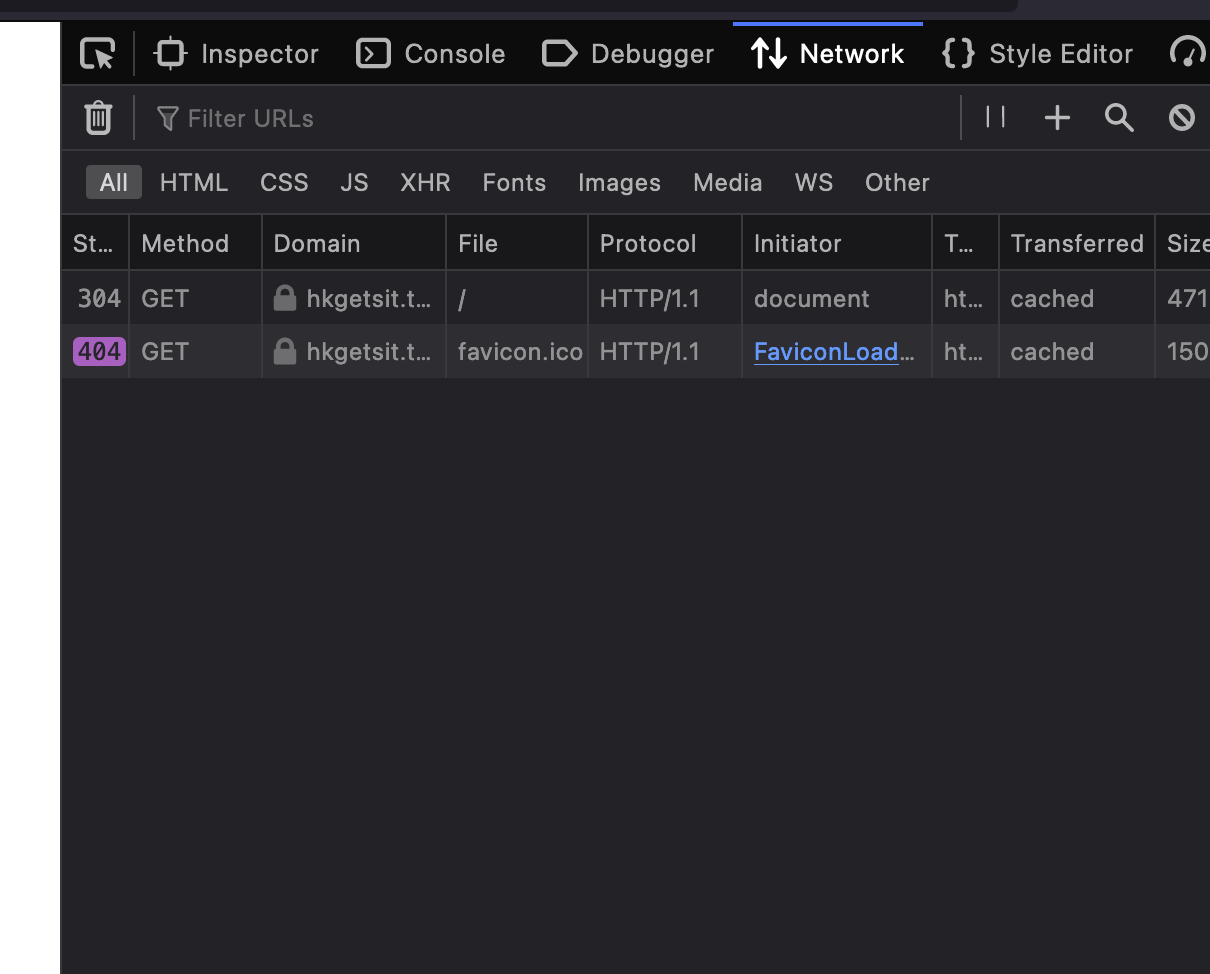
If we navigate to our domain (mine is hkgetsit.tech), this is what we see :
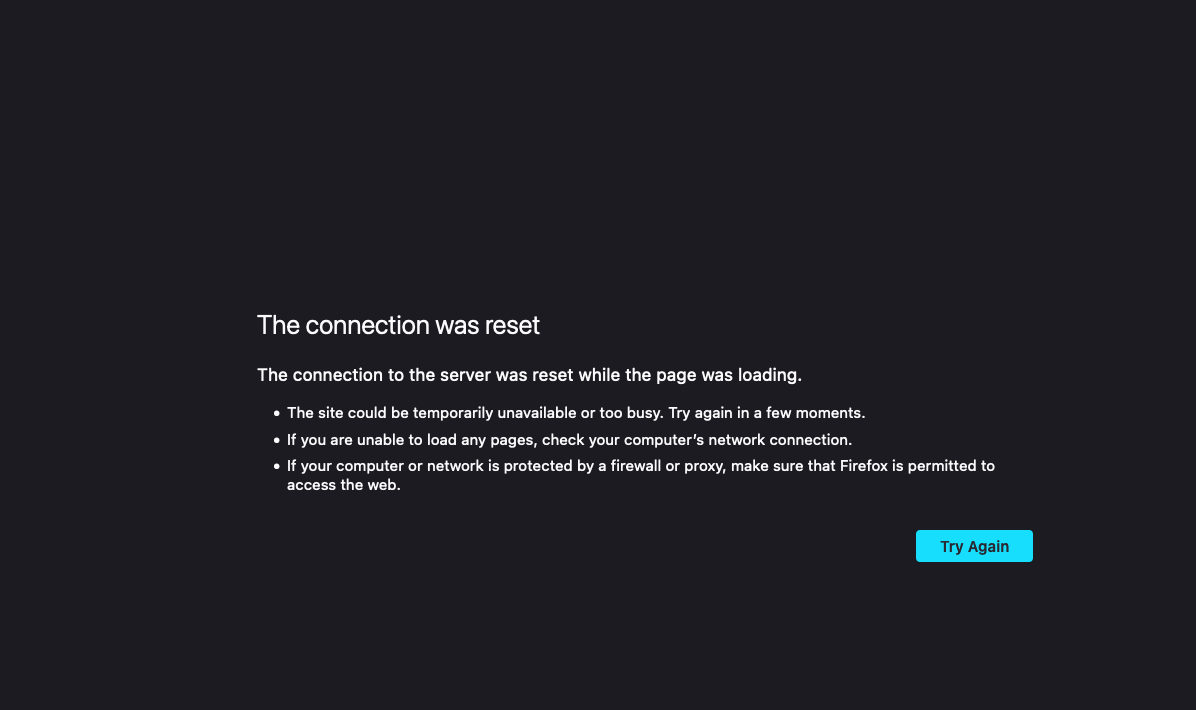
This is because the server doesn't know how to respond to a request.
Let's make our server responds to HTTP requests.
To do this we need a web server. There are many options out there but we are going to use Nginx.
Why do we need a web server?
We discussed web servers in part one of this article, it's time to see it in practice.
When an HTTP request comes in, we need a web server to route that request to the right place (database, application or another server).
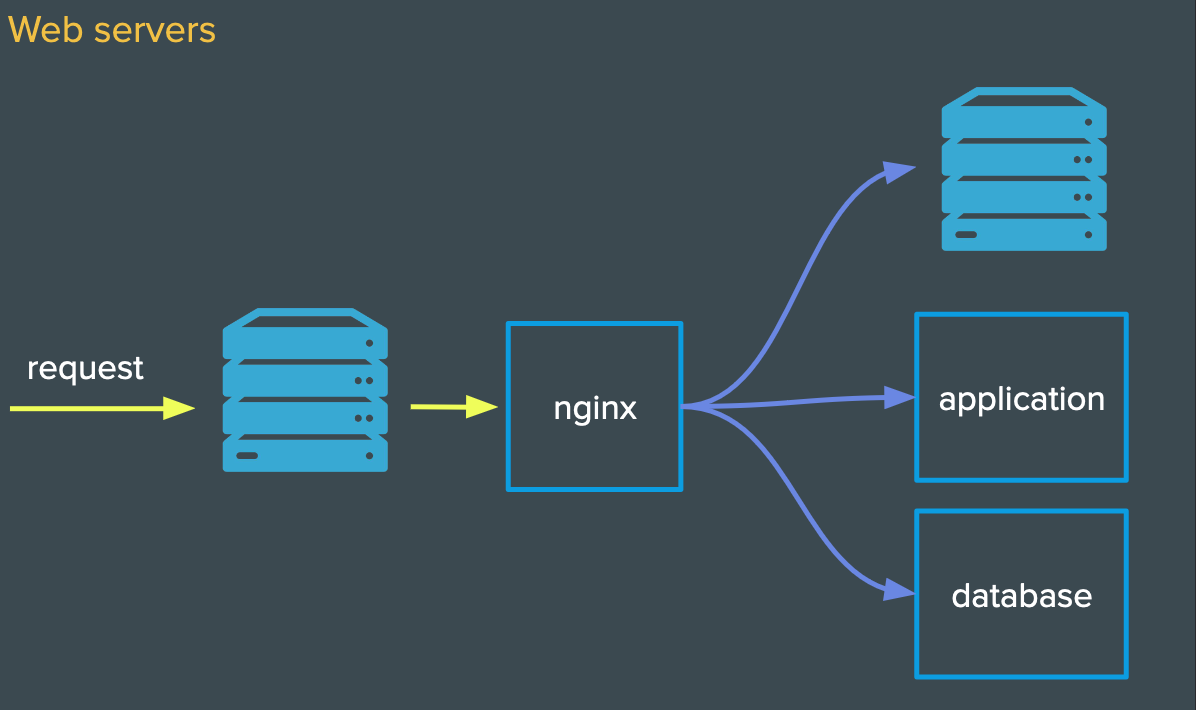
Though not required, using a web server offers several advantages, including:
Scalability: Web servers can handle a large number of simultaneous connections, making them suitable for high-traffic websites.Security: Web servers include security features to protect against common web threats like DDoS attacks and SQL injection.Customization: Web servers configurations can be customize to specific application requirements.
To learn more about web servers, check out part part one of this article .
Let's install and set up Nginx:
- SSH into your server (make sure to replace
<your_IP_address>) and install Nginx :
ssh root@<your_IP_address>
sudo apt install nginx
- Start Nginx :
sudo service nginx start
- If you navigate to your domain in the browser, you should see this :
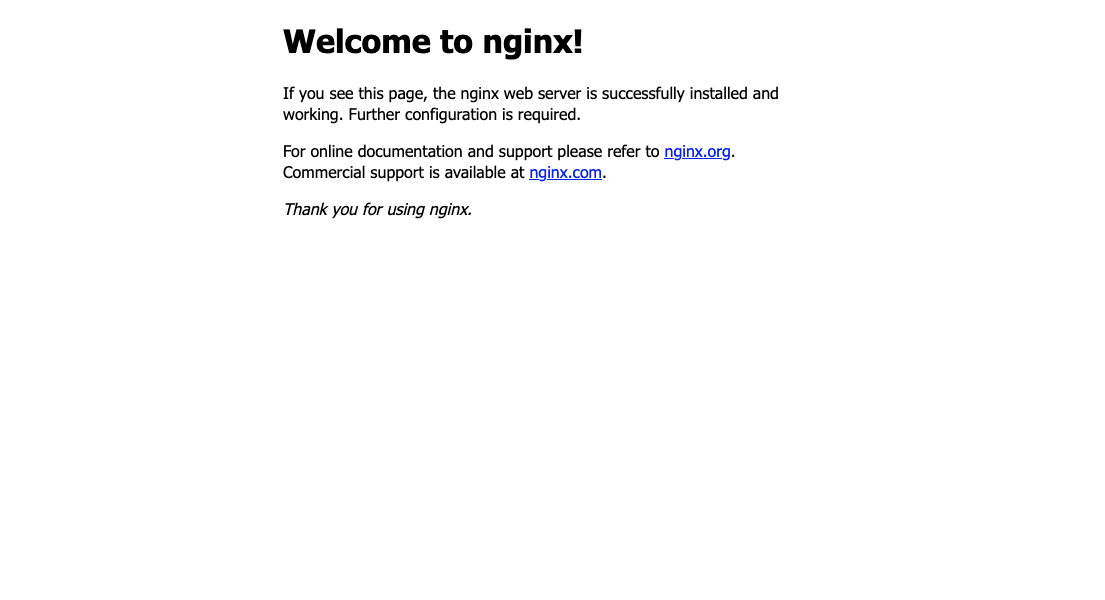
This is the nginx welcome page!
We can check the Nginx default server configuration by running the following command :
less /etc/sites-available/default
You should see :
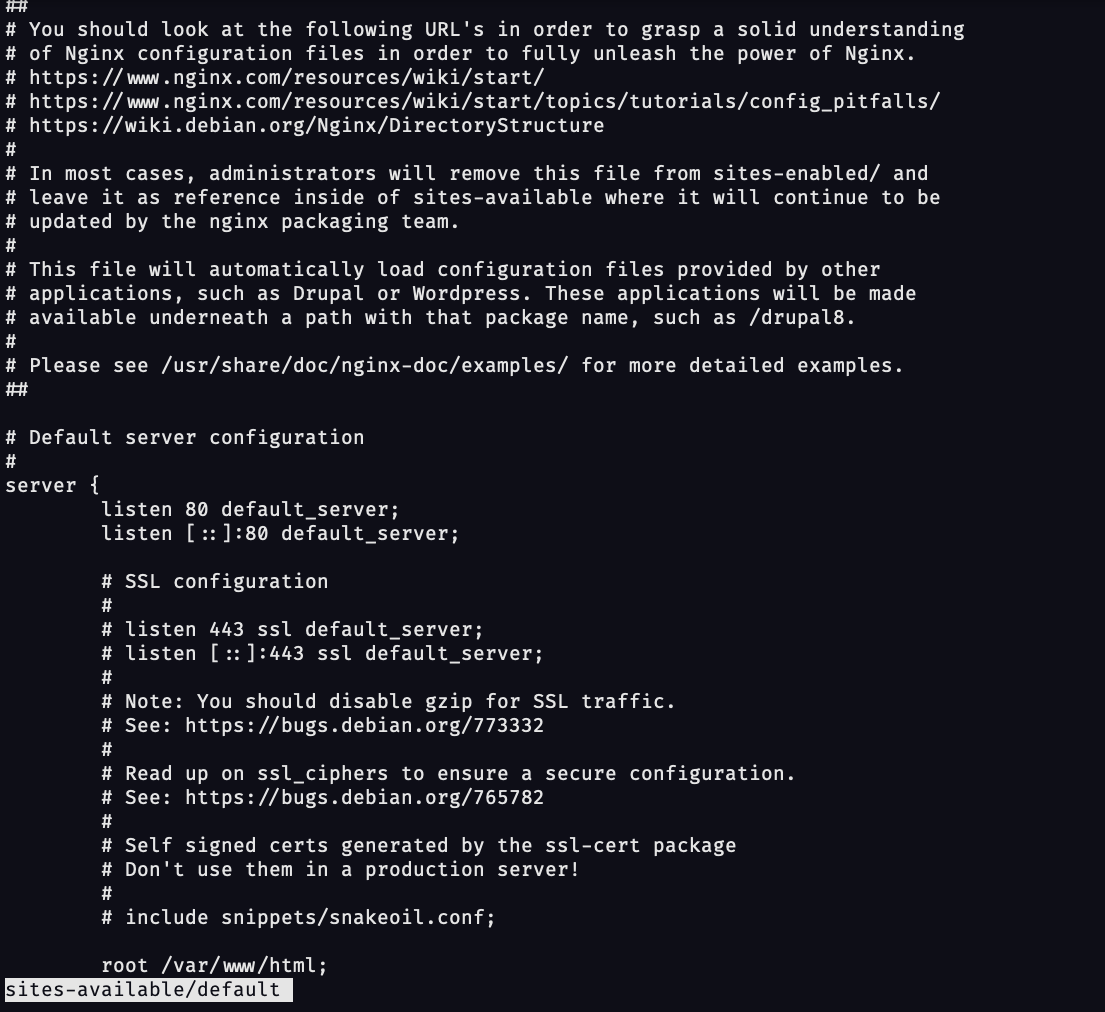
root /var/www/html: This is the base directory for requests, the welcome page above is located in this directory.
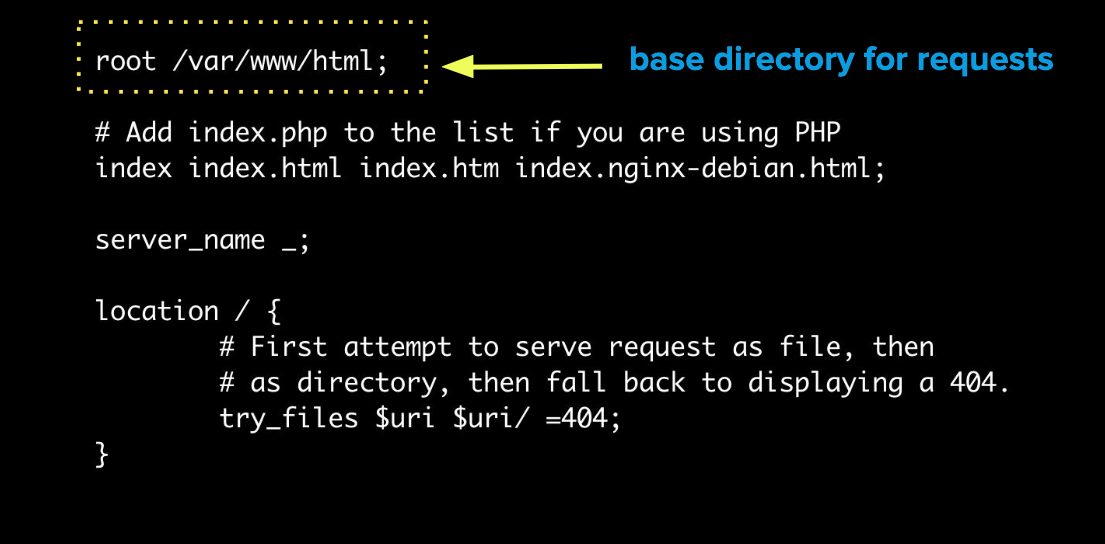
location: Location blocks are used to decide how to process the request based on the URI (the part of the request that comes after the domain name or IP address/port).
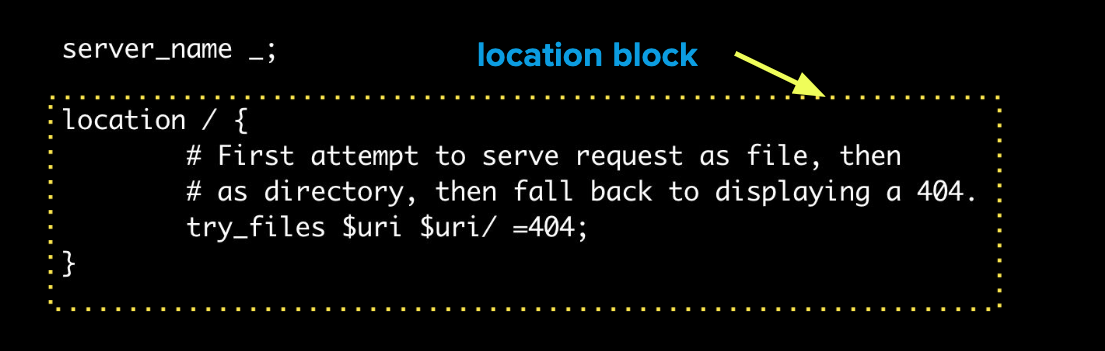
directives: In this example, the directive is to try to serve an HTML page and if the page can't be found, serve the 404 page. Later in this article, we will use another directive calledproxy_passto route requests to our node server using Nginx.
For now, let's edit the default homepage. Navigate to page's directory by running the following command:
cd /var/www/html
Open the file with Vim and edit the page as you wish (we are going to add the classic "hello world") :
vi index.html
# add hello world save and exit
If you go back to the browser and refresh the page you should see :

Setup Nginx as a reverse proxy
As mentionned above, it's not a requirement to use a web server.
Web applications written in Node.js for example, can run with their own standalone server. This means that the client can sends requests directly to the node server, and the server will respond to the client.
However, they lack a number of advanced features like load balancing, security, etc..
A reverse proxy is a server that retrieves resources for clients from one or more upstream servers.
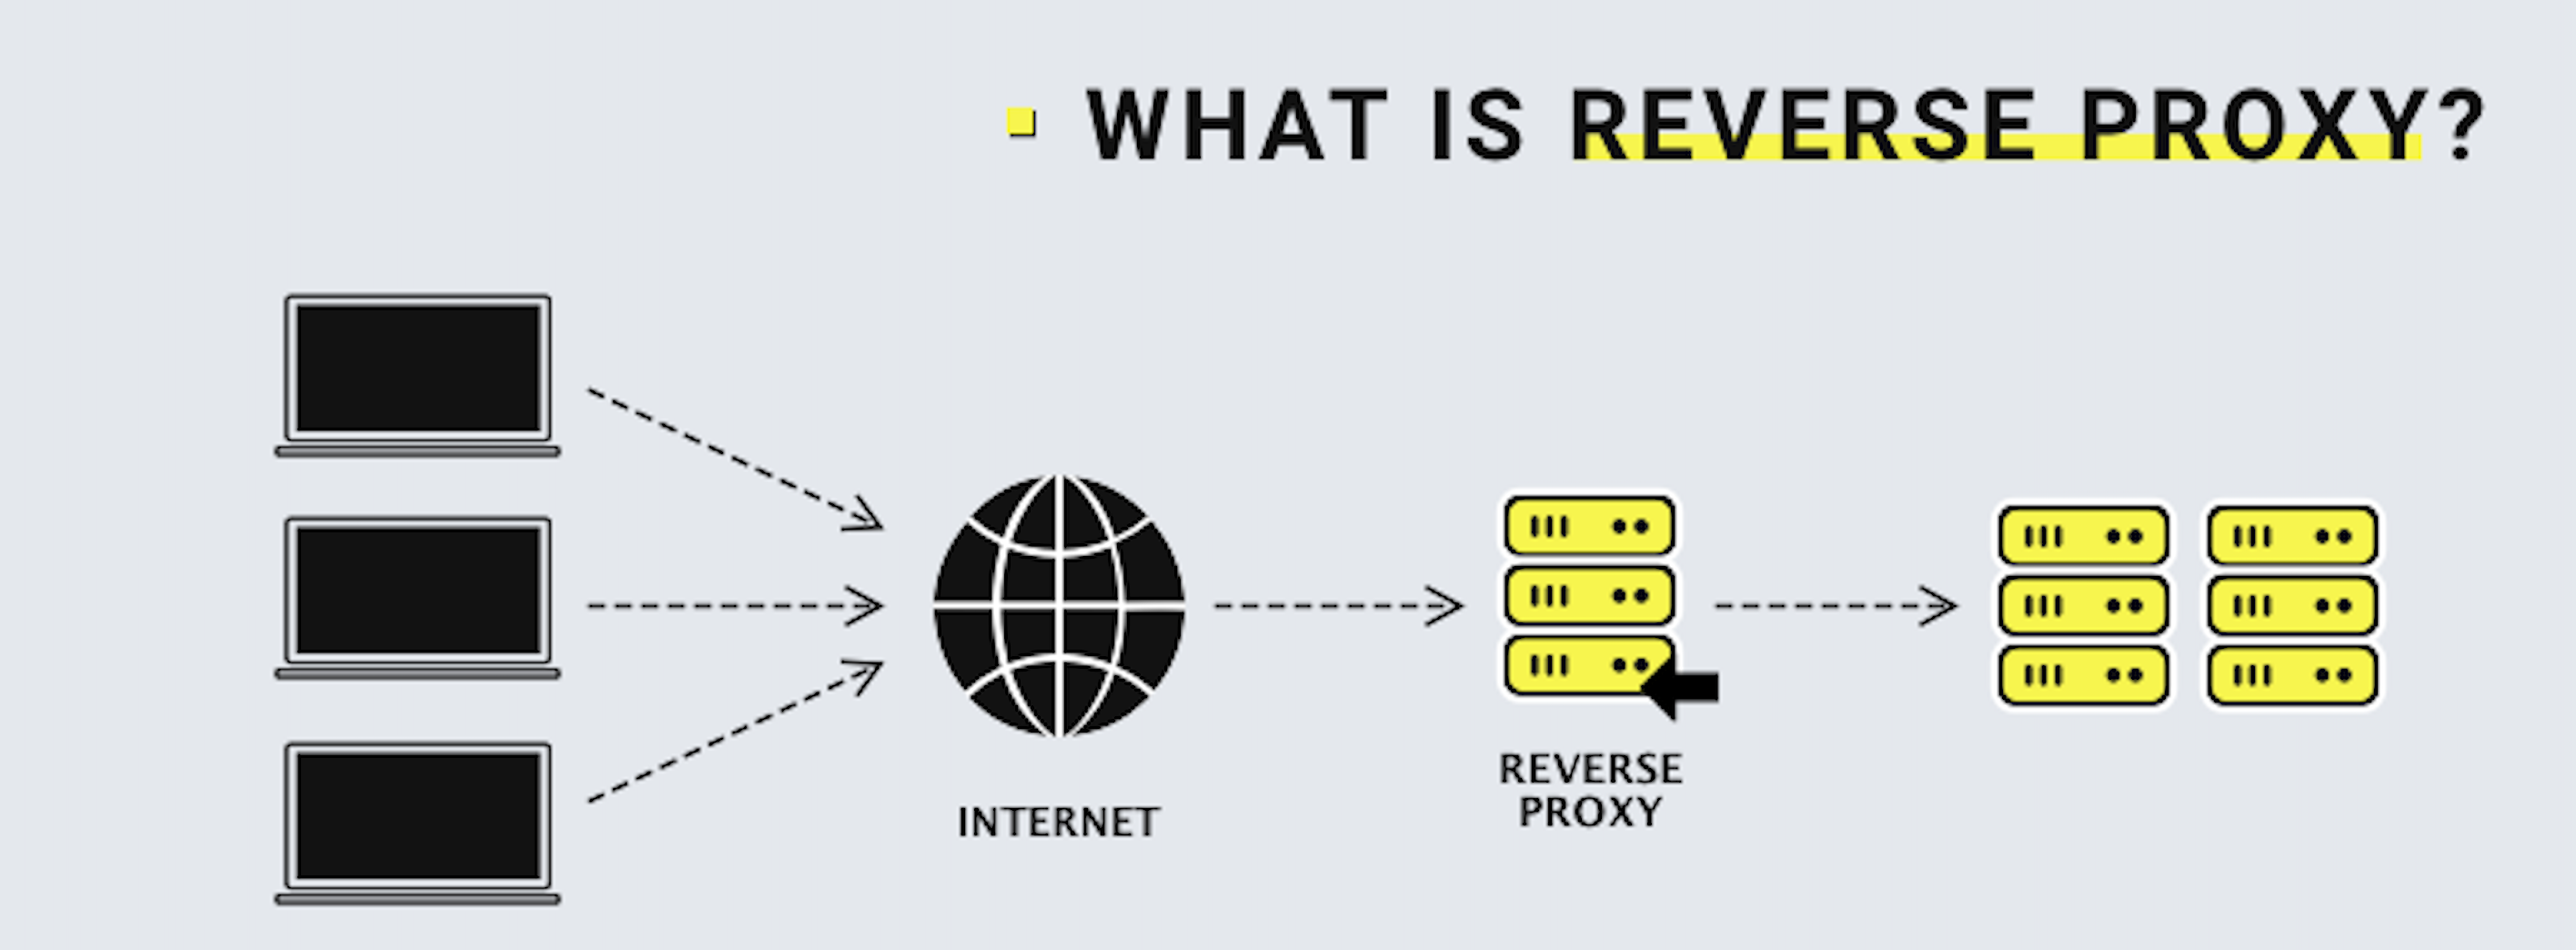
A reverse proxy is the recommended way to expose an application server to the internet. Check out this very interesting article to find more details.
Nginx can act as a reverse proxy while serving HTTP requests.
- First, let's install Node.js on our server :
Here is the link to install node on linux.
- SSH into your server
ssh root@<your_IP_address>
- Execute the following command to download and import the Nodesource GPG key :
sudo apt-get update
sudo apt-get install -y ca-certificates curl gnupg
sudo mkdir -p /etc/apt/keyrings
curl -fsSL https://deb.nodesource.com/gpgkey/nodesource-repo.gpg.key | sudo gpg --dearmor -o /etc/apt/keyrings/nodesource.gpg
- Create deb repository :
NODE_MAJOR=20
echo "deb [signed-by=/etc/apt/keyrings/nodesource.gpg] https://deb.nodesource.com/node_$NODE_MAJOR.x nodistro main" | sudo tee /etc/apt/sources.list.d/nodesource.list
- Install node :
sudo apt-get update
sudo apt-get install nodejs -y
- Install git (more on that later) :
sudo apt install git
- Next, let's create a basic Node.js application :
- Change ownership of the directory
/www:
sudo chown -R $USER:$USER /var/www
- Create a directory for the application call "app" :
mkdir /var/www/app
- Initialize a git repository
cd app
git init
- Run the following command to create a new
package.jsonfile:
npm init -y
- Create a file called
app.js
vi app.js
- Copy-paste this in
app.js:
const http = require('http')
const PORT = 8000

const server = http.createServer((req, res) =>{
res.write("Hello from basic nodejs server")
res.end()
})

server.listen(PORT)
console.log(`server is listening to port ${PORT})
- Next, we can setup proxy pass
Proxy pass is an Nginx directive that allows us to route any request that comes to our web server to our node.js server.
- Create a configuration file (called
hkfor our example) for your server
sudo vi /etc/nginx/sites-enabled/hk
- Copy-paste the following configuration to create a virtual server block, making sure to replace
<your_domain>and the app server address (http://127.0.0.1:8000)
server {
    listen  80;
    listen  [::] : 80 default_server
    root /var/www/html
    index index.html
    server_name <your_domain>
    location / {
              proxy_pass http://127.0.0.1:8000
    }
}
- Save and exit!
This configuration file begins with making nginx listen on port 80 and respond to requests made to <your_domain>.
The Reverse proxy functionality is enabled through Nginx’s proxy_pass directive. With this configuration, navigating to <your_domain> in your local web browser will be the same as opening http://localhost:8000.
While we will only proxy a single application server, Nginx is capable of serving as a proxy for multiple servers at once :
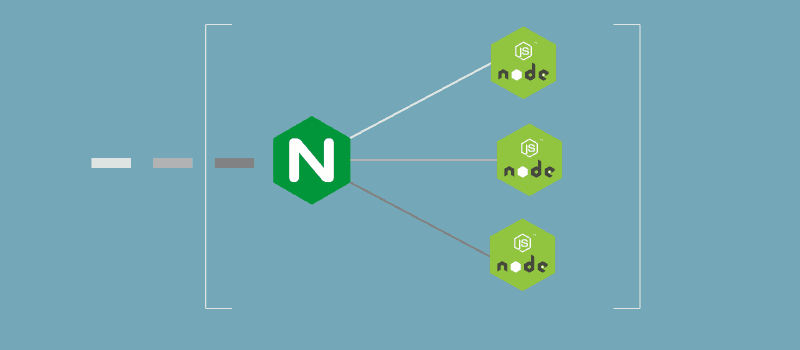
By adding more location blocks as needed, a single server name can combine multiple application servers through proxy into one cohesive web application.
- Finally, we're going to point Nginx to our new server.
- Open the file
nginx.conf:
sudo vi /etc/nginx/ngnix.conf
- Modify this line
/etc/nginx/sites-enabled/making sure to replace<server_config_file>(hkin my case) :
/etc/nginx/sites-enabled/<server_config_file>
- To validate your configuration file you can run the following command :
nginx -t
If everything is correct you should get the following output:

- check Nginx status and restart Nginx :
sudo service nginx status
sudo service nginx restart
In the terminal run the following command:
cd /var/www/app
node app.js
Navigate to your domain in the browser you should see the following:
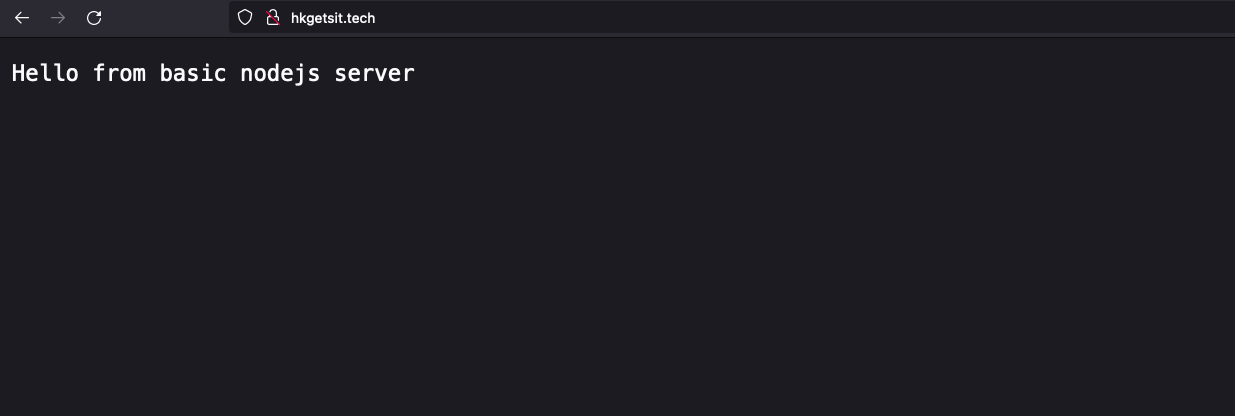
Congratulations! Nginx is now configured as a reverse proxy for your application server. With this in place, we can build a full web page, accessible via our domain (mine is hkgetsit.tech).
To make sure our website stays up and running even when we close the shell or exit the terminal, we're going to install a program called PM2. PM2 is a powerful process manager for Node.js.
The start script sets up PM2 as a service under the init system. When the server restarts, it will automatically restart PM2, which will then restart all the Node.js applications/processes it is managing.
- Install pm2
sudo npm i -g pm2
- Start pm2
pm2 start app.js
you should get this output:

- Setup autostart
pm2 startup
pm2 save
Copy paste the output command and execute it. You should see the following output:

- To check if all your Node.js processes are running under PM2, we can run the following command:
pm2 ls
#or
pm2 status

If our server reboot, pm2 will bring up our node app automatically.
Creating a git repo
Right now, our node app is only accesible on the server.
Let's create a git repository to be able to access our node js app on our local machine (in VS code).
-
On github create a git repository
-
Log in to the server and generate an SSH key called gh_key
cd ~/.ssh
ssh-keygen
-
Add the ssh key to github following these instructions:
-
Make sure git uses your new SSH key
vi ~/.ssh/config
#add this to your configuration

Host github.com
Hostname github.com
IdentityFile ~/.ssh/gh_key
- Push the repository to github.
git push -u origin main
We've pushed our code to github, if everything is working correctly, you should be able to pull the code from the repo to your local machine.
In the next sections, we will go over different topics to get some familiarity with the entire process of building a full stack application.
Security
What could someone do if they gain access to your server? :
- Use your server as a bot to attack other users infrastructures.
- People can connect to your Github via your server.
- People can connect to your server and delete log files making it impossible to know that your machine was compromised.
How can we secure our application? :
Security is paramount when it comes to servers. To protect our server, we can :
- Use SSH for authentication
- Setup firewalls to restrict access
- Keep the software up to date because to ensure your software is always running the latest version
- Use Two factor authentication
- Use a VPN
In the next section, we will focus on firewalls. But before we get into it, we need to understand what a port is. By defintion, a port is a communication endpoint that maps to specific process or network service. Ports are amazing because they allow us to run multiple services on one IP address. However, they are also an entry point for hackers because they are an opening to your computer.
To take a look at the well known ports, run this command :
less /etc/services
We will use a program called nmap. :
- Install nmap
sudo apt install nmap
- Run nmap
nmap <your_server_ip>
- Extra service/version information
nmap -sV <your_server_ip>
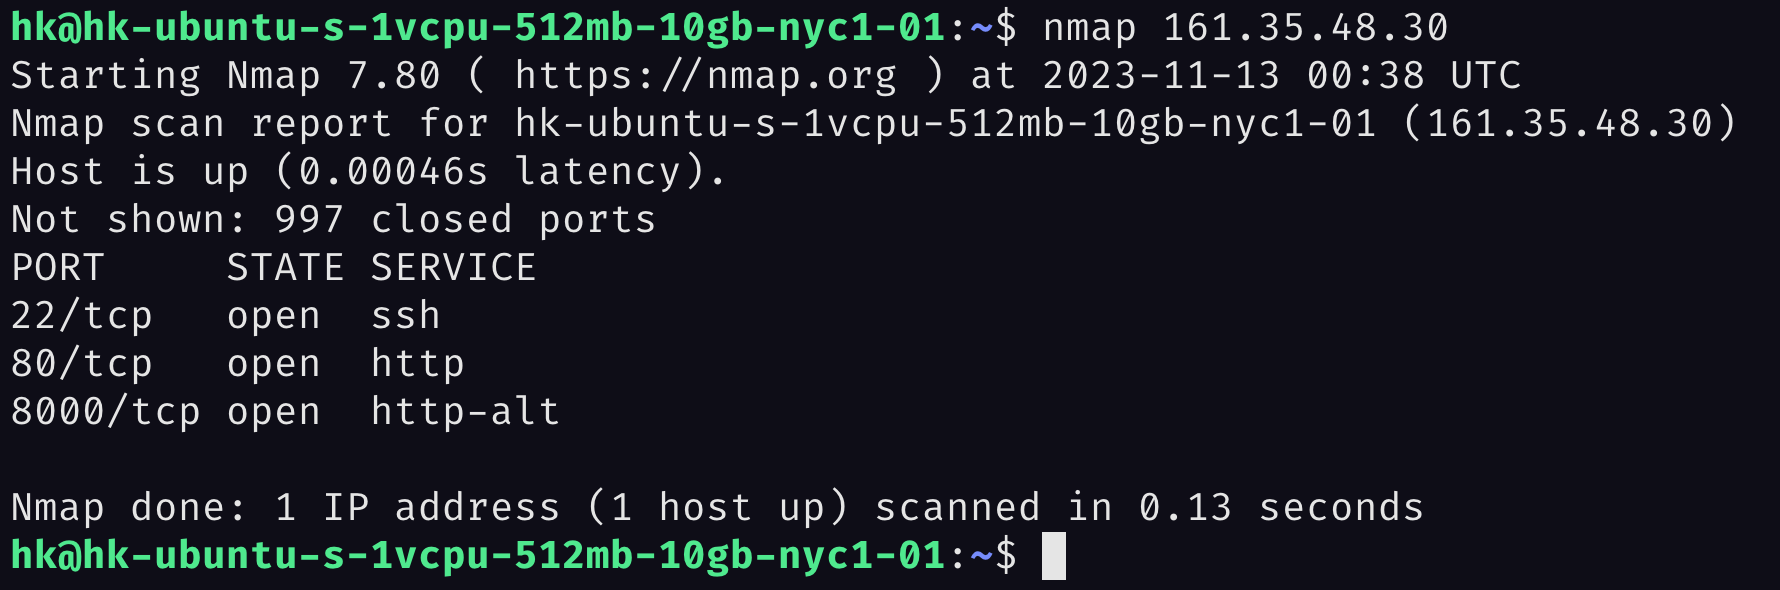
We can see that Port 22 (ssh), Port 80(http) and Port 8000(http-alt) are open.
Firewall
A firewall is a network security device that monitors incoming and outgoing network traffic and decides whether to allow or block specific traffic based on a defined set of security rules. Source
Check out cisco docs on firewalls
For our example, we will use a program called UFW or uncomplicated firewall.
The commands are really simple :
- ufw allow
- ufw deny
- ufw reject
The first step is to allow UFW to take over the management of our firewall. We will then allow ssh, http, and finally enable the firewall :
- Check firewall status
sudo ufw status
The status will probably be inactive which is fine.
- Allow ssh
sudo ufw allow ssh
- Allow http
sudo ufw allow http
- Enable firewall
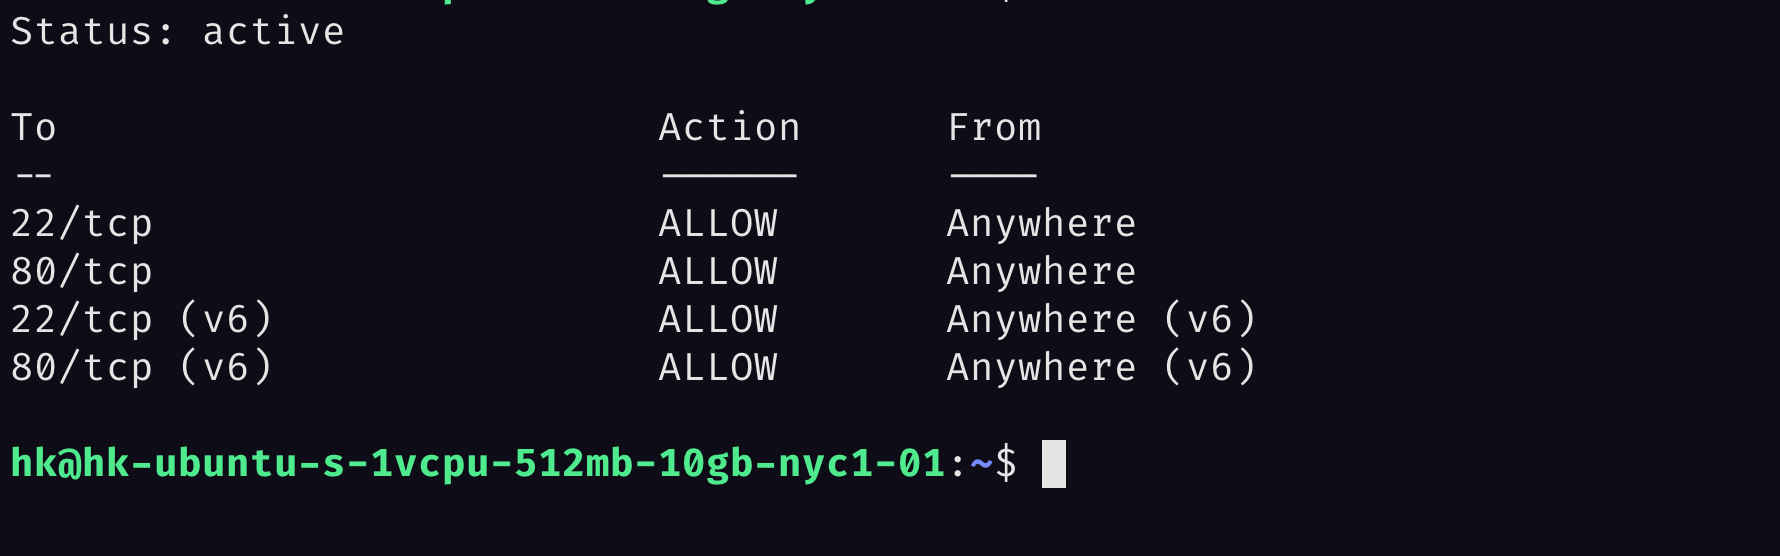
sudo ufw enable
If we run sudo ufw status again we should see the open ports :
Our firewall is set up, what else can we do?
If we need to block http connection (for example to only allow https connections), we could run this command :
sudo ufw reject http
Keeping our application up to date
Another solution to keep our application secure is keeping our software and packages up to date. We will use a package called unattended-upgrades to allow upgrade to run on the system periodically.
- Install unattended-upgrades
sudo apt install unattended-upgrades
- Enable upgrades
# enable us to run it in the background
sudo dpkg-reconfigure --priority=low unattended-upgrades
Continous integration and delivery (CI/CD)
Continuous integration is an important DevOps concept. The idea is that developers should frequently merge code changes into a central repository where automated tests and builds are run. Continuous integration puts a great emphasis on automated tests to ensure that the application is not broken whenever new commits are integrated into the main branch.
Continuous delivery is an extension of continuous integration since it automatically deploys all code changes to a testing and/or production environment after the build stage. This means that on top of automated testing, you have an automated release process.
For our application, we are going to automate a very simple task :
- Pulling the latest commit from our repository at certain intervals.
In order to do this, we will create a cron job to execute a shell script.
This is what a shell script looks like :
#! /usr/bin/bash

read -p "what is your name" name
echo "have a great day, $name"
We can create a file called github.sh to write our script :
vi github.sh
The command to pull from github is git pull origin <branch_name>.
So, our script would look like this :
#! /usr/bin/bash
cd /var/www/app
git pull origin main --ff-only
This tells git to apply the remote changes only if they can be fast-forwarded.
The first thing we need to do is to change the permission so that we can execute the file github.sh :
In the terminal run the command :
chmod 700 github.sh
To execute the file, we run the following command:
cd /var/www/app
./github.sh
# the result should look like this:
#* branch           main       -> FETCH_HEAD
#Already up to date.
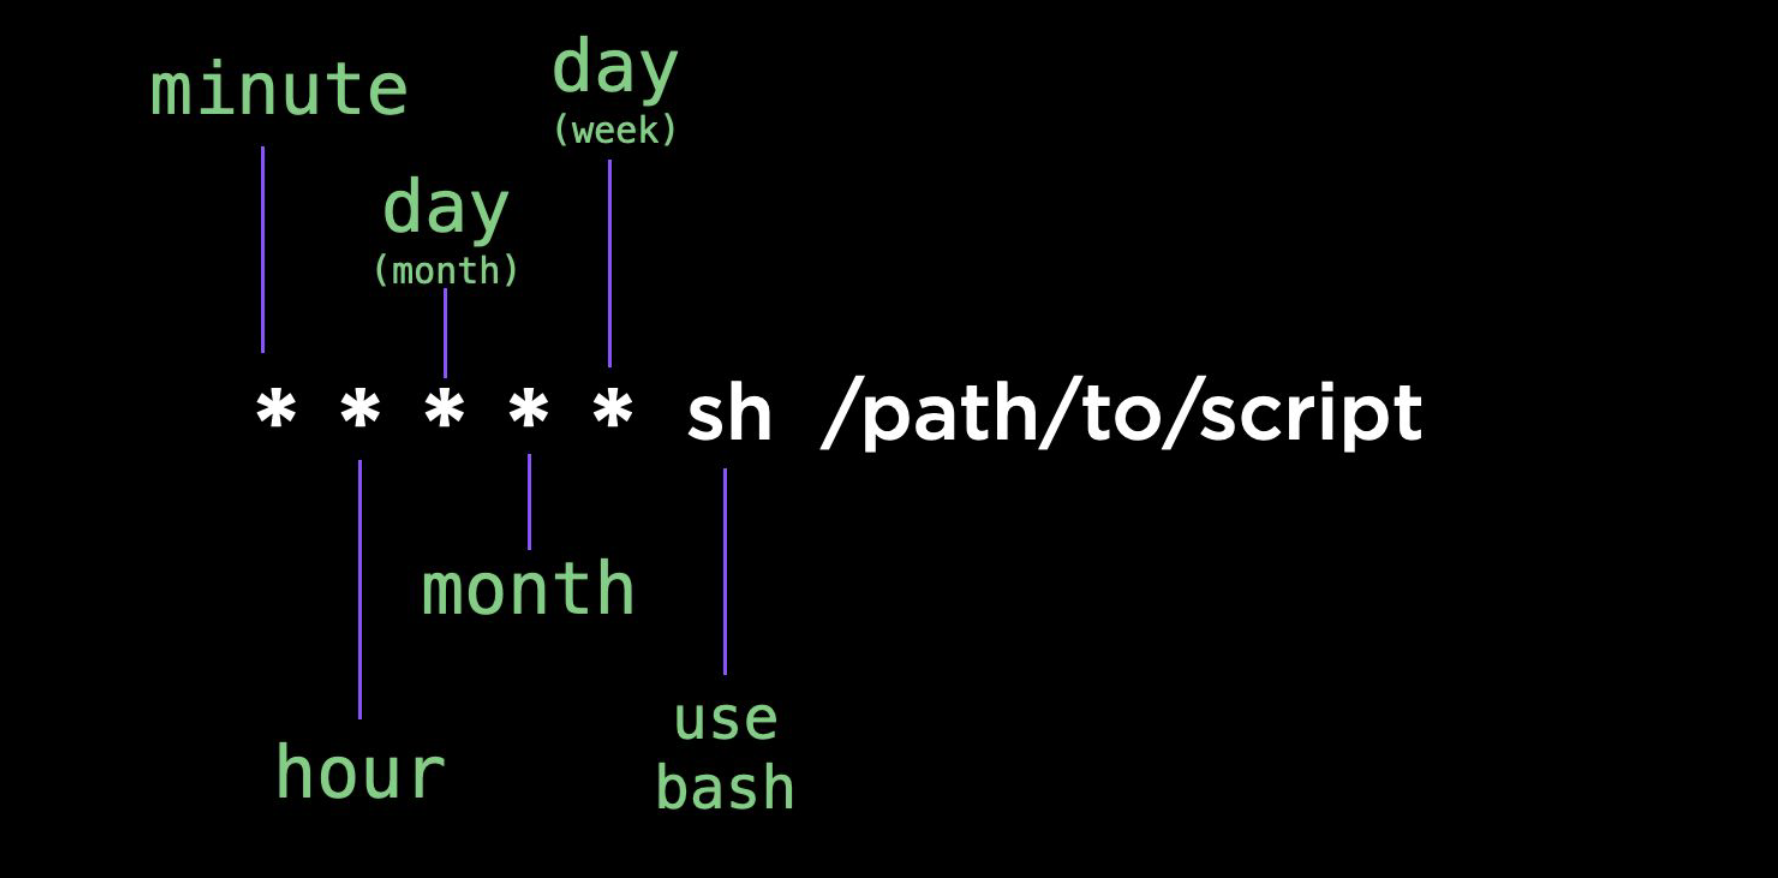
We wrote our shell script to pull from github, but we want to execute it at certain interval, that's where cron job comes into play.
For our cron job, we need :
- a timer
- a path to the script we want to run.
crontab.guru is a website that allows us to generate
the timer for our cronjob.
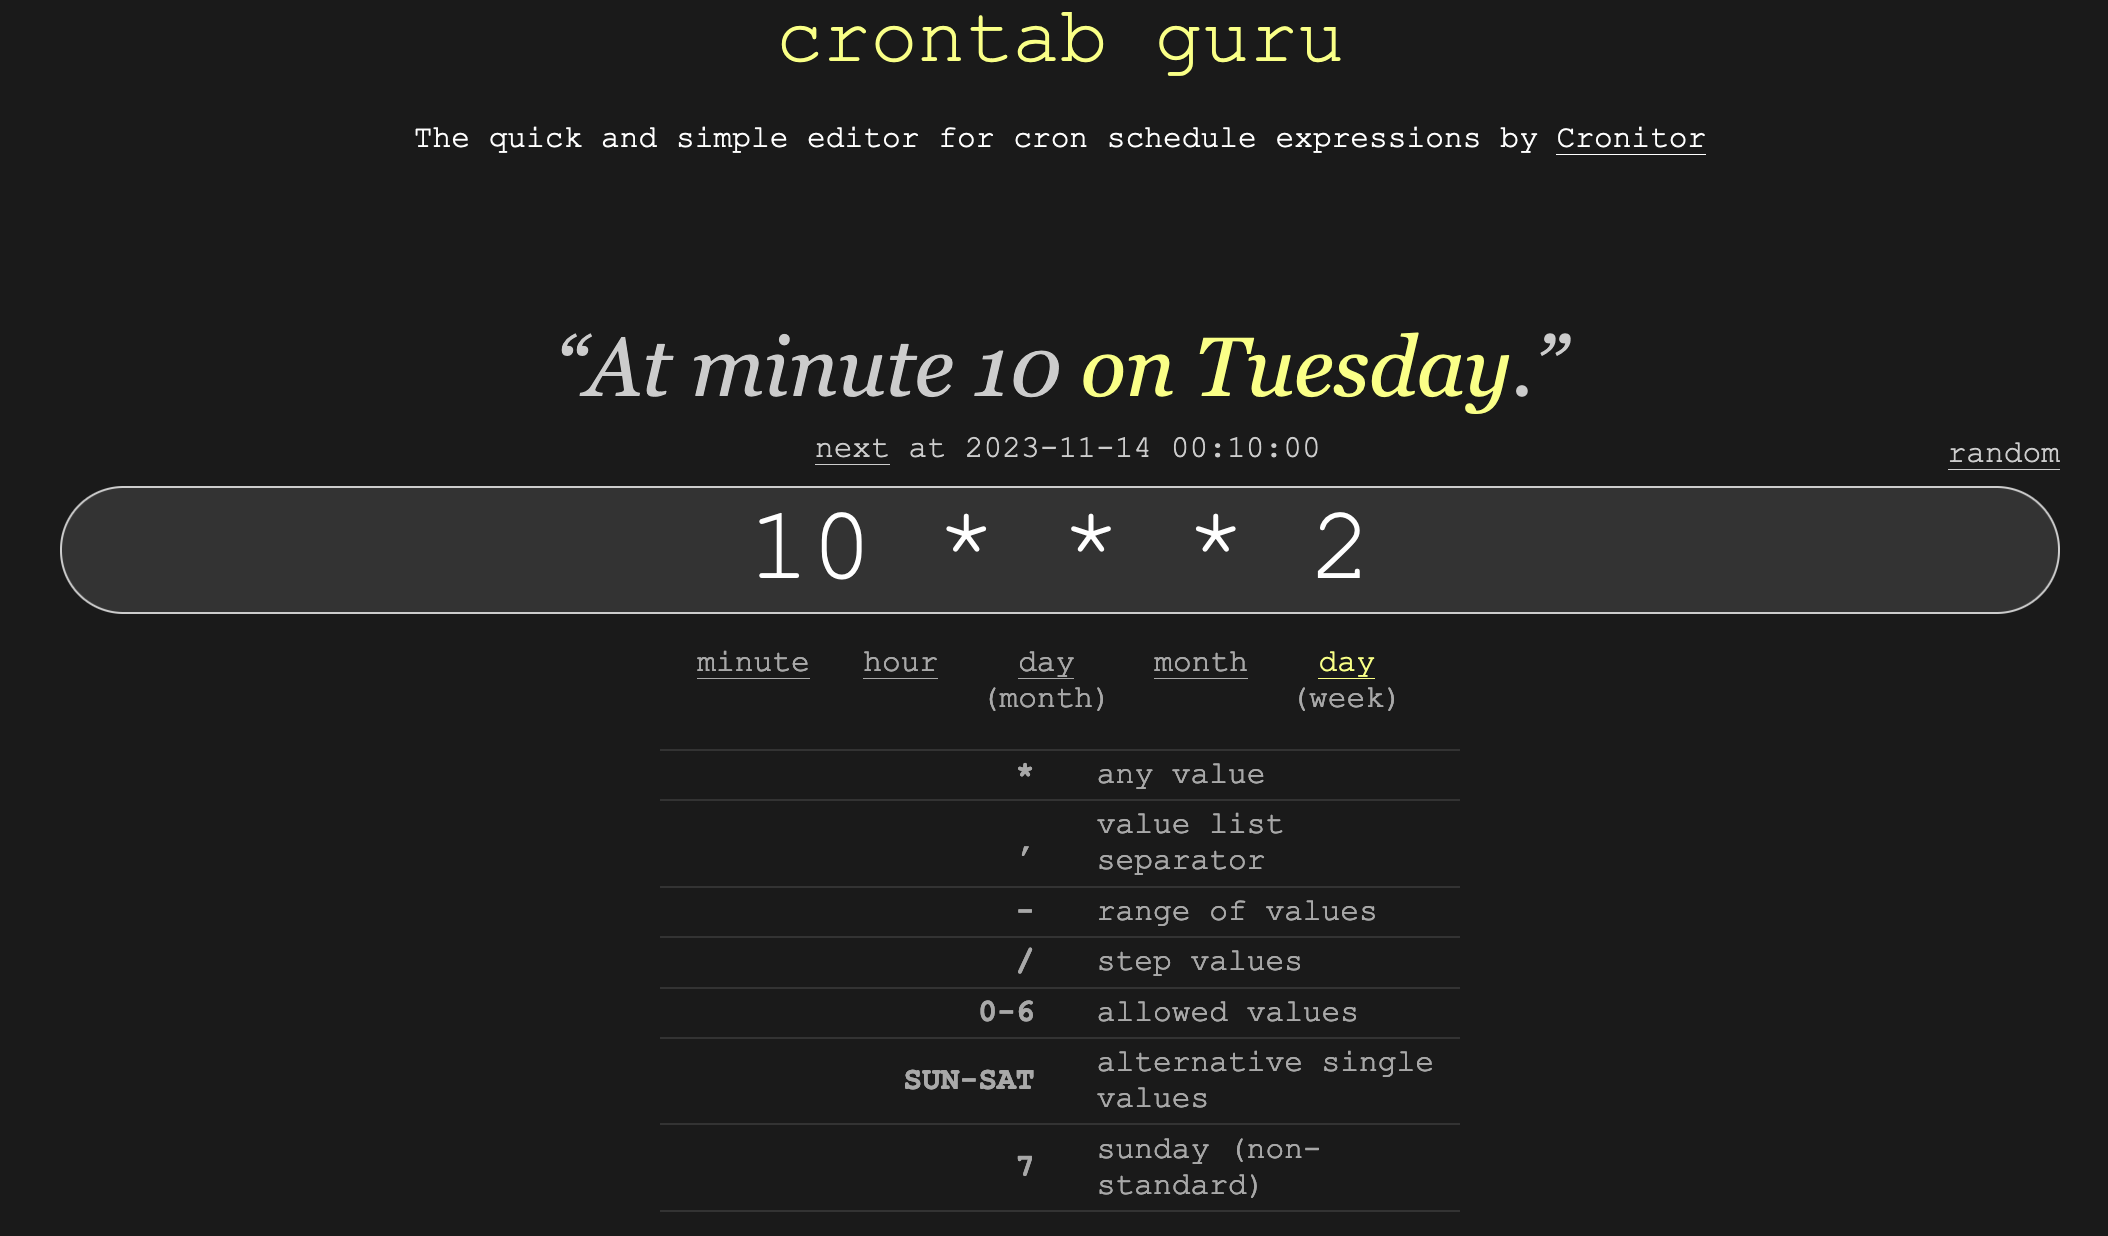
For example if we want to run a cronjob at minute
ten on tuesday we can write the following:
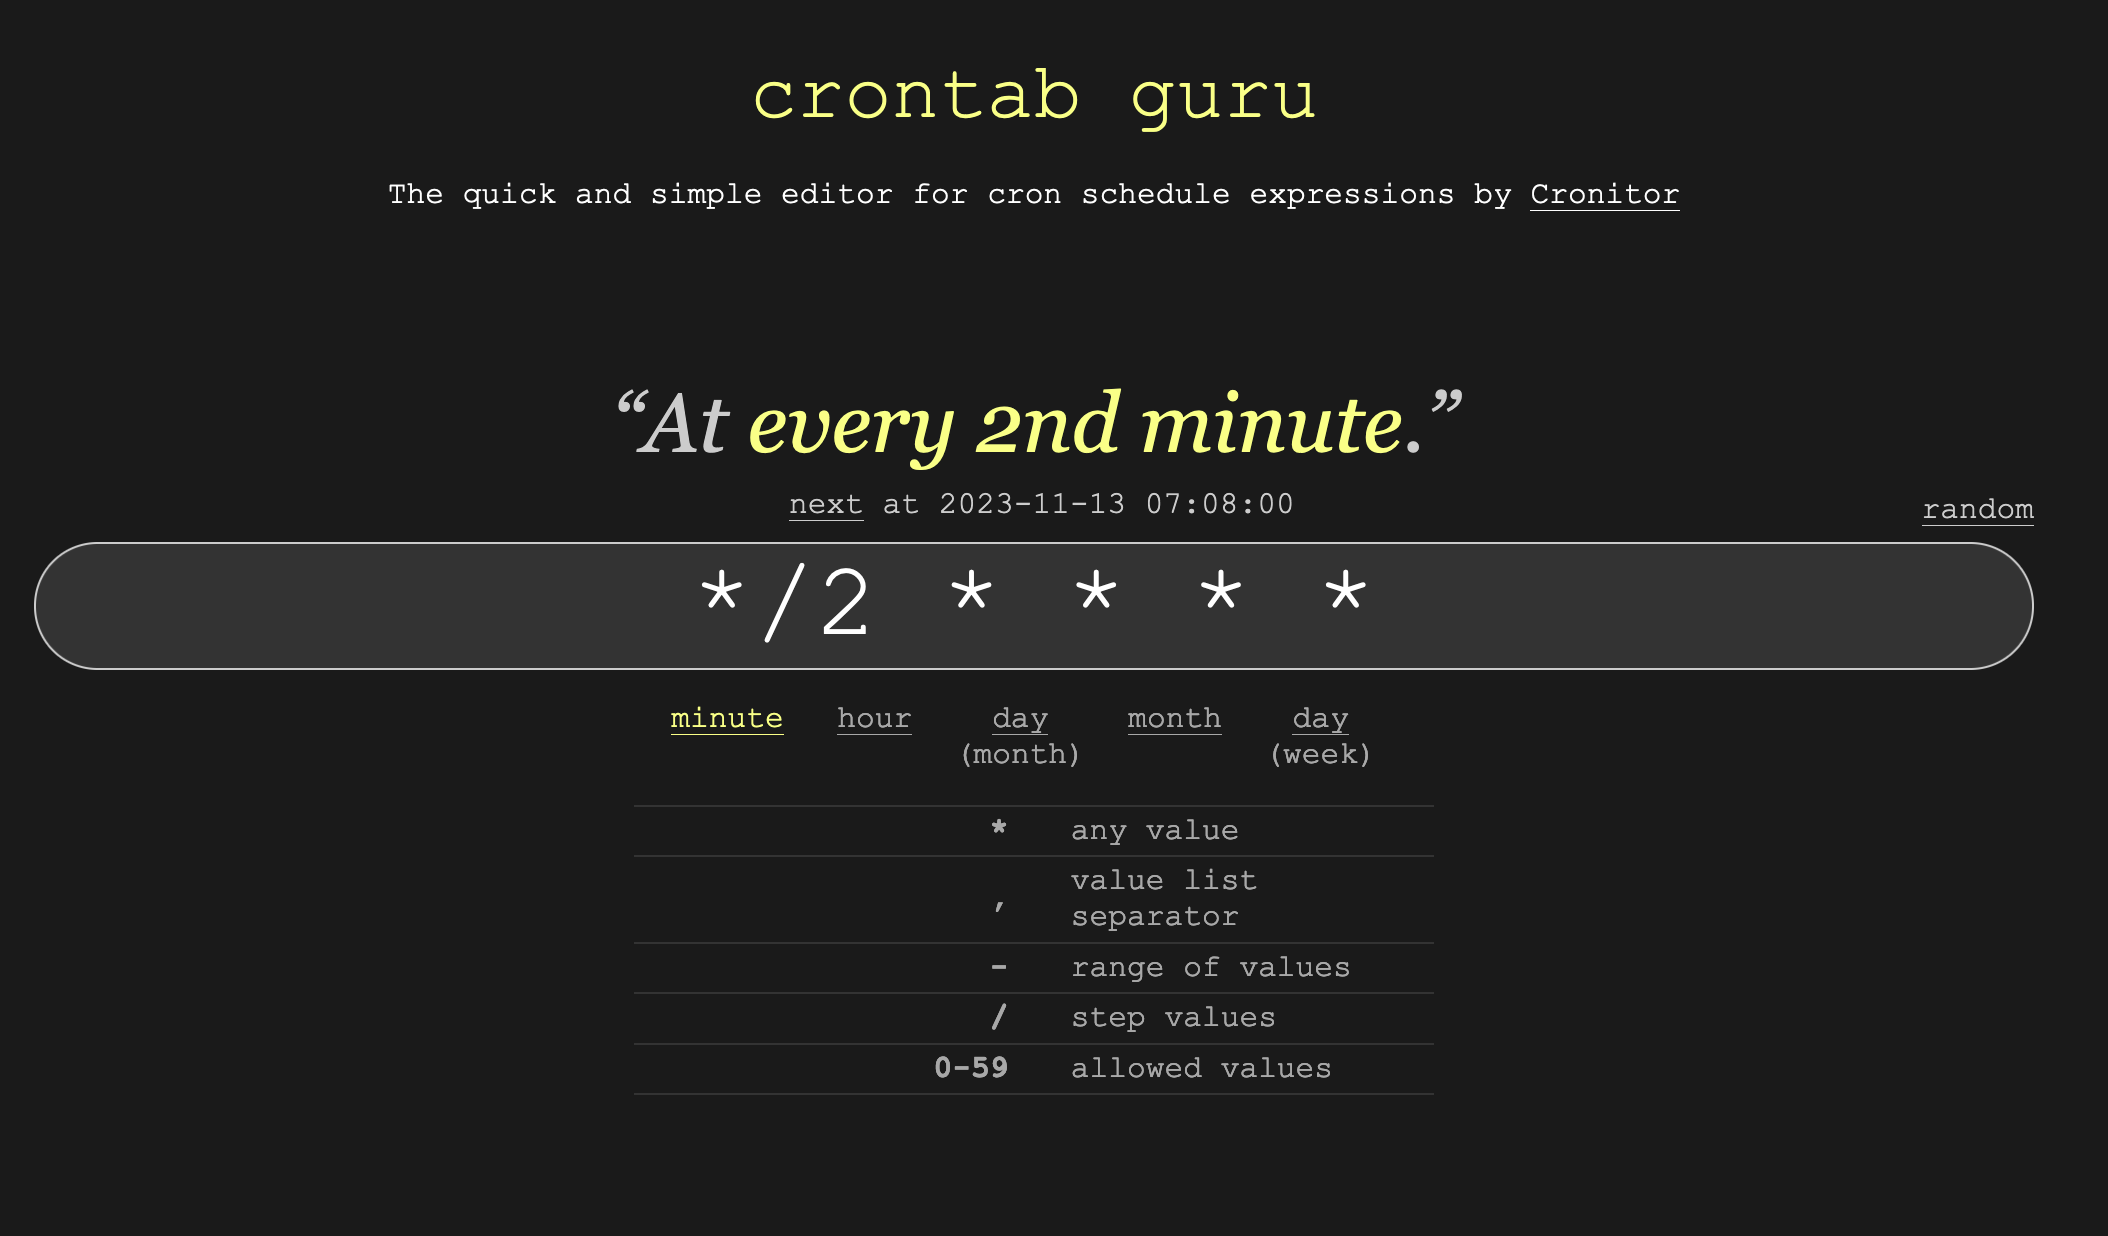
for our app, we want our cronjob to run every two minute (you can change it later if you want), so we can write the following:
To edit our cron job, we can run this command:
crontab -e
# you should see the following
Select an editor.  To change later, run 'select-editor'.
  1. /bin/nano        <---- easiest
  2. /usr/bin/vim.basic
  3. /usr/bin/vim.tiny
  4. /bin/ed


# select vim by choosing option 2

Choose 1-4 [1]: 2
In the editor, you can write the following:
*/2 * * * * sh /var/www/app/github.sh 2>&1 | logger -t github.sh
0 22 * * 1-5 sh /var/www/app/github.sh 2>&1 | logger -t github.sh
Save it!
We piped our output into syslog, so to check if it's running we can execute this command :
sudo tail -f /var/log/syslog
We should see something like:

We can see that the script was executed.
With that in place, everytime we make a change it will be pull down automatically to our server.
Loggins and Redirection
When it comes to log files, there's a few different ways of reading it :
tail: output the last part of the filehead: output the first part of the fileless: output one page at a timecat: output entire file
The most common logs are :
- syslog
- auth.log
- nginx/access.log
Logs are always located in /var/log
In unix every command has :
- an input called standard in
- an output called standard out
(More on that here)
And every function take the same arguments which allows to chain commands.
The most common commands for redirection are:
|: read from standard output>: write standard output to a file>>: append standard output to a file<: read from standard input2>&1: redirect both standard error and standard output
To find things we can use the following :
find: search file namesgrep: search file content
For example :
find /bar -name foot.txt
- find : command
/bar: the directory-name: optionfoo.txt: file
or :
grep -i 'hello' /var/www
- grep : command
-i: option-hello: search term/var/www: directory
For example, this command is useful to find running processes
ps aux | grep node
Creating a subdomain
Subdomains are useful for developement purposes. For example, a development version of a website can be located at dev.website.com while the production version continues to run at website.com giving developers the flexibility to make modifications as they wish without breaking the production version.
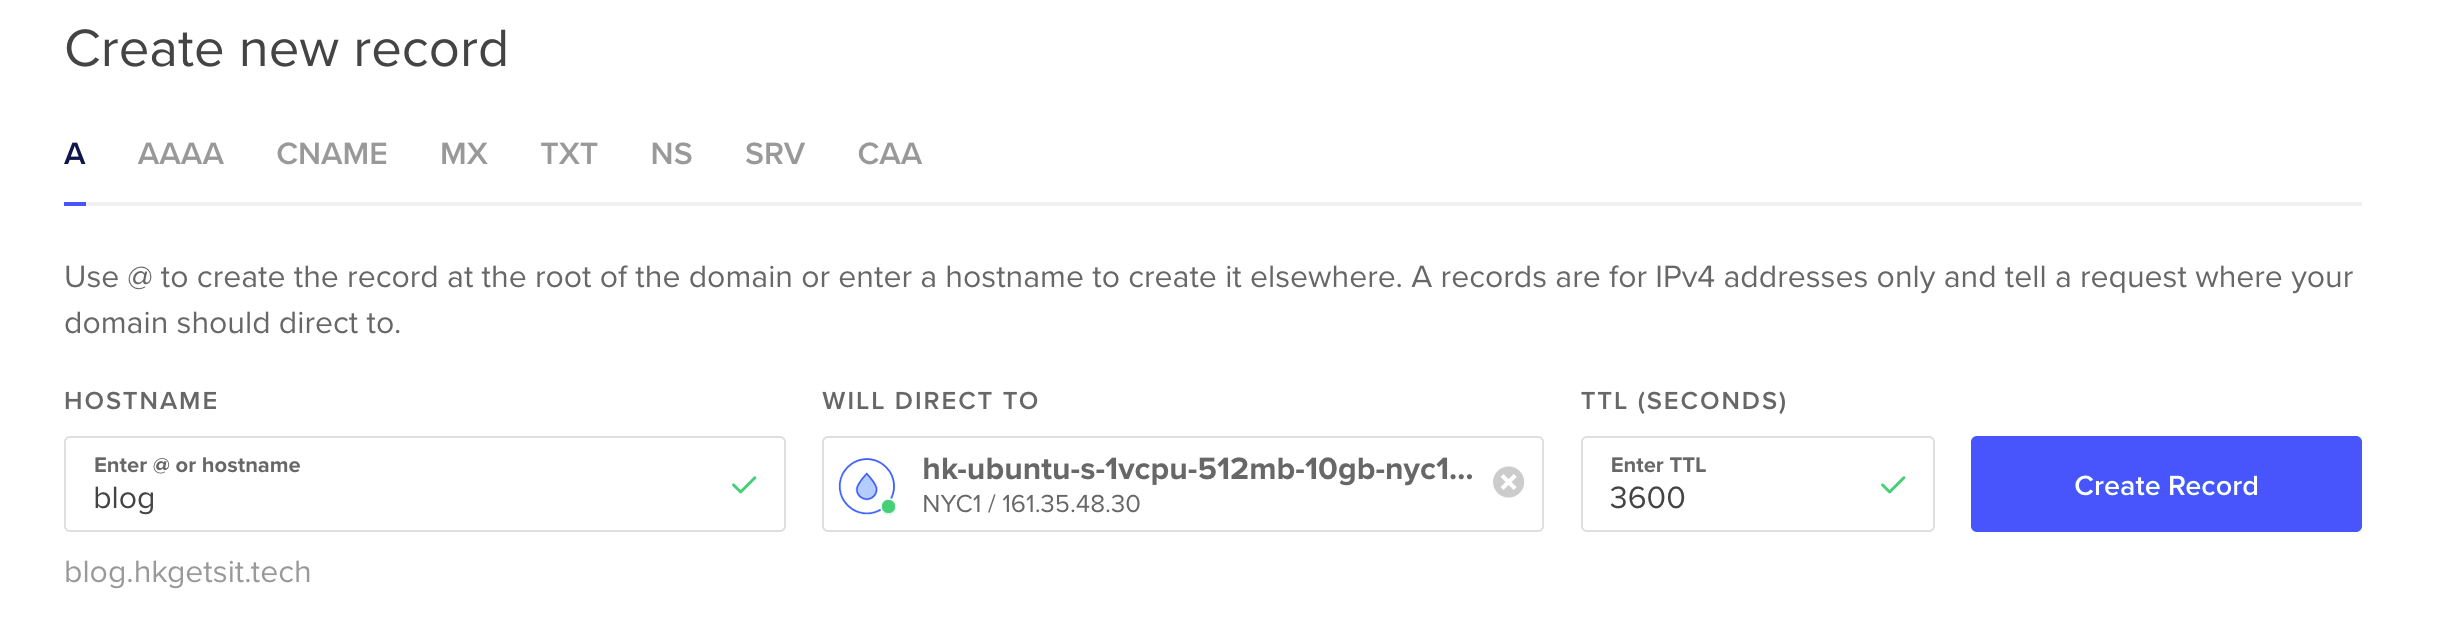
We're going to create a subdomain called blog.hkgetsit.tech :
- The first thing to do is to create a new A record on digitalocean.com :
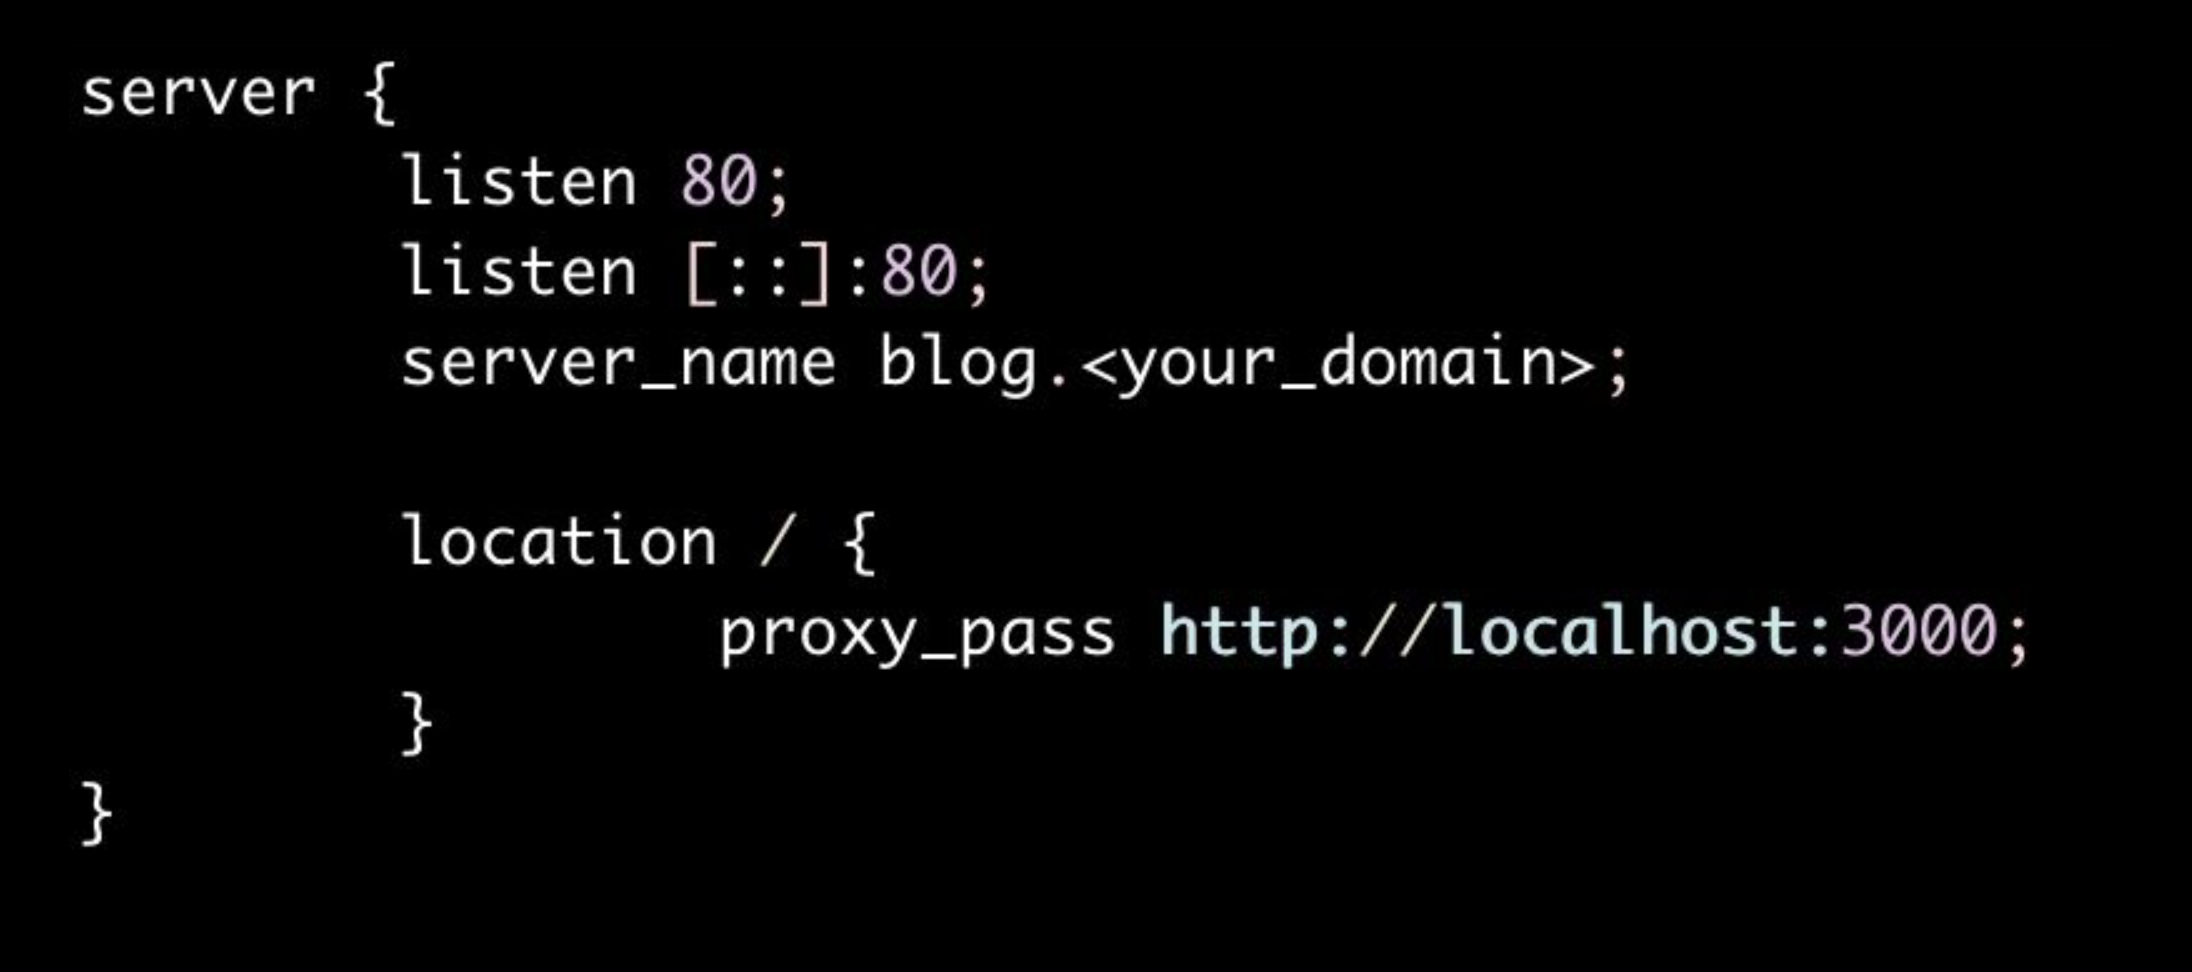
- Create a new nginx configuration file for our subdomain. Navigate to
/etc/nginx/sites-enabledand execute the following command :
sudo vi blog._your_domain_.
And edit your file to look like this :
- Update your main nginx.conf file :
cd /etc/nginx/
sudo vi nginx.conf
Edit your file by adding a new "include" line for "blog.your_domain" (make sure to replace "blog.your_domain")

- Finally restart nginx server :
sudo service nginx restart
Check out this link if you run into an error.
As always run nginx -t to validate your configuration. If you open the browser and navigate to your subdomain, you should see:

Databases
A database is an organized collection of structured information, or data, typically stored electronically in a computer system. A database is usually controlled by a database management system (DBMS). Together, the data and the DBMS, along with the applications that are associated with them, are referred to as a database system, often shortened to just database. Source
Another way to think about this is that it is a place to save your application's data (state) so that it can be retrieved later. For example, let's say you are building a website where users can see or download cocktail recipes. You would certainly need a database to store and query the list of recipes. A query is a command you send to a database to get it to do something, whether that's to get information out of the database or to add/update/delete something in the database.
There are two main types of databases :
-
Relational databases (often called RDBMS or SQL databases) : organizes data into rows and columns, which collectively form a table. Data is structured across multiple tables, which can be joined together via a primary key or a foreign key (establishing relationships between tables) . Examples of relational databases are : SQL, mySQL, SQLITE etc..
-
Non-relational databases (often called NoSQL) : solve the flexibility and scalability issues inherent in relational models which are not ideal for unstructured data formats, like text, video, and images. These types of databases include: Key-value store, Document store etc.. Examples of non-relational databases are : MongoDB, Cassandra, Couchbase, ReThinkDB etc..
For our application, we're going to create a database using Sqlite, a lightweight SQL database. The goal is to store a list of countries that we are going to be able to retrieve and display. Check out the sqlite3 library API docs for more information.
Relational databases are made up of three different components:
- Table : in our example, our table will be
COUNTRIES. - Fields or columns : we will have two columns
nameandtime. - Rows or records: we will have three countries, so this table will have three records.
Here are the steps to follow :
- Open up vs code (or the editor of your choice), create a directory and clone the code from your git repository :
git clone <your_repo_link>
- Run the following command to installl sqlite3 and express (more information about express here)
npm i sqlite3
npm i express
- In
app.js, import sqlite and express :
const sqlite = require('sqlite3')
const express = require('express')
- Copy the code below, to create a new express server that sends back an html page when users hit our homepage
'/':
app.use(express.json())

app.get('/', function (req, res) {
  res.sendFile('index.html', { root: __dirname })
})

app.listen(PORT, () => {
  console.log(`listening on port ${PORT}`)
})
- Still in app.js, create a new database instance and put it in memory :
...
const db = new sqlite.Database(':memory:')
- Create a table named
countries, with two columns namednameandtimeand insert three values :
...
db.serialize(() => {
  db.run(`CREATE TABLE countries (
       name Text,
       time TEXT
    )
    `)
  db.run(`INSERT INTO countries (name, time)
          VALUES ('Norway', datetime('now')), ('Spain', datetime('now')), ('Germany', datetime('now'))
  `)
})
- Create a new route called "/getCountries" to query the database and return all the records :
...
app.get('/getCountries', function (req, res) {
  db.all('SELECT * FROM countries', (err, rows) => {
    res.send(rows)
  })
})
- In the "index.html" file, copy the code below :
<!DOCTYPE html>
<html lang="en">
  <head>
    <meta charset="UTF-8" />
    <meta name="viewport" content="width=device-width, initial-scale=1.0" />
    <title>PostgreSQL Sample</title>
    <style>
      .container {
        height: 95vh;
        width: 95vw;
        display: flex;
        align-items: center;
        justify-content: center;
      }

      .button-30 {
        align-items: center;
        appearance: none;
        background-color: #fcfcfd;
        border-radius: 4px;
        border-width: 0;
        box-shadow: rgba(45, 35, 66, 0.4) 0 2px 4px, rgba(45, 35, 66, 0.3) 0 7px
            13px -3px, #d6d6e7 0 -3px 0 inset;
        box-sizing: border-box;
        color: #36395a;
        cursor: pointer;
        display: inline-flex;
        font-family: 'JetBrains Mono', monospace;
        height: 48px;
        justify-content: center;
        line-height: 1;
        list-style: none;
        overflow: hidden;
        padding-left: 16px;
        padding-right: 16px;
        position: relative;
        text-align: left;
        text-decoration: none;
        transition: box-shadow 0.15s, transform 0.15s;
        user-select: none;
        -webkit-user-select: none;
        touch-action: manipulation;
        white-space: nowrap;
        will-change: box-shadow, transform;
        font-size: 18px;
      }

      .button-30:focus {
        box-shadow: #d6d6e7 0 0 0 1.5px inset, rgba(45, 35, 66, 0.4) 0 2px 4px,
          rgba(45, 35, 66, 0.3) 0 7px 13px -3px, #d6d6e7 0 -3px 0 inset;
      }

      .button-30:hover {
        box-shadow: rgba(45, 35, 66, 0.4) 0 4px 8px, rgba(45, 35, 66, 0.3) 0 7px
            13px -3px, #d6d6e7 0 -3px 0 inset;
        transform: translateY(-2px);
      }

      .button-30:active {
        box-shadow: #d6d6e7 0 3px 7px inset;
        transform: translateY(2px);
      }
      .box {
        display: flex;
        flex-direction: column;
        gap: 5px;
      }
      ul {
        list-style-type: none;
      }
      li {
        padding: 5px 10px;
        background-color: #d6d6e7;
        color: black;
        border: 1px solid #dddddd;
      }
    </style>
  </head>
  <body style="background: black">
    <div class="container">
      <div class="box">
        <button class="button-30" role="button" id="btn">get countries</button>

        <ul id="myList"></ul>
      </div>
    </div>

    <script>
      const btn = document.getElementById('btn')
      const list = document.getElementById('myList')
      async function httpGetCountries() {
        try {
          const response = await fetch('http://localhost:8000/getCountries')
          const countries = await response.json()
          console.log(countries)
          for (i = 0; i < countries.length; ++i) {
            let li = document.createElement('li')

            li.innerText = countries[i].name

            list.appendChild(li)
          }
        } catch (error) {
          console.log(error)
          return {
            ok: false,
          }
        }
      }

      btn.addEventListener('click', httpGetCountries)
    </script>
  </body>
</html>
- Start up the server and open up the browser at http://localhost:8000/ you should see this page with the button "get countries" :

- Click on the button "get countries" to display the list of countries stored in the database :

Commit your changes to the repository.
HTTPS
HTTP is made up of two parts :
- the request
- the response
here's how a request looks like :
GET /http.1
Host: hkgetsit.tech
User-Agent: Mozilla/5.0 (Macintosh; Intel Mac OS X 10.15; rv:109.0) Gecko/20100101 Firefox/118.0
Accept: */*
Accept-Language: en-US,en;q=0.5
Accept-Encoding: gzip, deflate, br
Some common headers are:
- user-agent : the requesting device type
- Accept : what the device type will handle
- Accept : the browser language
- Content-type : The type of media
- Set-cookie : sets stateful information
- X- : typically used for custom headers.
The response looks like this :
GET /http.1.1 OK
server: nginx/1.1.4 Ubuntu
date: sun nov 18 2020 1:14:13 GMT
Content-Type: application/json
Content-Length: 12
Status code indicates the status of an http request. Some common status code are :
- 200 : OK
- 301 : Moved permanently
- 302 : Found (temp redirect)
- 401 : Not authorized
- 500 : Internal server error
status code begining by :
- 1xx : is usually information
- 2xx : success
- 3xx : redirect
- 4xx : client error
- 5xx : server error
All modern browsers will require to use https to secure the request and response traffic. HTTPS helps us to encrypt the information sent back and forth between the server and the client.
Let's implement https.
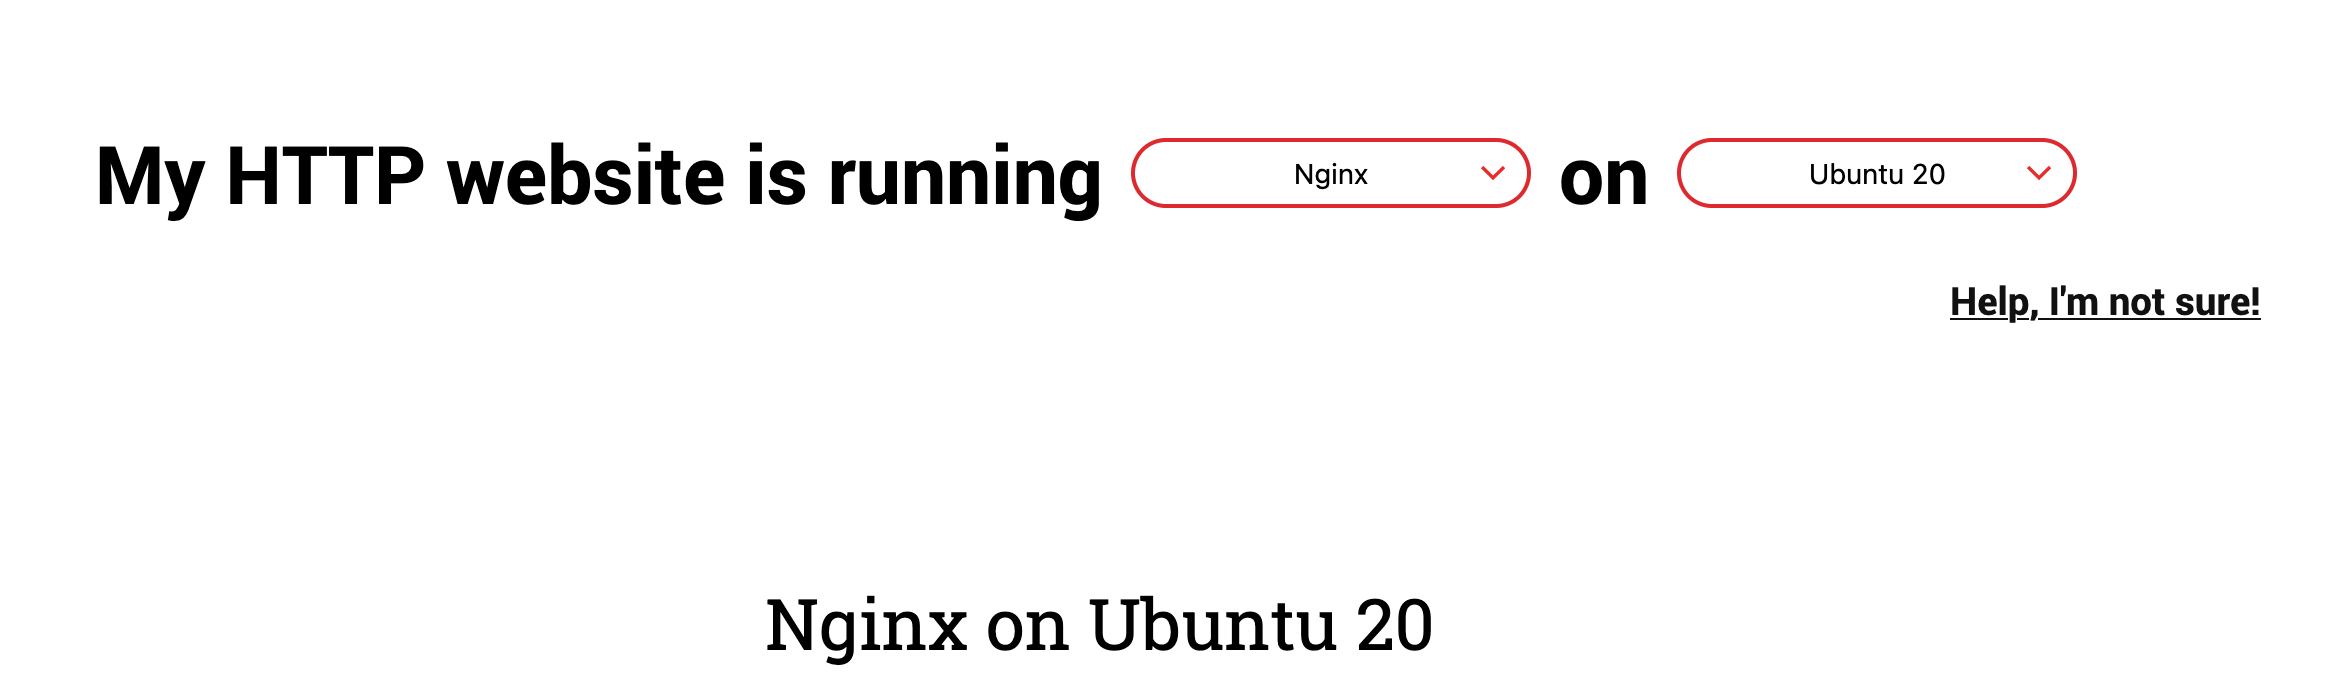
To do that we're going to use certbot.
Select nginx and ubuntu 20 and you should see the instructions for setting up nginx :
- SSH into the server
SSH into the server running your HTTP website as a user with sudo privileges.
- Install snapd
sudo snap install core
sudo snap refresh core
- Remove certbot-auto and any Certbot OS packages
sudo apt-get remove certbot
- Install Certbot
sudo snap install --classic certbot
- Prepare the Certbot command
Execute the following instruction on the command line to ensure that the certbot command can be run.
sudo ln -s /snap/bin/certbot /usr/bin/certbot
- Choose how you'd like to run Certbot
Run this command to get a certificate and have Certbot edit your nginx configuration automatically to serve it, turning on HTTPS access in a single step.
sudo certbot --nginx
- Put in your email
- Select Yes to read the terms and service
- Select yes or no for the newsletter
- Leave it blank to have certificate for both the domain and the subdomain
If it's successful you should be able to see this :
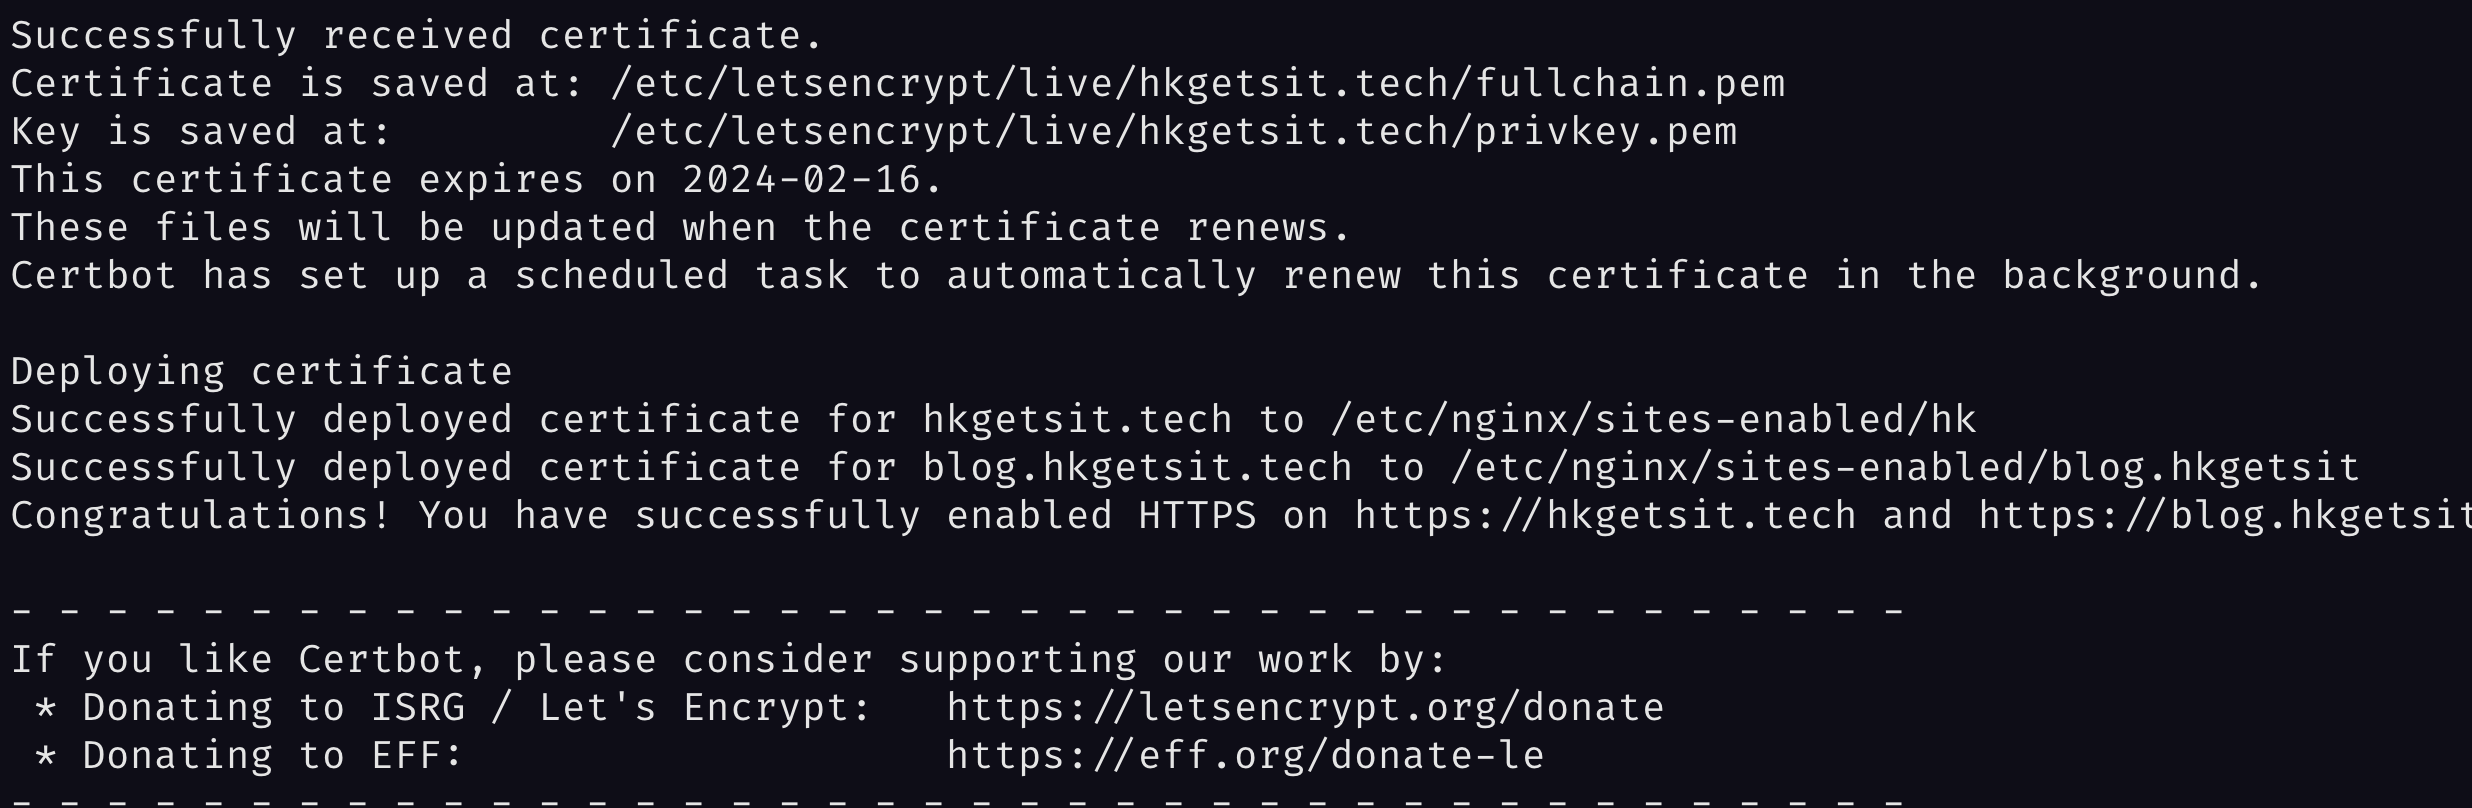
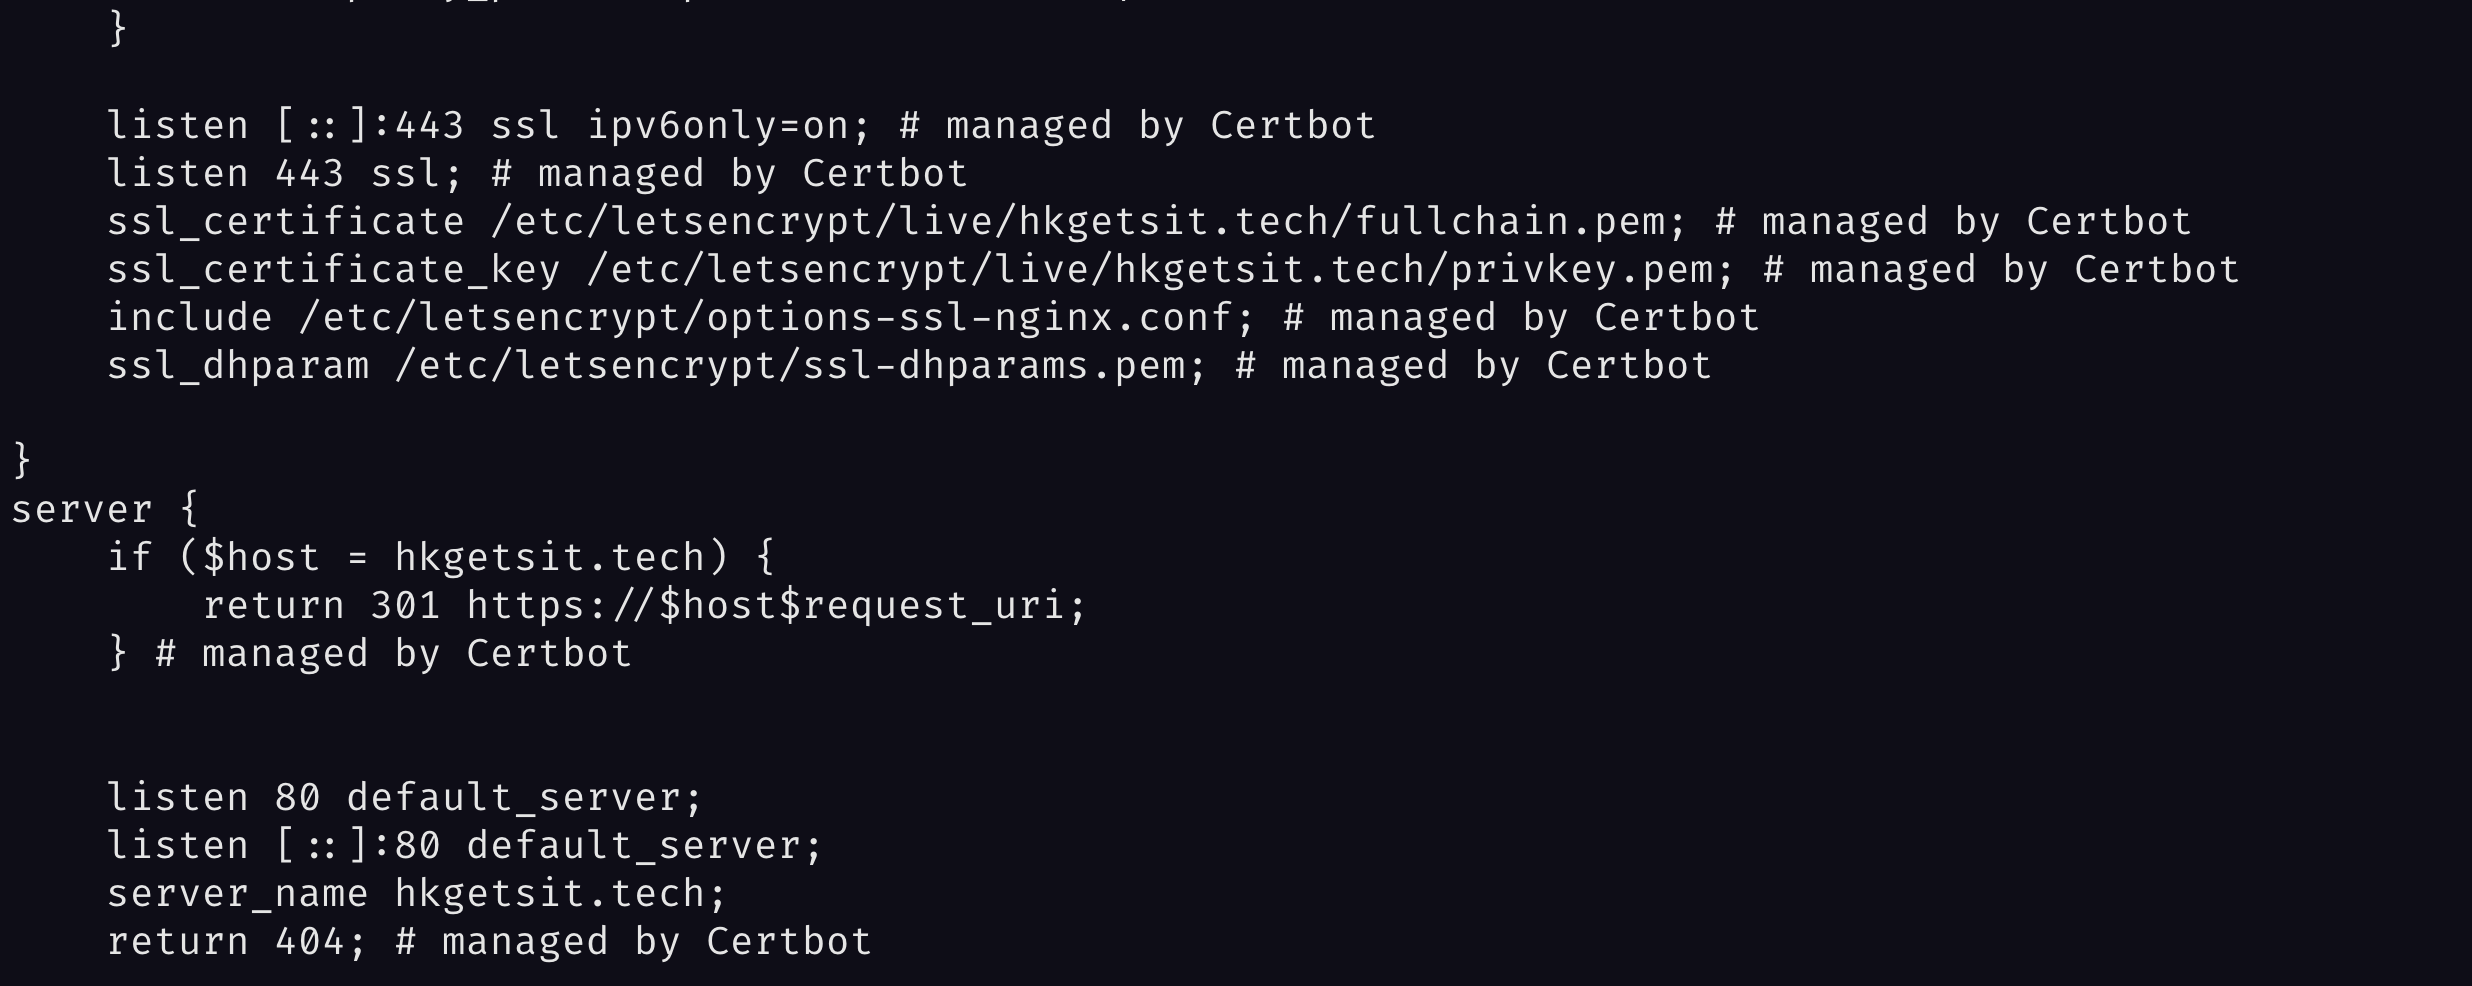
What certbot did is :
- Adjusting our nginx configuration
- Test automatic renewal
The Certbot packages on your system come with a cron job or systemd timer that will renew your certificates automatically before they expire.
sudo certbot renew --dry-run
Finally, we're going to open the port :
sudo ufw allow https
Now if we open up the browser and visit our website, we should see a lock indicating the connection is now secured via https.
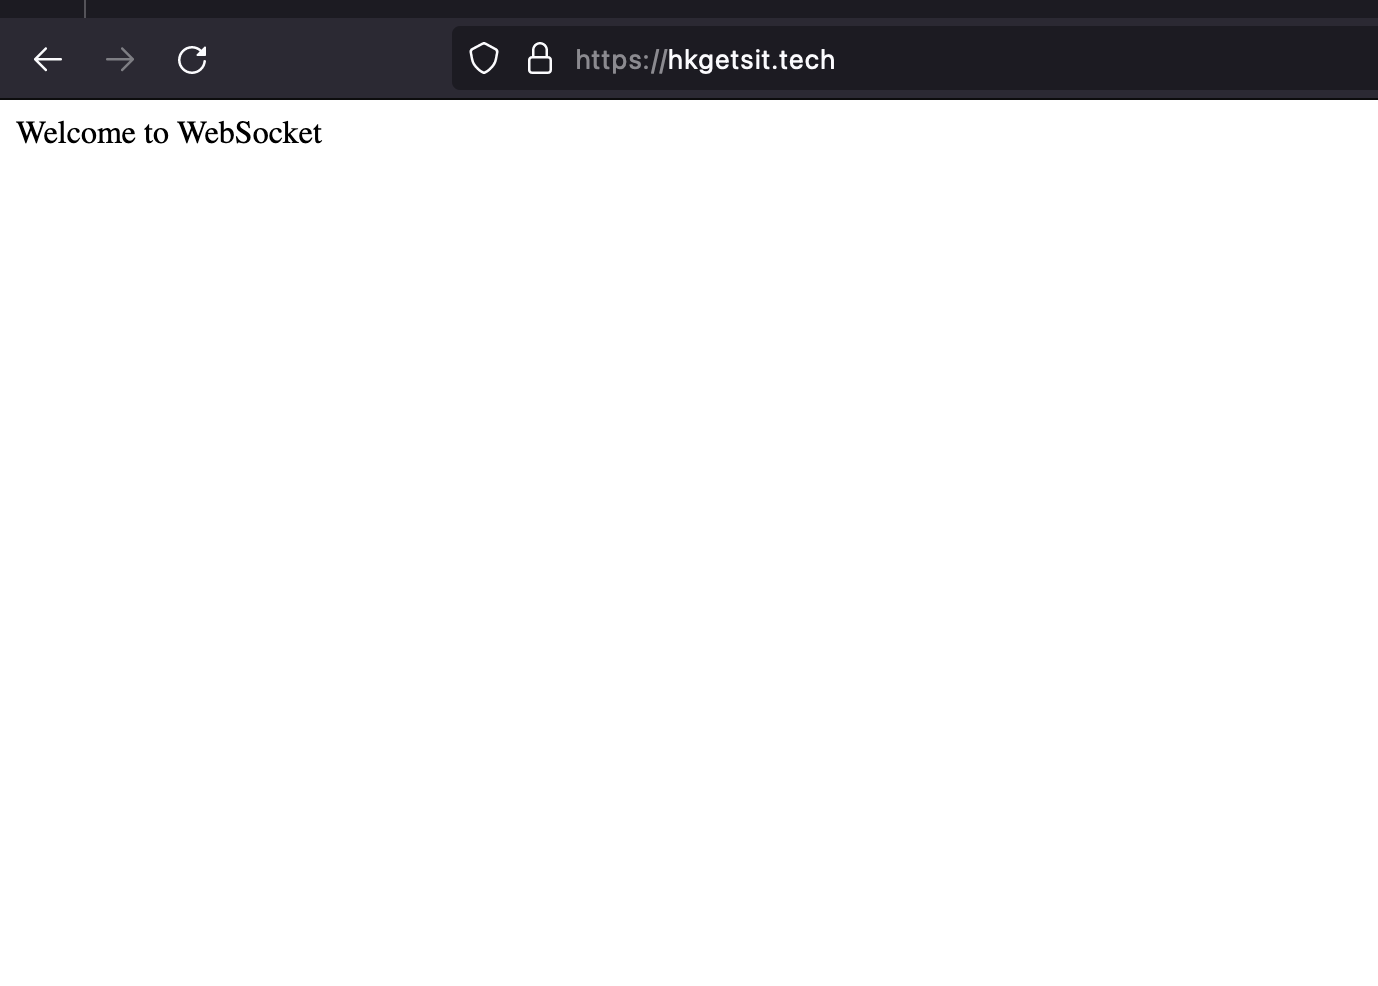
And that's it! We've implemented https
HTTP2
HTTP2 does something called multiplexing, which just means we can do multiple things on one connection.
On our website we can see that the protocol used is HTTP1
Let's implement HTTP2
- Open up our server configuration file :
sudo vi /etc/nginx/sites-enabled/hk
- Add HTTP2 to the listen block like this:
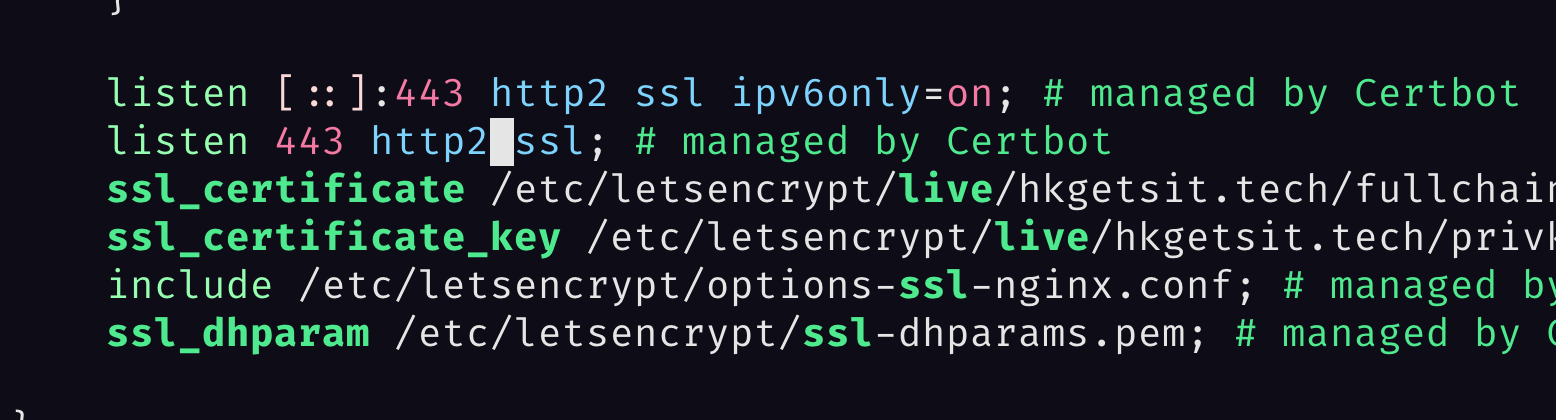
- Restart nginx :
sudo service nginx restart
Now, let's open up the website again :
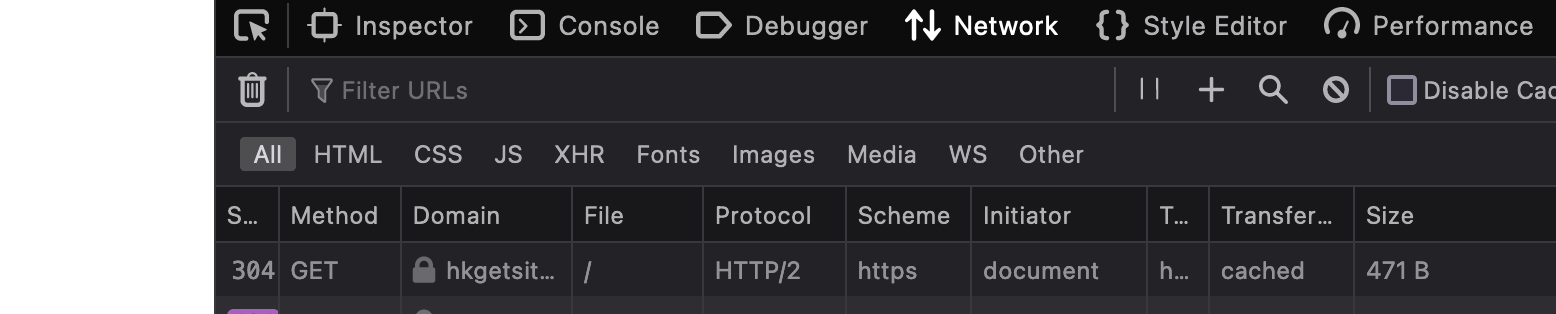
We can see that the protocol has changed to HTTP2
Containers
What are Containers?
Containers are packages of software that contain all of the necessary elements to run in any environment. In this way, containers virtualize the operating system and run anywhere, from a private data center to the public cloud or even on a developer’s personal laptop. Containers offer a logical packaging mechanism in which applications can be abstracted from the environment in which they actually run. Source
Containers exist because they solve an important problem: how to make sure that software runs correctly when it is moved from one computing environment to another.
A well-known solution to this problem is virtualization. Virtualization allows multiple operating systems to be run completely independently on a single machine. The main benefit of this approach is that the operating system is encapsulated, which means that there are far fewer compatibility problems.
Containerization is an extension of the virtualization approach.
Virtualization uses specialized software called a Hypervisor that encapsulates a guest version of the operating system and emulates hardware resources like server CPU, memory, hard disk and other resources so that these resources can be shared across multiple virtual machines. The hypervisor creates and runs multiple instances of an operating system so that multiple operating systems can be run on a single physical machine sharing the hardware resources.
Containerization takes things a little further. It achieves far greater efficiency than virtualization by eliminating the hypervisor and its multiple virtual machines.
Instead of hypervisors, containers are essentially applications, and all their dependencies packaged into virtual containers.
Containers contain not just the application, but everything that it needs to run including runtime, system libraries, etc. Each application shares a single instance of the operating system and runs on the “bare metal” of the server.

We can see on the diagram above that since the operating system is shared by all containers and because they are much more lightweight than traditional virtual machines, it’s possible to host far more containers on a single host than fully-fledged virtual machines.
Why do we need containers?
Besides obvious reasons such as : containers are lightweight, easier for development, easier to manage etc.., the biggest selling point is that containers allow us to decouple the application from the infrastructure. This decoupling allows container-based applications to be deployed easily and consistently, regardless of whether the target environment is a private data center, the public cloud, or even a developer’s personal laptop.
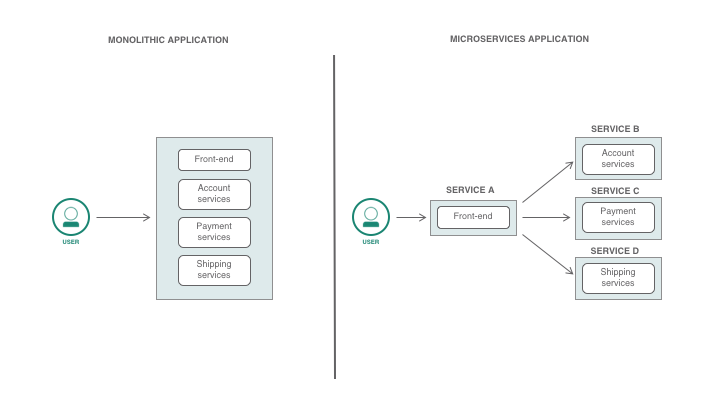
Containers are also one of the key technology that enable us to build microservices, which is a software architecture design for building distributed applications. Applications were traditionally built as monolithic pieces of software. However, monolithic applications are updated infrequently and changes usually affect the entire application. Adding new features requires reconfiguring and updating the entire stack which can be a costly and cumbersome process delaying the application development. Microservices architecture was designed to remedy this problem. All services are created individually and deployed separately. This allows for each service to scale or update, without disrupting other services in the application and enables the rapid, frequent and reliable delivery of large, complex applications..
How do we containerize our application?
Docker is by far the best-known containerization technology. Docker containers package an application and its dependencies into a single is by far the best-known containerization technology. Docker containers package an application and its dependencies into a single image file, which can be deployed to any platform that supports Docker.
Docker has the advantage of a large user community providing excellent support to users.
These are the steps to follow in order to containerize our application with docker :
- Write a Dockerfile
- Install Docker
- Build a Docker image
- Run a Docker container
- Writing a Dockerfile :
- Navigate to the app directory:
cd /var/www/app
- Create a dockerfile
vi dockerfile
add the following :
FROM node:19-alpine3.16
Run mkdir -p /home/node/app/nodes_modules && chown -R node:node /home/node/app/
WORKDIR /home/node/app
COPY --chown=node:node package*.json ./
USER node
Run npm install
COPY --chown=node:node . .
EXPOSE 8000
CMD ["node", "app.js"]
- The first line defines what type of OS it's running on : we're using alpine which is lightweight version of linux
- We will create an app directory within the node home directory and changed ownership to the node owner
- We set up a working directory (/home/node/app)
- Next because we're making a docker image from the application we already wrote, we need to copy the package file from our directory to docker container.
- We set the user to NODE
- Install the packages
- We changed the ownership from our current os which is owned by us to node user and copied the rest of our application
- We exposed port 8000 to run our application
- Finally, we run the command :
node app.jsto start the server.
- Install docker :
sudo apt install docker.io
- Create docker build :
docker build -t node-hkgetsit .
- To see the image we created, we can run the command:
docker image ls
- Run the docker image in the background :
- first we need to stop the app running on port 8000
pm2 stop app.js
- Run the image :
docker run -d -p 8000:8000 node-hkgetsit
Now if we visit our website again, we're back to our simple node server :

We can create another docker instance running on another port :
docker run -d -p 3001:8000 node-hkgetsit
We can see that we have two instances running by running this command
docker ps
You should see something like this:

and that's the power of docker we can run as many instances as we like on one server.
Load balancer
Going back to our application, we have two instances running, we can balance between the two of them using a load balancer :
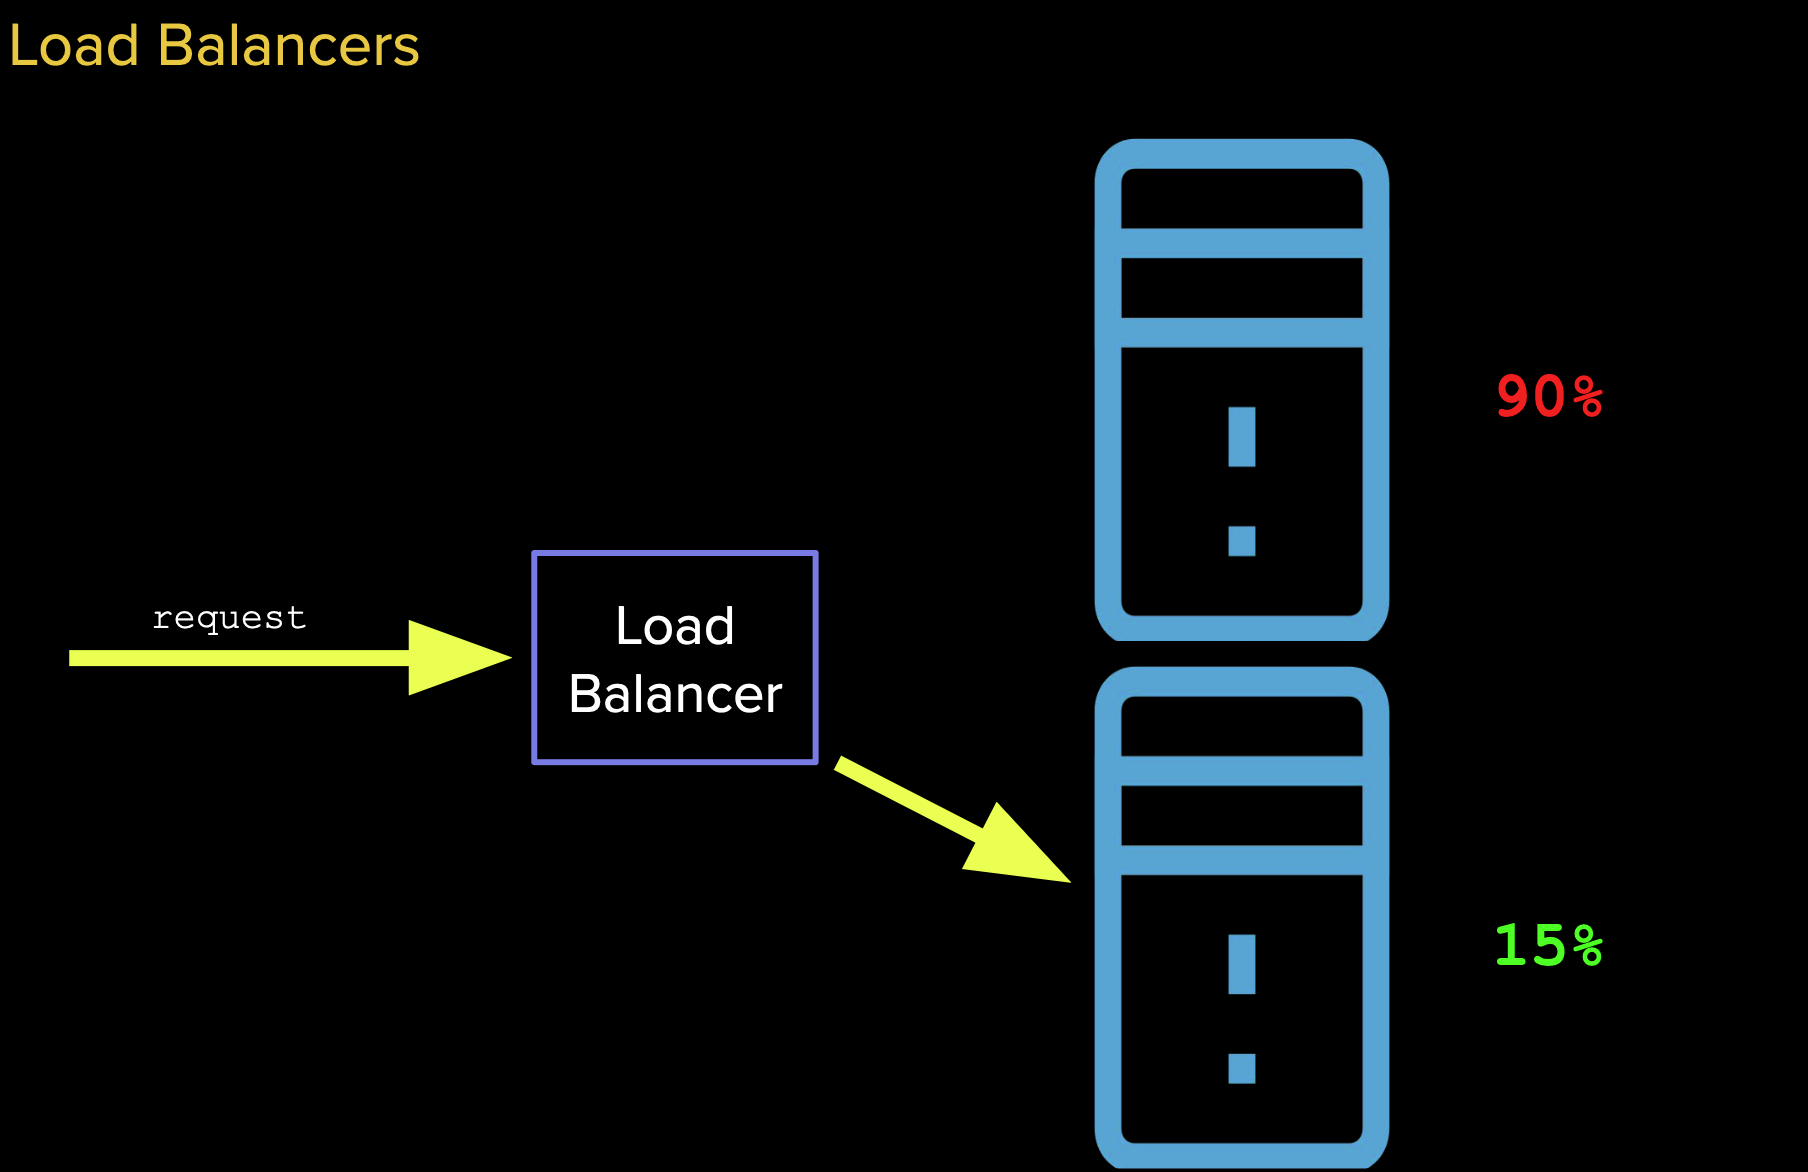
One of the main benefits of using a load balancer is that if one server is overloaded with requests, we would be able to route the request to the one that's runnning lower as illustrated in the diagram above.
There are different types of algorithm for deciding how to balance between containers :
- Round robin algorithm
- IP hashing
- Random choice
- Least connection
- Least loads
Check out this article for more information
Let's implement a load balancer in nginx. We're going to create an Upstream to list the servers we want to connect to and then in a server block we'll proxy pass the cluster, nginx will take care of the rest.
- Add server cluster to the nginx configuration
sudo vi /etc/nginx/nginx.conf
and add the following in the http block :
upstream nodebackend {
  server localhost:8000;
  server localhost:3001;
}
- Proxy pass to the cluster
sudo vi /etc/nginx/sites-enabled/hk
and add the following in the location block :
location {
  ...
  proxy_pass http://nodebackend
}
- Restart nginx
sudo service nginx restart
If we did everything correctly, you should be able to visit the website.
Conclusion
In this article, we explained what full-stack engineering means, we created a node.js application and deployed it on a cloud server on digital ocean. We also purchased a domain, hooked it to our cloud server and set up Nginx as a reverse proxy to retrievs resources for clients from our node.js application.
Finally, we've gone over the basics of databases, containers, continous integration and delivery, load balancer etc...
Equipped with this knowledge, you should be familiar with the entire process of building full stack web applications.