
An overview of full stack development - (Part I)
This is the first part of a comprehensive guide on full-stack engineering.
We will start by understanding what it means, we will also get hands-on with setting up our own server to build and deploy a web application in the cloud.

We will dive deep into servers, work with the command line, learn the fundamentals of networking and security, set up continuous integration and deployment, learn how to manage databases and build containers.
The goal is to get some familiarity with the entire process, from the terminal, to building a web application hooked up to our own server.
📖 Table of contents
Part I:
- What is a full stack engineering ?
- Command Line
- Servers
- The internet
Part 2:
- Application setup
- Security
- Continous Integration and Delivery
- Loggins and redirection
- Subdomains
- Databases
- HTTPS and
- Containers
- Load balancer
What is a full stack engineering?
Modern computing can be break down into three components :
-
The UI - The user interface a user interacts with (browser, mobile device, desktop, etc..). The UI can be built using various front-end technologies like HTML, CSS, Javascript
-
The Server - the term “server” can refer to either a type of software that enable applications to communicate with one another or the hardware that supports an application’s development and delivery. To learn more about servers, check out this very interesting article .
-
The Database : Data is pivotal in today’s applications and websites developement. From the items in your shopping list to the comments left on your favorite video streaming application, they are all considered bits of information that can be stored in a database (More on that in part 2).
Full stack engineering deals with the challenges of building a user interface but also everything else (database, server, etc..). Our goal is to cover the "everything else". We will see that the relationship between a server and a user interface is complex, there are a lot of rules to follow and a staggering amount of technologies that goes into allowing us to build user interfaces. Gaining this knowledge will give us not only the confidence to understand any system, but also the ability to put them together to create robust web applications.
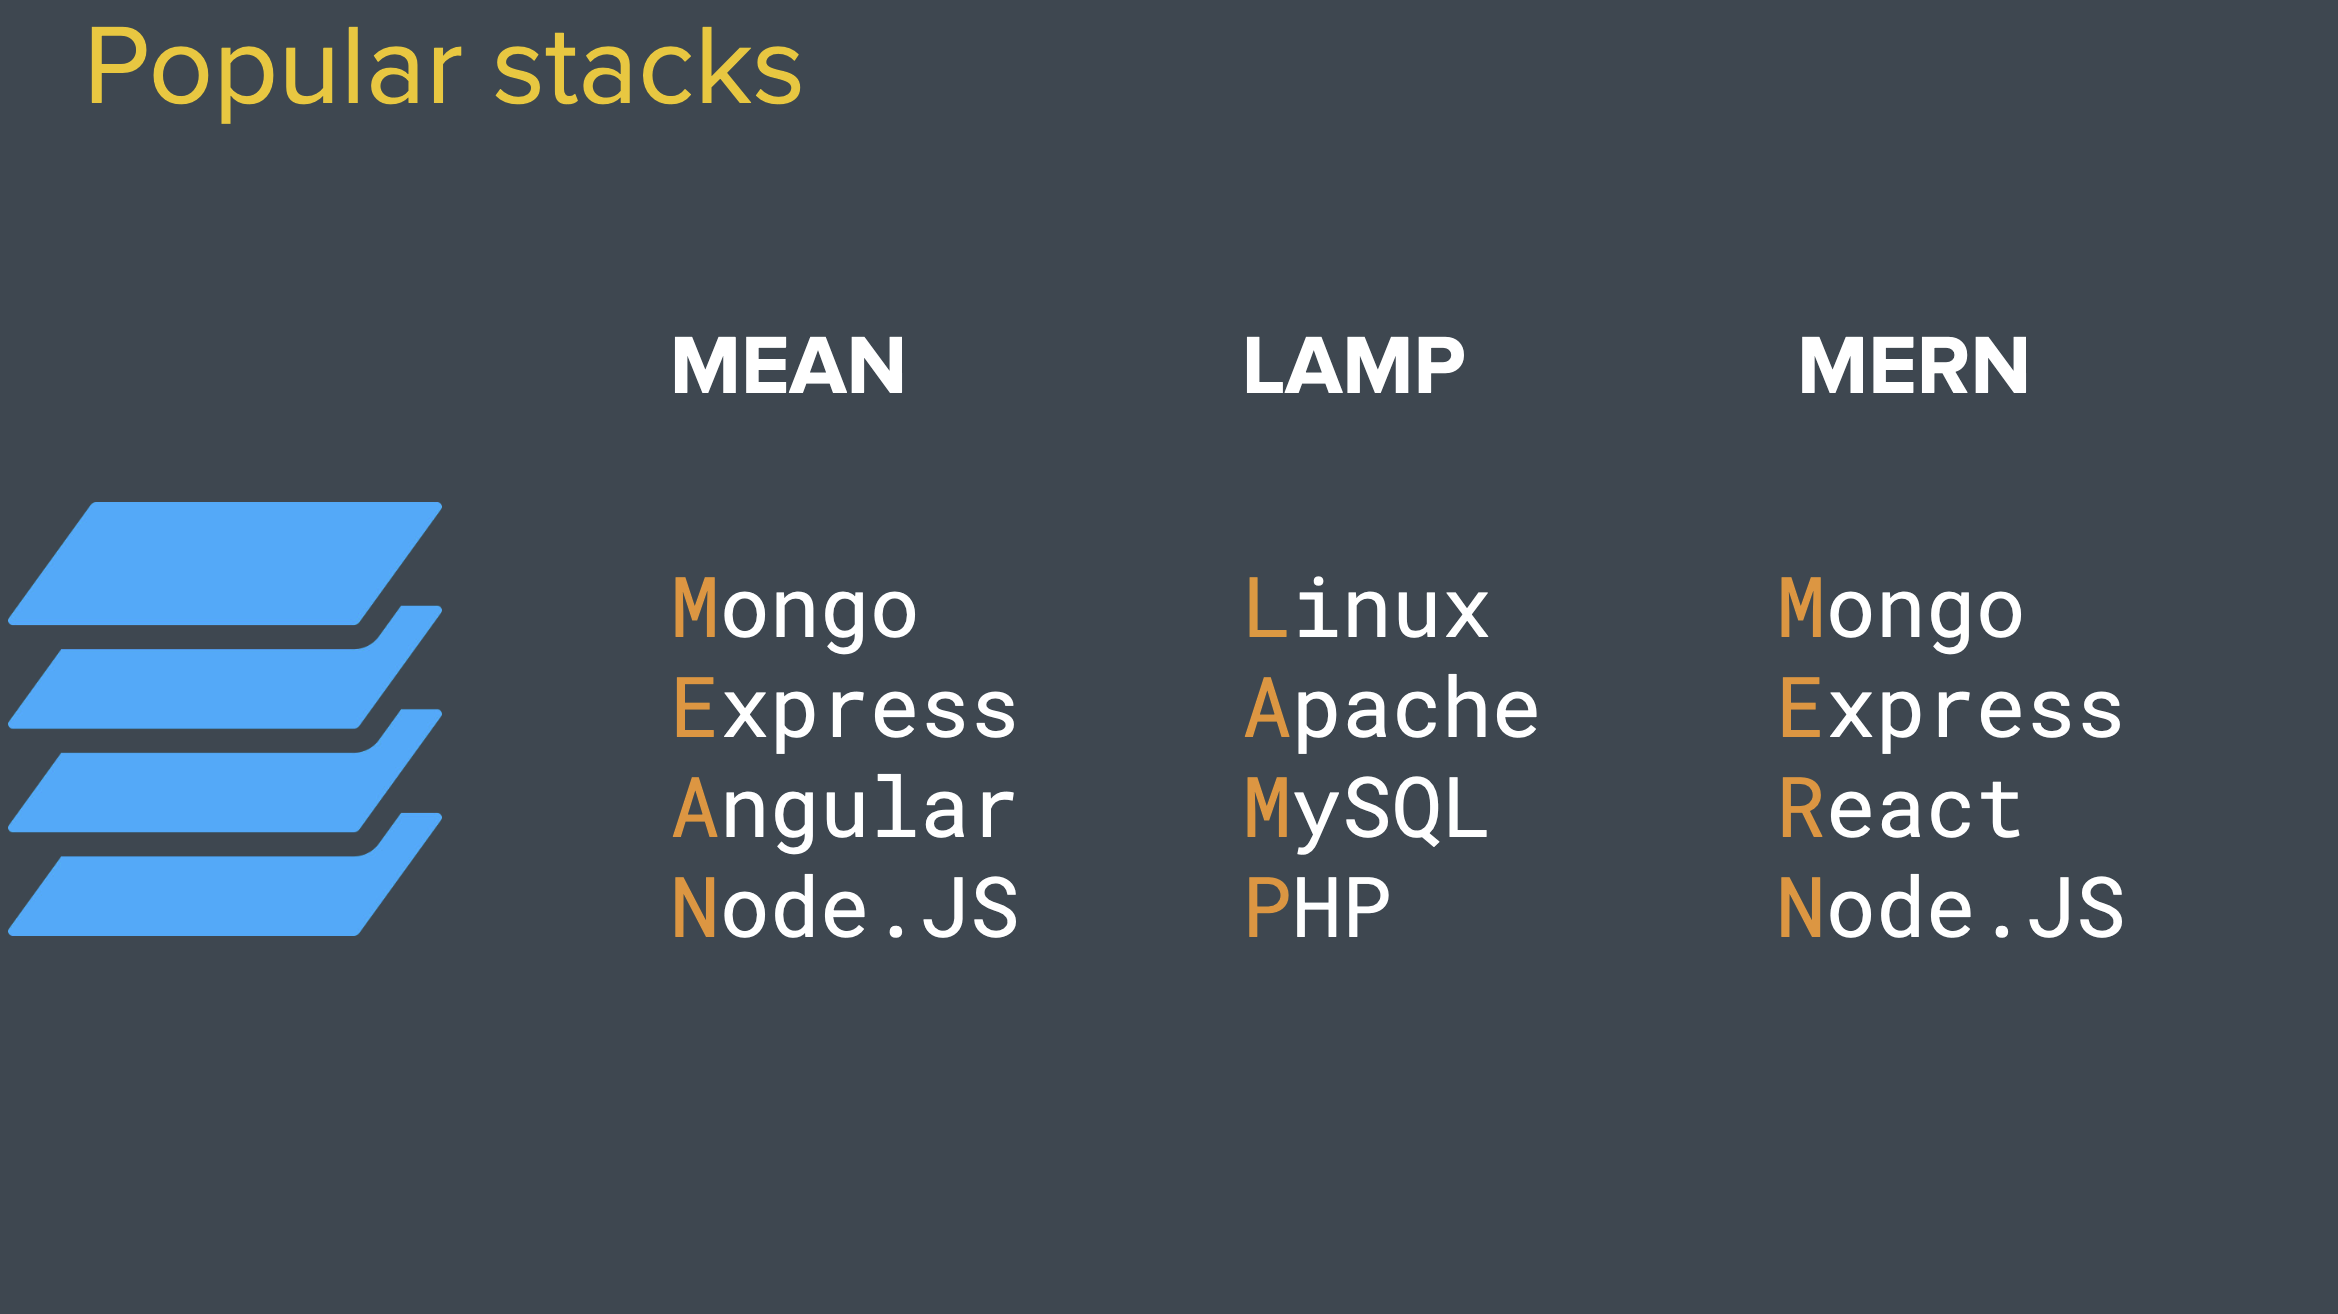
An example of a few popular stack :
The command line
We will spend a lot of time in the terminal because it is arguably the most fast and efficient way of talking to a computer. MacOs has a built in terminal but we are going to use iterm2.
The terminal interacts with a program often referred to as the shell, which is the command line interface that exposes human input from the terminal to the operating system. Unlike the terminal, the shell is what actually processes the commands, whereas the terminal is just the text-based interface to interact with the shell.
In Unix, the shell is called Bash (The Bourne Again Shell), and the prompt is the $ (dollar sign).
Create, view files
A computer’s file system organizes the data stored by a computer, so that it can be easily retrieved by users. Files are generally represented in a tree-like structure, in which any parent directory can have any number of children.
The root directory is found at the base of the tree.
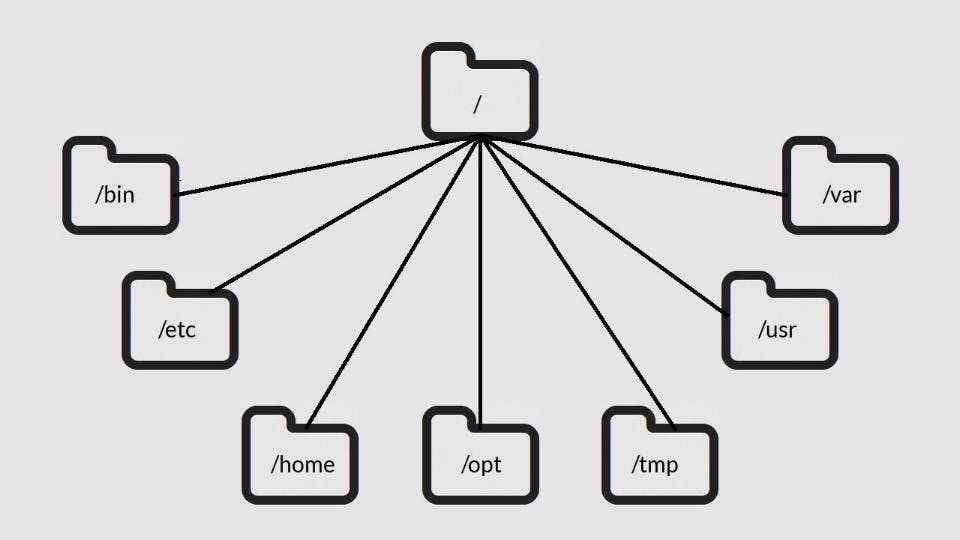
The command line allows us to navigate the file system and run built-in programs or custom scripts.
Here are some common commands :
pwd: Print Working Directory.
pwddisplays the file path from the root directory to the current working directory.
$ pwd
/Users/sonny/Downloads
mkdir: Make Directory
mkdiris used to make a new directory.
$ mkdir new-directory
$ ls
old-directory    new-directory
ls: List
lsis used to list the content of a directory. If no argument is given, the content of the current working directory will be displayed.
$ ls Desktop
resume.pdf
photo.png
cd: Change Directory
cdis used to move throughout the file system. It accepts a variety of arguments: full file paths, names of children of the current directory,..the parent of the current directory
$ cd some-directory
$ cd ..
touch: Create New File
touchcreates a new file in the current working directory with the name provided.
$ touch grocery-list.txt
-
Helper commands for the command line include:
clearto clear the terminaltabto autocomplete the line↑and↓to cycle through previous commands.
Editing files
To edit a file, we can use a program called nano. In the terminal, execute the following command to edit a file with nano:
vi [file] - Edit file.
While nano is great for simple edits, vi and emacs have more advanced and powerful features. There is a learning curve to using these editors as they are not exactly intuitive.
To edit a file with vi, use the command :
vi [file] - Edit file.
Vim stands for "Vi Improved". It's also a text editor that is free, open-source, and based on the vi editor that was originally created for the Unix operating system. However, it can be run on Windows, Mac, Linux, or Android.
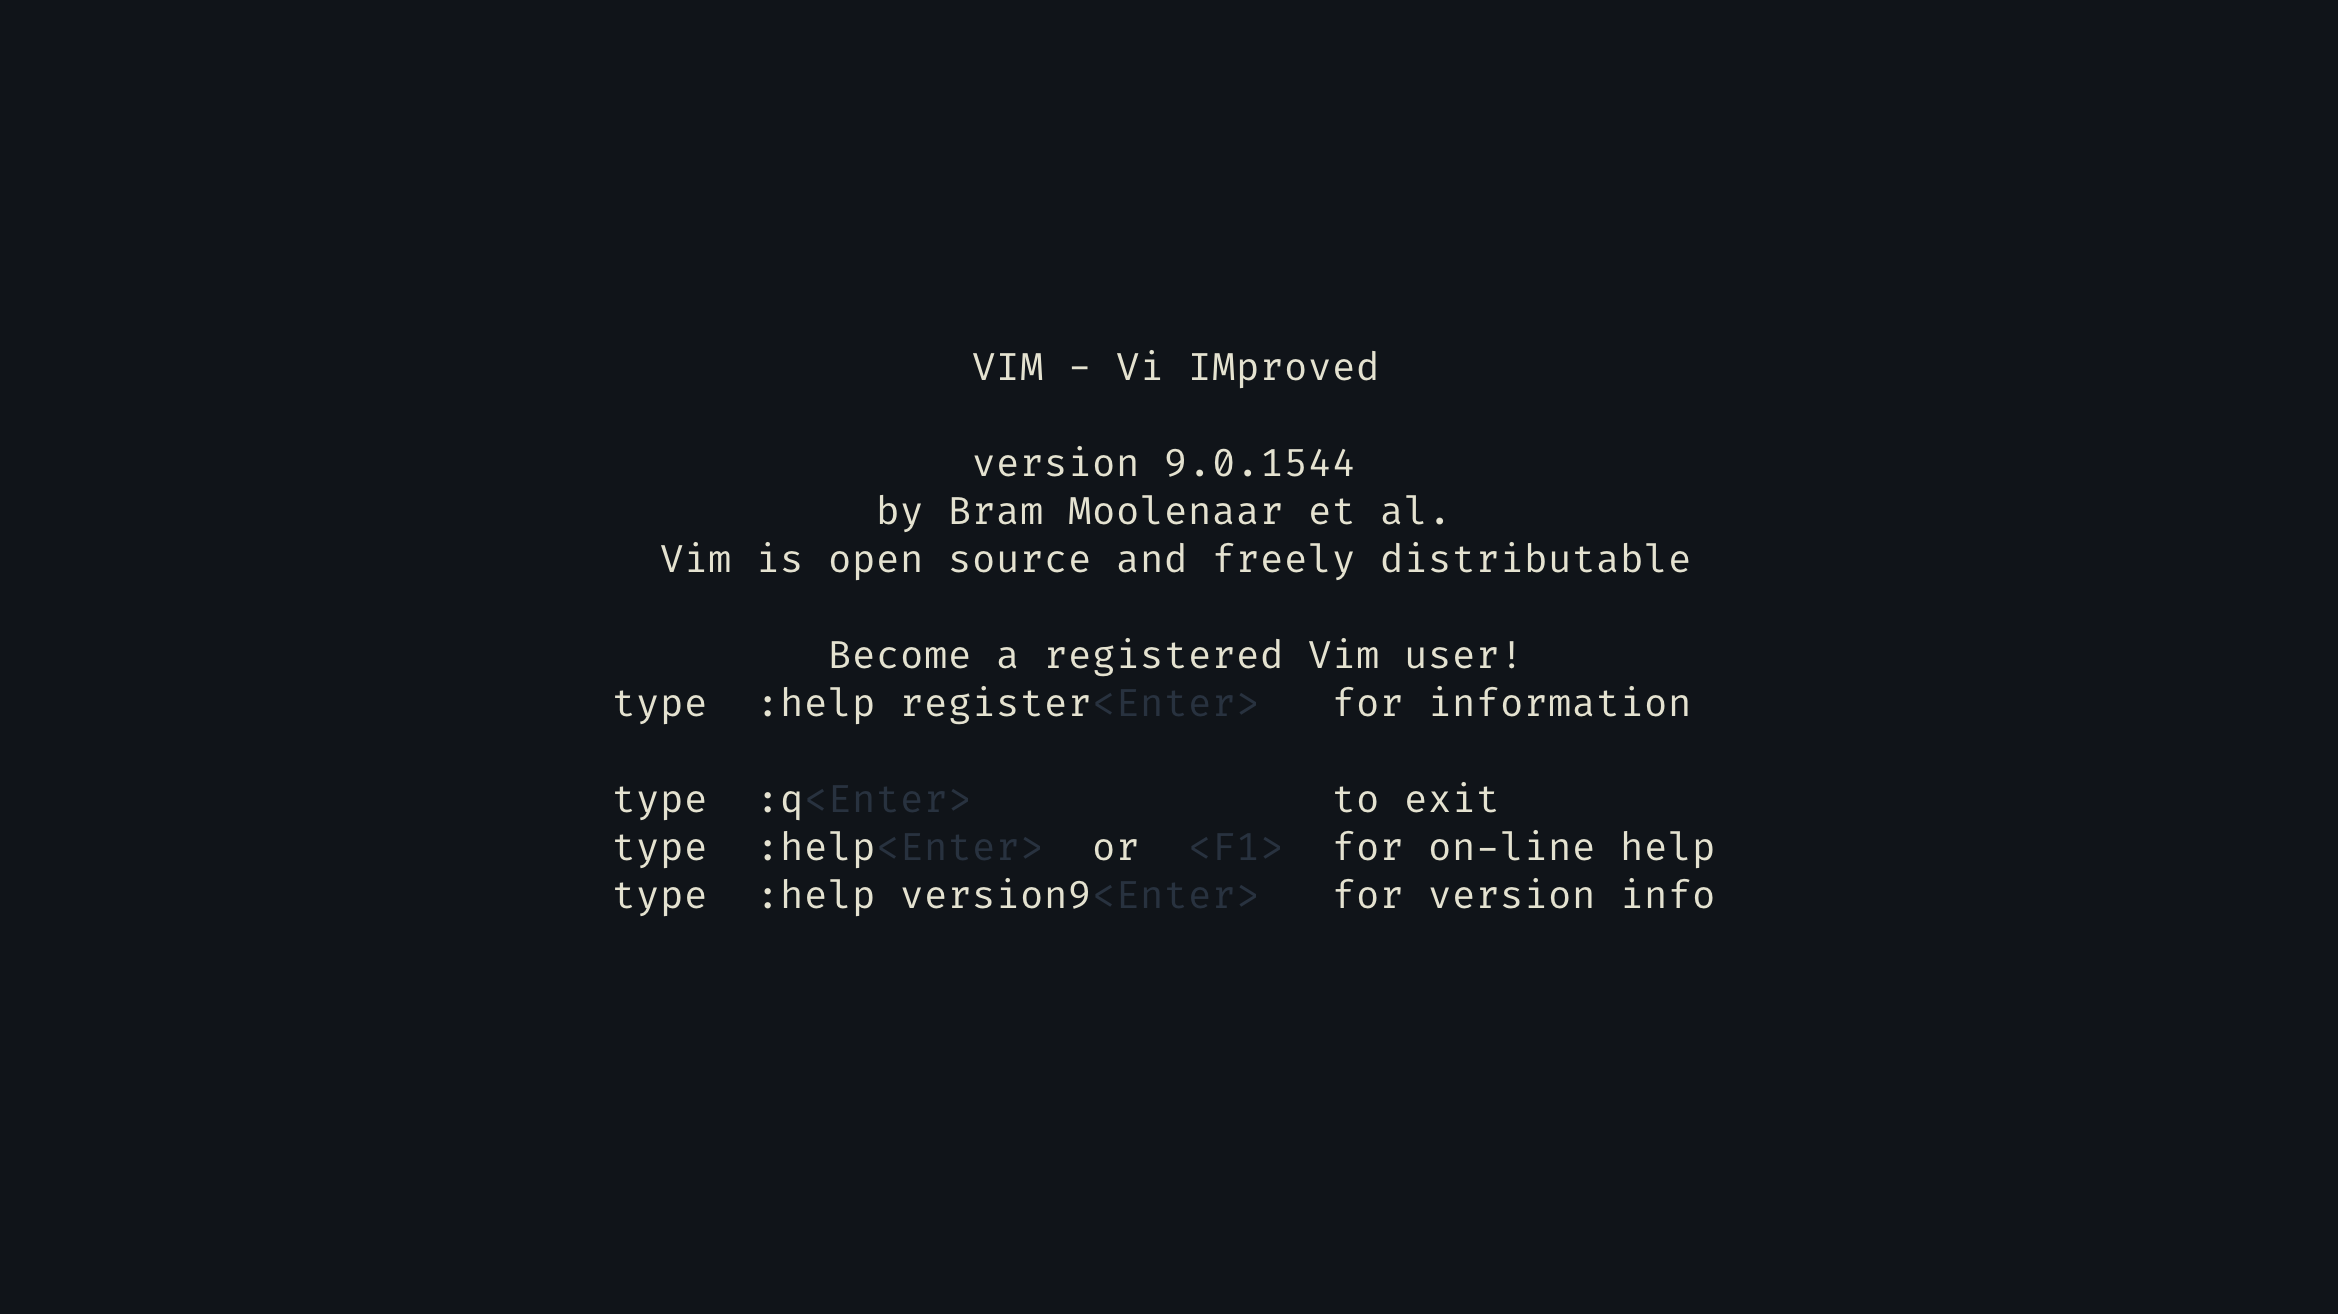
Vim can be launched directly from the terminal by running the vim command.
vim
The start screen will look like this:
Vim is very popular amongst developers. They will find it useful for working on source
code or scripting files, but Vim is also ideal for editing configuration files
when working from the terminal.
Vim has this concept of modes. You are always working in one of three modes: command mode, insert mode, or line mode. When Vim starts you are placed into command mode. To get back to command mode at any time hit the escape key (Esc).
Command mode
Command mode allows you to navigate the file, perform searches, delete text, copy text, and paste text.
Here are some commonly used key for navigation :
k- Up one line.j- Down one line.h- Left one character.l- Right one character.w- Right one word.b- Left one word.^- Go to the beginning of the line.$- Go to the end of the line.
Note that commands are case sensitive. For example, if you want to move down one line type the
lowercase j. The uppercase J joins lines together. It's also possible to navigate using the arrow keys on your keyboard.

Insert mode
To enter insert mode, press one of the following keys :
i- Insert at the cursor position.I- Insert at the beginning of the line.a- Append after the cursor position.A- Append at the end of the line.
After entering insert mode, type the desired text. When you are finished, type Esc to return to command mode.
Line mode
To enter line mode you must start from command mode and then type a colon (:) character. If
you are in insert mode, type Esc to get back to command mode and then type a colon for line
mode.
Here are some of the most common line mode commands to know :
:w- Writes (saves) the file.:w!- Forces the file to be saved even if the write permission is not set. This only works on files you own.:q- Quit. This will only works if there have not been any modifications to the file.:q!- Quit without saving changes made to the file.:wq!- Write and quit. After modifying a file this command ensures it gets saved and closes vi.:x- Same as :wq.:n- Positions the cursor at line n. For example, :5 will place the cursor on the fifth line in the file.:$- Positions the cursor on the last line of the file.:set nu- Turn on line numbering.:set nonu- Turn off line numbering.:help [subcommand]- Get help. If you want more information on the:wcommand type:help :w.
Advanced editing
You can repeat commands in Vim by preceding them with a number. For instance, if you would
like to move the cursor up 5 lines type 5k. If you would like to insert a piece of text 80 times, type 80i and start entering the text. Once you hit Esc to return to command mode the text you typed will be repeated 80 times. If you would like to make a line of asterisks, you could type 80i*Esc.
Can you see how Vim is more powerful than an editor like nano?
Here are some useful commands :
-
Deleting Text :
-
x- Delete a character. -
dw- Delete a word. To delete five words, type d5w. The repeating concept in vi shows up in many places. -
dd- Delete a line. To delete 3 lines, type 3dd. -
D- Delete from the current position to the end of the line. -
Changing Text :
-
r- Replace the current character. -
cw- Change the current word. -
cc- Change the current line. -
c$- Change the text from the current position to the end of the line. -
C- Same as c$. -
~- Reverses the case of a character. -
Copying and Pasting
-
yy- Yank (copy) the current line. -
y<position>- Yank the<position>. For example, to yank a word typeyw. To yank three words type y3w. -
p- Paste the most recent deleted or yanked text. -
Undo / Redo
-
u - Undo.
-
Ctrl-r - Redo.
-
Searching
-
/<pattern>- Start a forward search for<pattern>. -
?<pattern>- Start a reverse search for<pattern>.
Check out these links to learn more about Vim:
Check out this fairly comprehensive article about the command line.
Servers
The next step after this brief overview of the command line will be discussing servers. We are going to take a look at VPS, operating systems, SSH etc..
What is a server?
HTTP : Communication protocol between web server and web clients
Business logic: Rules for data storage and transfer of application resources Application: A software program or website attached to a database
A server is essentially a powerful computer (designed to handle heavy workload) that delivers information and software to other computers. There are many different types of servers including :
-
Web servers- A web server’s main role is to serve web pages for a website. When you visit netflix.com, you begin with entering a URL that starts a request over the internet. This request passes through multiple layers, one or more of which will be a web server. This web server acts as an intermediary between thebackendand thefrontend, generates a response to your request which is a combination of many resources (HTML, CSS, JS files, JSON data, etc..) that put together form the website that you can see and play around with.
The most popular open source web servers are currently Apache and Nginx. -
Application servers(Also known as thebackend) - they usually sits in front of the database as you can see in the diagram below.
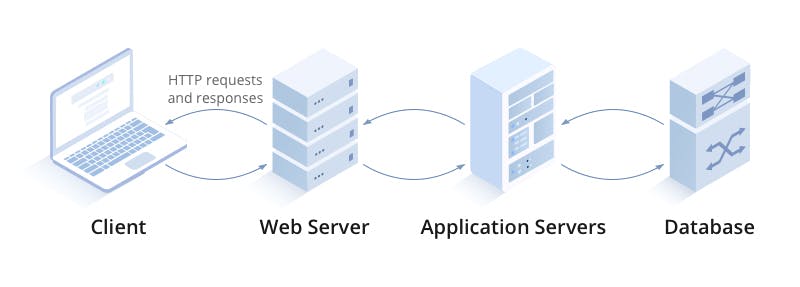
They are quite similar to web servers as they use HTTP protocol and answer client requests. However, these servers focus on dynamic requests (business logic requests). For example, after you log in to a website, often times your username will dynamically populate in the top navigation bar. This is usually a script, designed to retrieve this information from the database and executed by an application server. Dynamic content like this adds extra complexity because it forces the web server to handle many requests at the same time. Popular Examples include Java Application Servers (e.g., Tomcat), .NET Application Servers, and Node.js servers.
-
Database servers- host database software and offer database services to client computers (storing, modifying, and retrieving data by executing a query); A query is a command you send to a database to get it to do something, whether that's to get information out of the database or to add/update/delete something in the database. Some examples of database servers include Microsoft SQL, MySQL, MongoDB, and SQLite. -
Cloud server(also called V.P.S, virtual private server) - To do anything online, like start a website likecoursera.comor run a service such as a food app, you need to run a program or host files on a server. In other words, no server, no website. However, physical servers are large, powerful machines that are expensive to buy and maintain. This is where virtualization comes in: rather than having to buy or rent an entire server for each site or online service, individuals or small companies can rent just a fraction of a server from a web hosting company (like digitalocean.com).
The great thing about a VPS is that you get to decide, the operating system the machine will run on (generally linux) and how powerful the machine can be in terms of computing power (memory, disk space, CPU cores, etc..) As a result, they're a very flexible for small companies or any individual interested in a scalable solution.
In a later section of this article, we will buy our own VPS to host a web application.
However, committing to running an entire cloud server, especially in a production deployment, requires a certain amount of knowledge of Linux best practices, usually formalized in dedicated System Administration (“sysadmin”) or Development Operations (“DevOps”) roles for dealing with security, deployment, and so on. Being able to perform these roles on an occasional or an as-needed basis is very useful, but can be complex. This is especially true when considering that it is not strictly necessary to know how to interact with a Linux server or a command line at all to develop most softwares.
This list is not exhaustive, I recommend this article to get more information about servers
I also recommend this very interesting article that explains web servers using a microbrewery analogy.
Creating a simple node.js server
Prerequisites: To complete this part, you will need Node.js installed on your computer. We are using version 19.0.0. Check out this link to install Node.js and also this link to learn more about node.js.
Let's try and create a very simple node.js server.
- In the terminal, run this command to create a file called
server.js:
vim server.js
This should open a vim editor like this :

- This is an example of the code we need to create a server in
Node.js:
const http = require('http')
const fs = require('fs')
const PORT = 8000

const server = http.createServer((req, res) => {
  res.writeHead(200, { 'content-type': 'text/html' })
  fs.createReadStream('index.html').pipe(res)
})

server.listen(PORT)
console.log(`server is listening to port ${PORT}`.)
-
On the first line, we imported the
HTTPmodule. TheHTTPmodule is a built-in node module that allows us to transfer data over the Hyper Text Transfer Protocol (HTTP). -
fsis also built-in node module that allows us to work with the file system on the computer. Common uses of the file System module includes: Read, create, update, delete, rename files. We need thefsmodule because we are going to serve files. -
On the third line, we defined our server port : 8000 and save it in variable called
PORT -
The
http.createServer()method takes a function, that accepts two argumentsreqandresor request and response. The response is an object with a lot of properties (more on that later), one of which is thewriteHead()method useful to write headers. Headers are metadata attached to the server response. Headers can help us determine if a user is logged in or not, verify the cookies, or check the HTTP status.200is theOKHTTP status code and just to be as explicit as possible, we added a second argument which is an object that helps the client determines the response data type, which is anhtmlfile. -
We also created a read stream. Streams allow us to read from or write to a source continuously, thus eliminating the need to fit all the data in memory at once. With stream we can start processing data almost immediately instead of waiting for the entire payload making it a suitable tool for large data transfer.
-
The server is created and the function passed into
createServer()will be executed when we'll open the browser on port8000. To open that port, we called thelisten()method and passed into it our variablePORT. -
Finally, it's nice to know that the server is running, so we logged a message to the console.
- The last file we need is the
htmlfile that we will serve. We can create it by running this command
vim index.html
.. and write a simple paragraph saying "hello world"
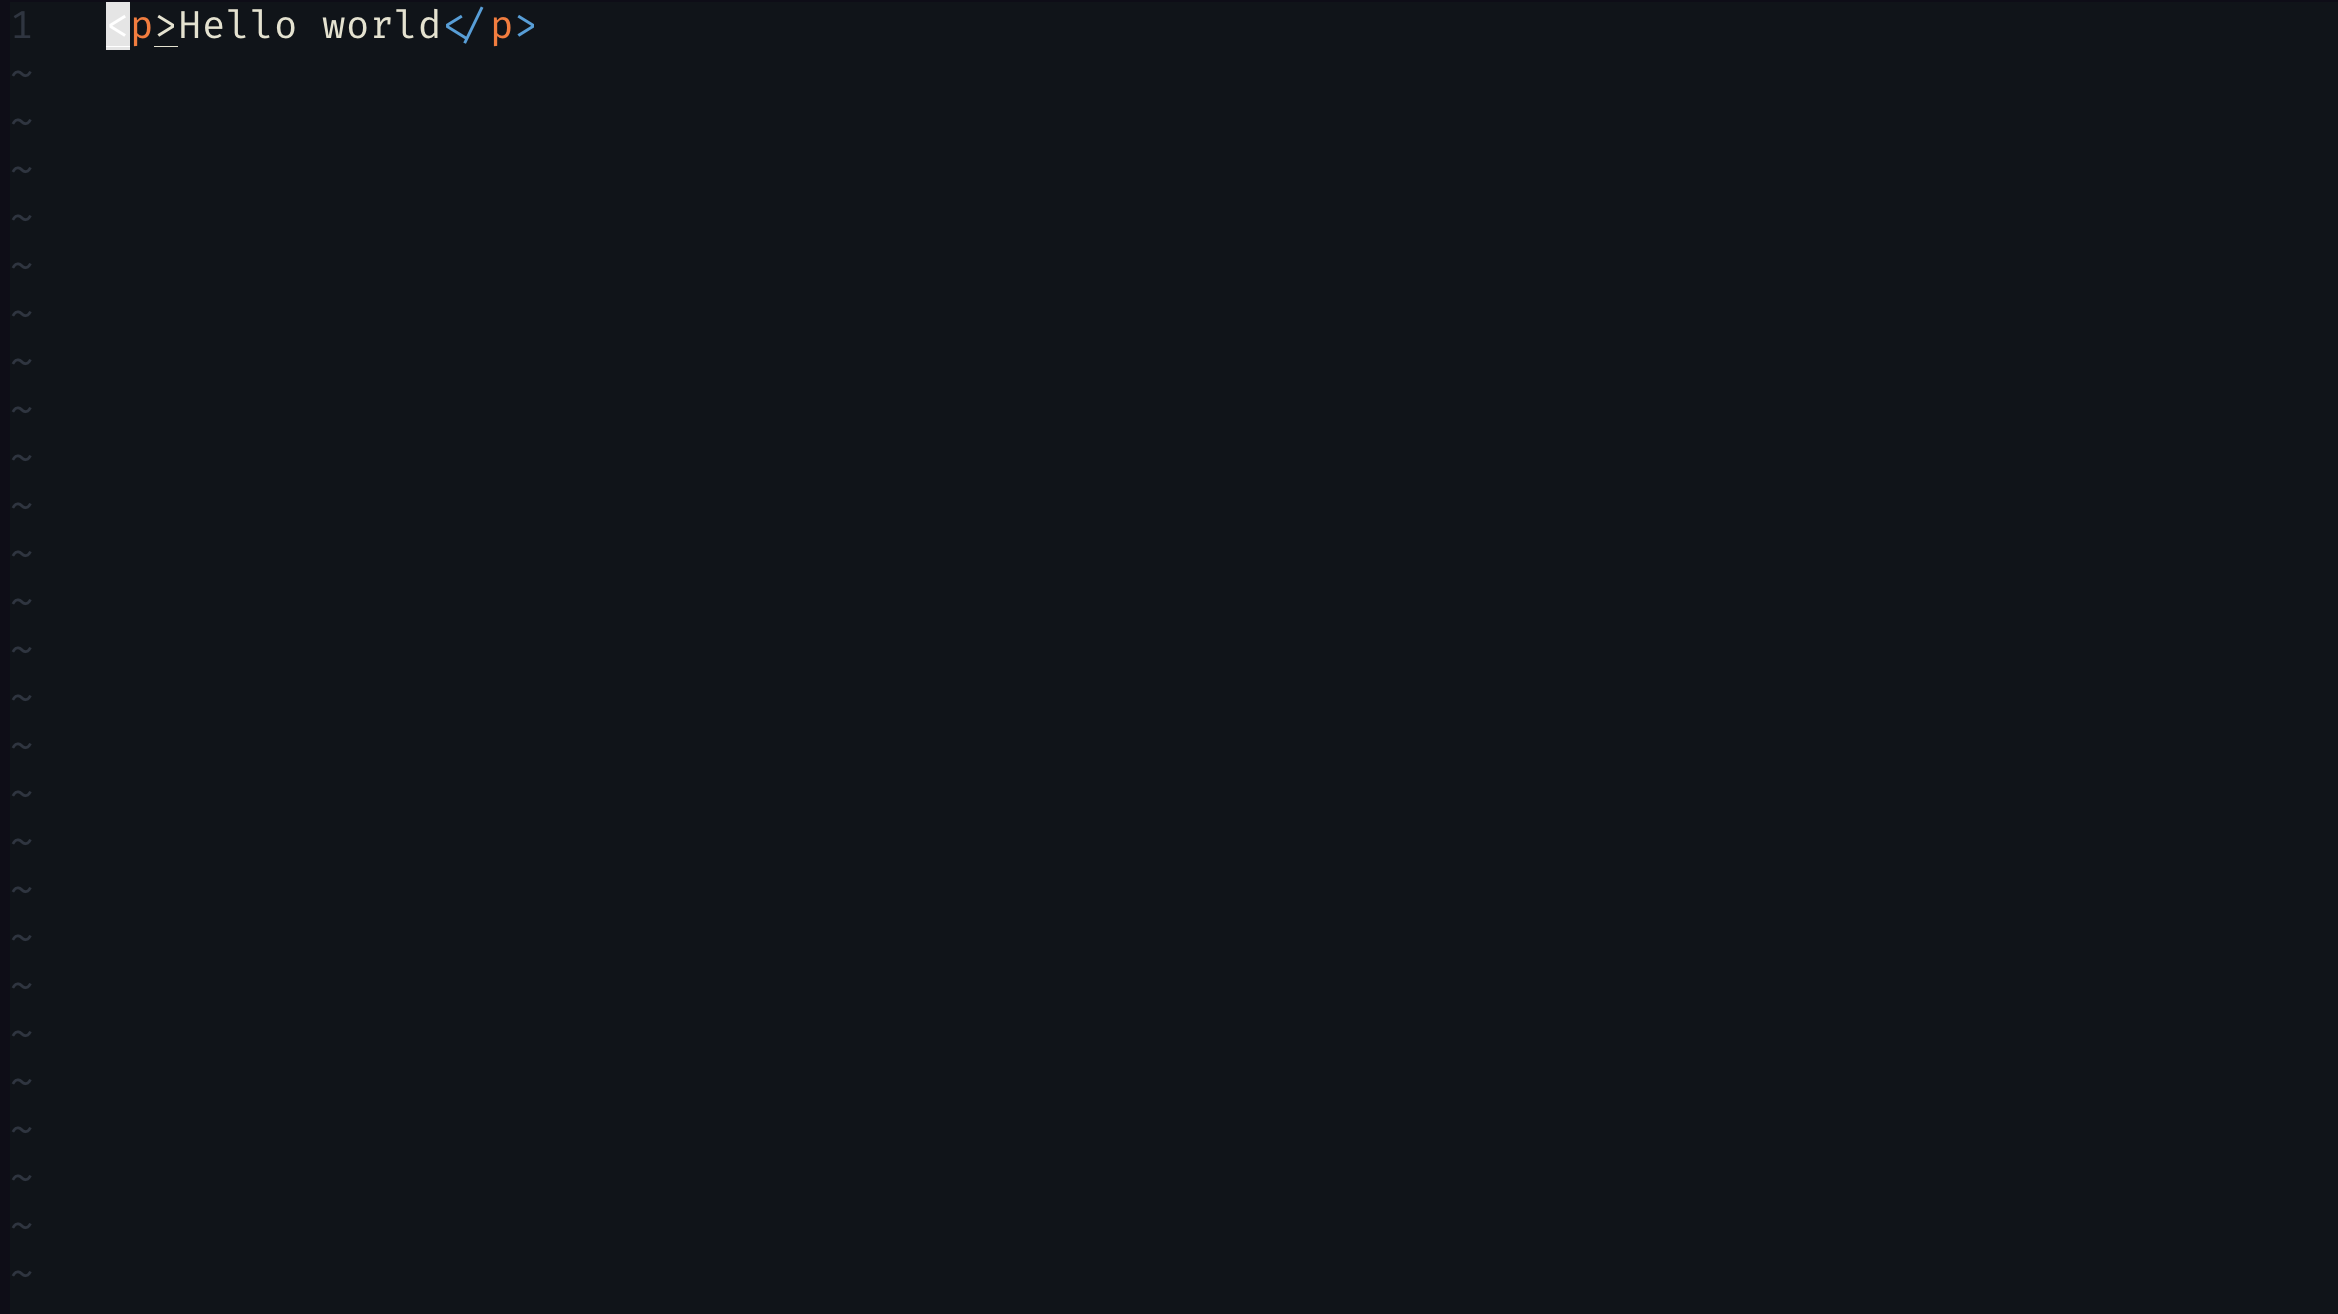
- To start the server we can run the following command:
node server.js
if we open localhost:8000 in the browser, we should see our html page :

Hosting our application
We have a node server up and running and it's serving an HTML page but how can we scale it? How can we make it accessible and available for users all around the world? Also, what happens if the server goes down, how do we make sure that we don't rely on only one server in case of failure?
As explained above, all digital data and systems have to exist and be hosted somewhere in the real world.
A company website you visit online, or an app on your phone can all be traced back to where they are hosted: a real machine.
Not so long ago, most companies used to run their website on their own machine: a physical server. Physical servers are any machine with, CPU, GPU, RAM, storage, power supply unit, network interface,etc..., typically designed to run 24/7 and used to run applications that serve other computers, such as web servers.
Today, modern companies use virtual servers. Companies like AWS, Digital Ocean, Rackspace etc.. offer many services that allow users to host their applications in the cloud, providing the performance and scalability that these applications need. Virtualization is the secret behind big tech companies success and the reason why they can offer efficient resources at global scale while maximizing their hardware.
Buying and setting up a VPS (virtual private server)
Currently, our node server is running locally.
Let's
purchase a virtual private server to host our node server on a virtual machine.
In the browser, navigate to digitalocean.com.
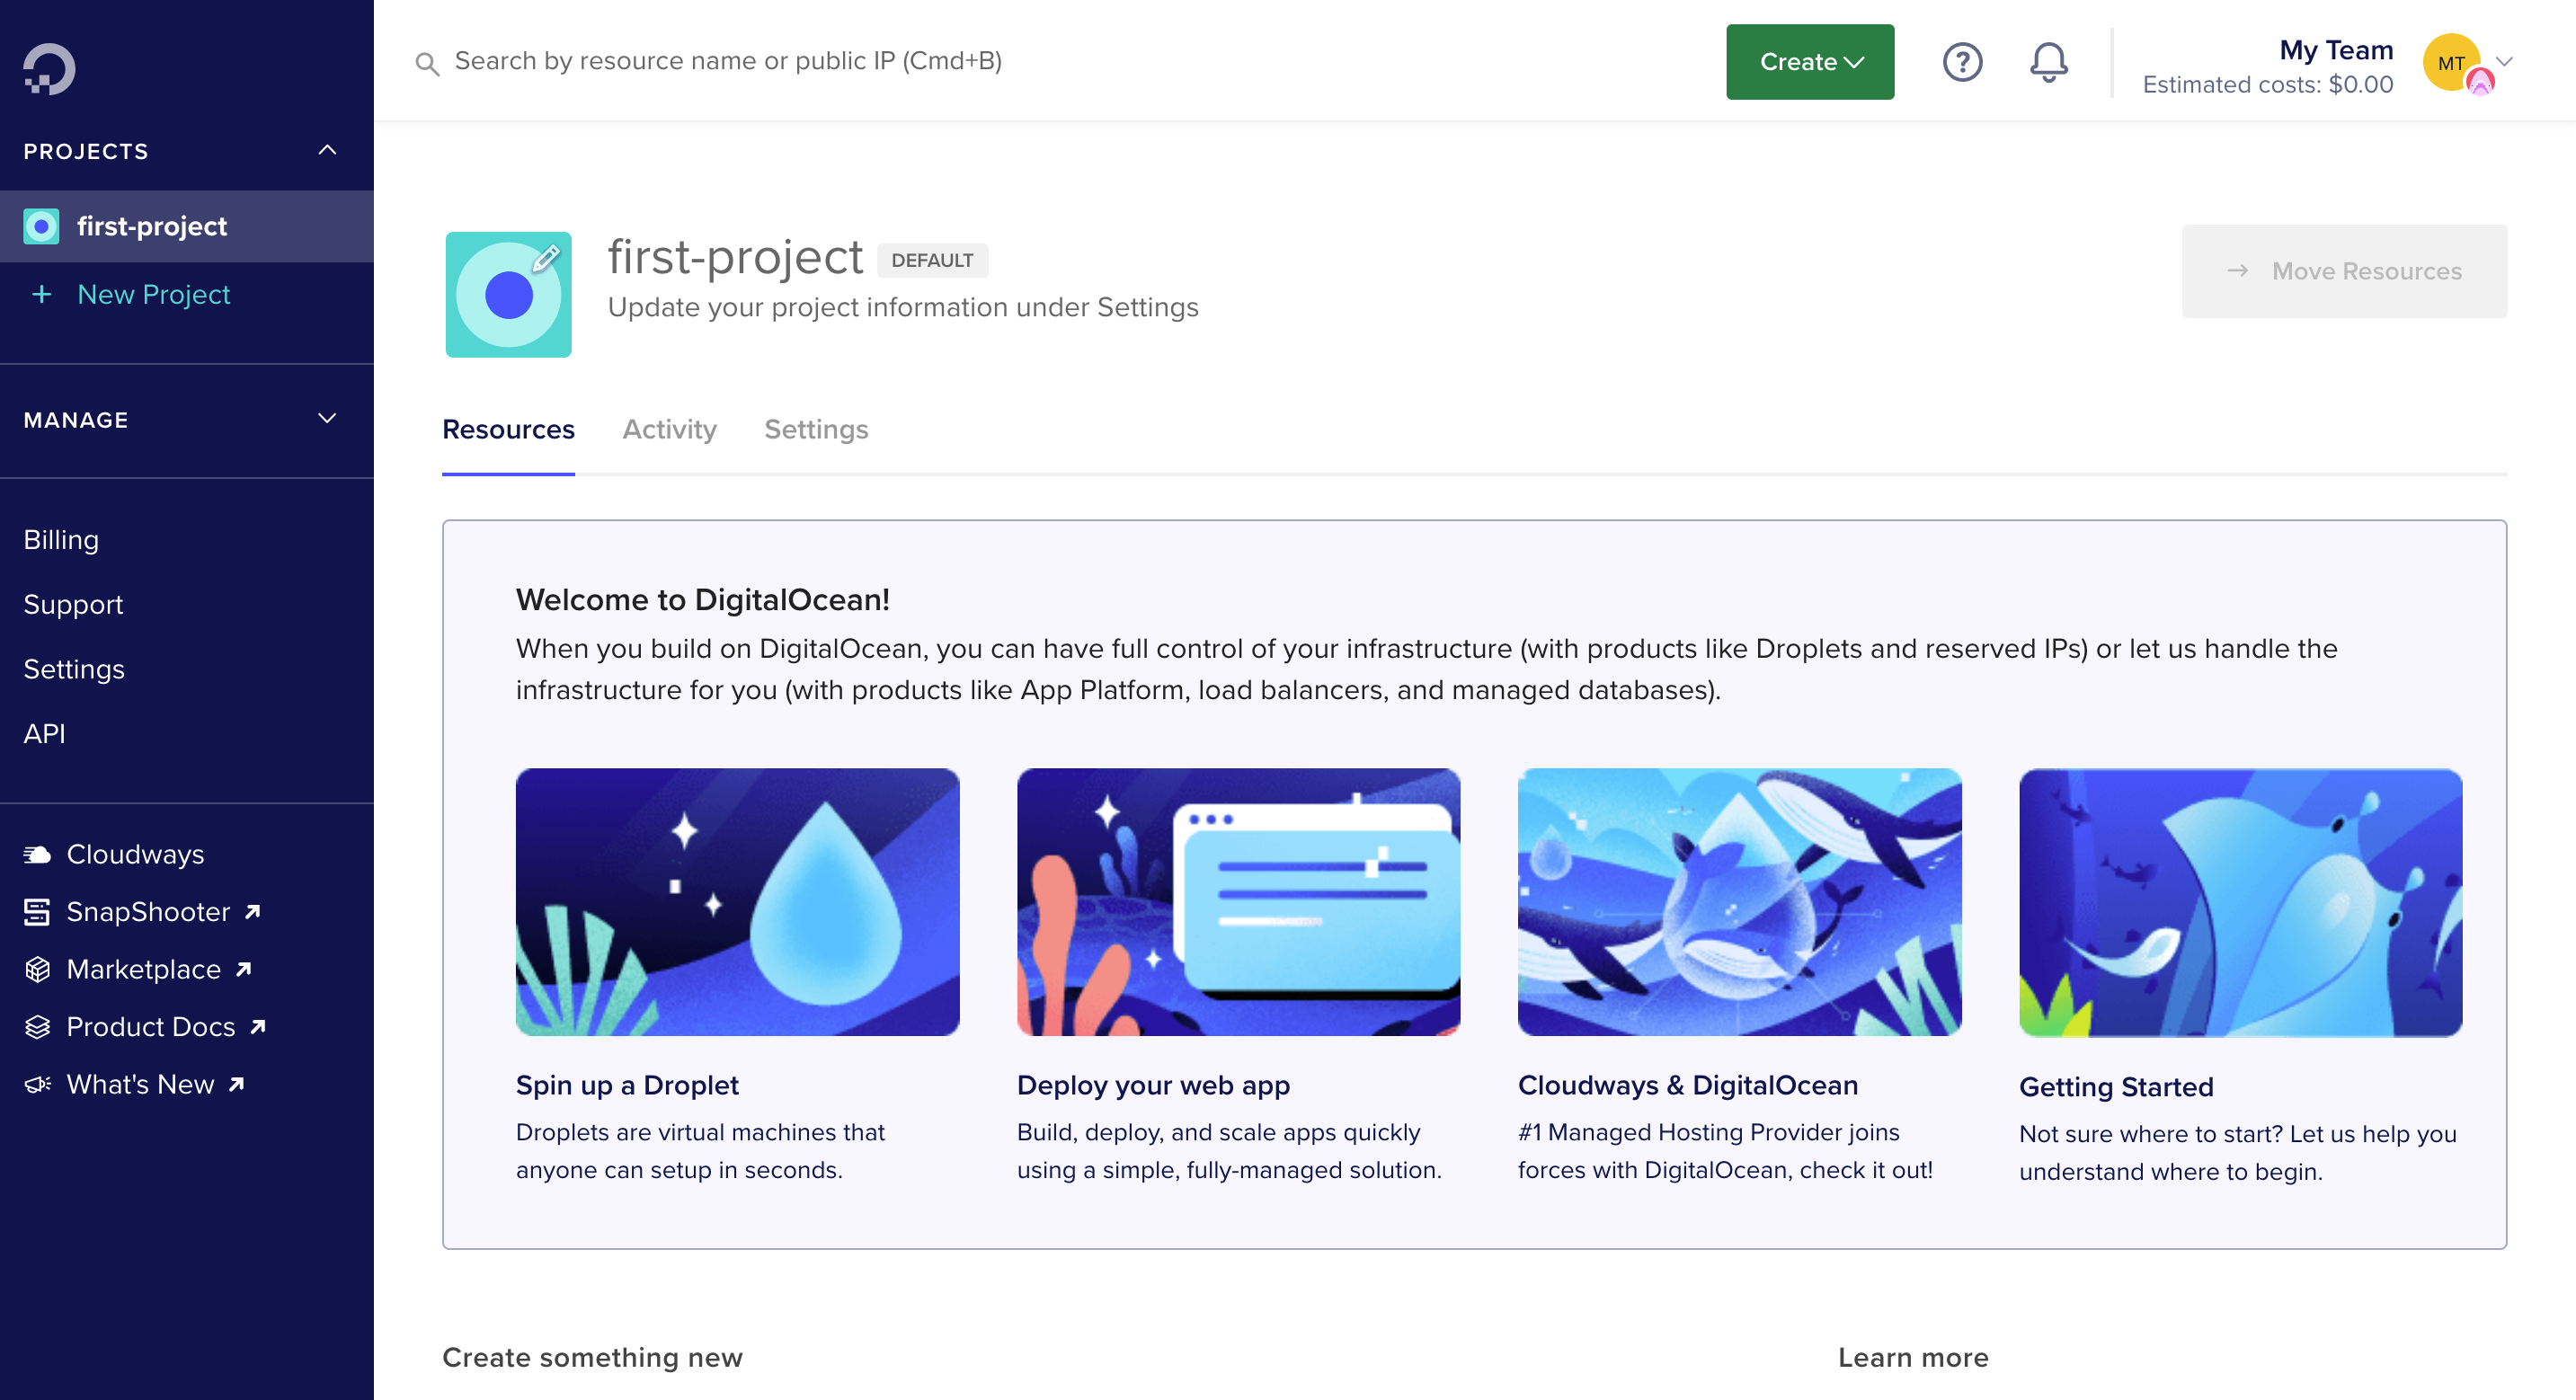
Once your account is created, you should land on a dashboard like this :
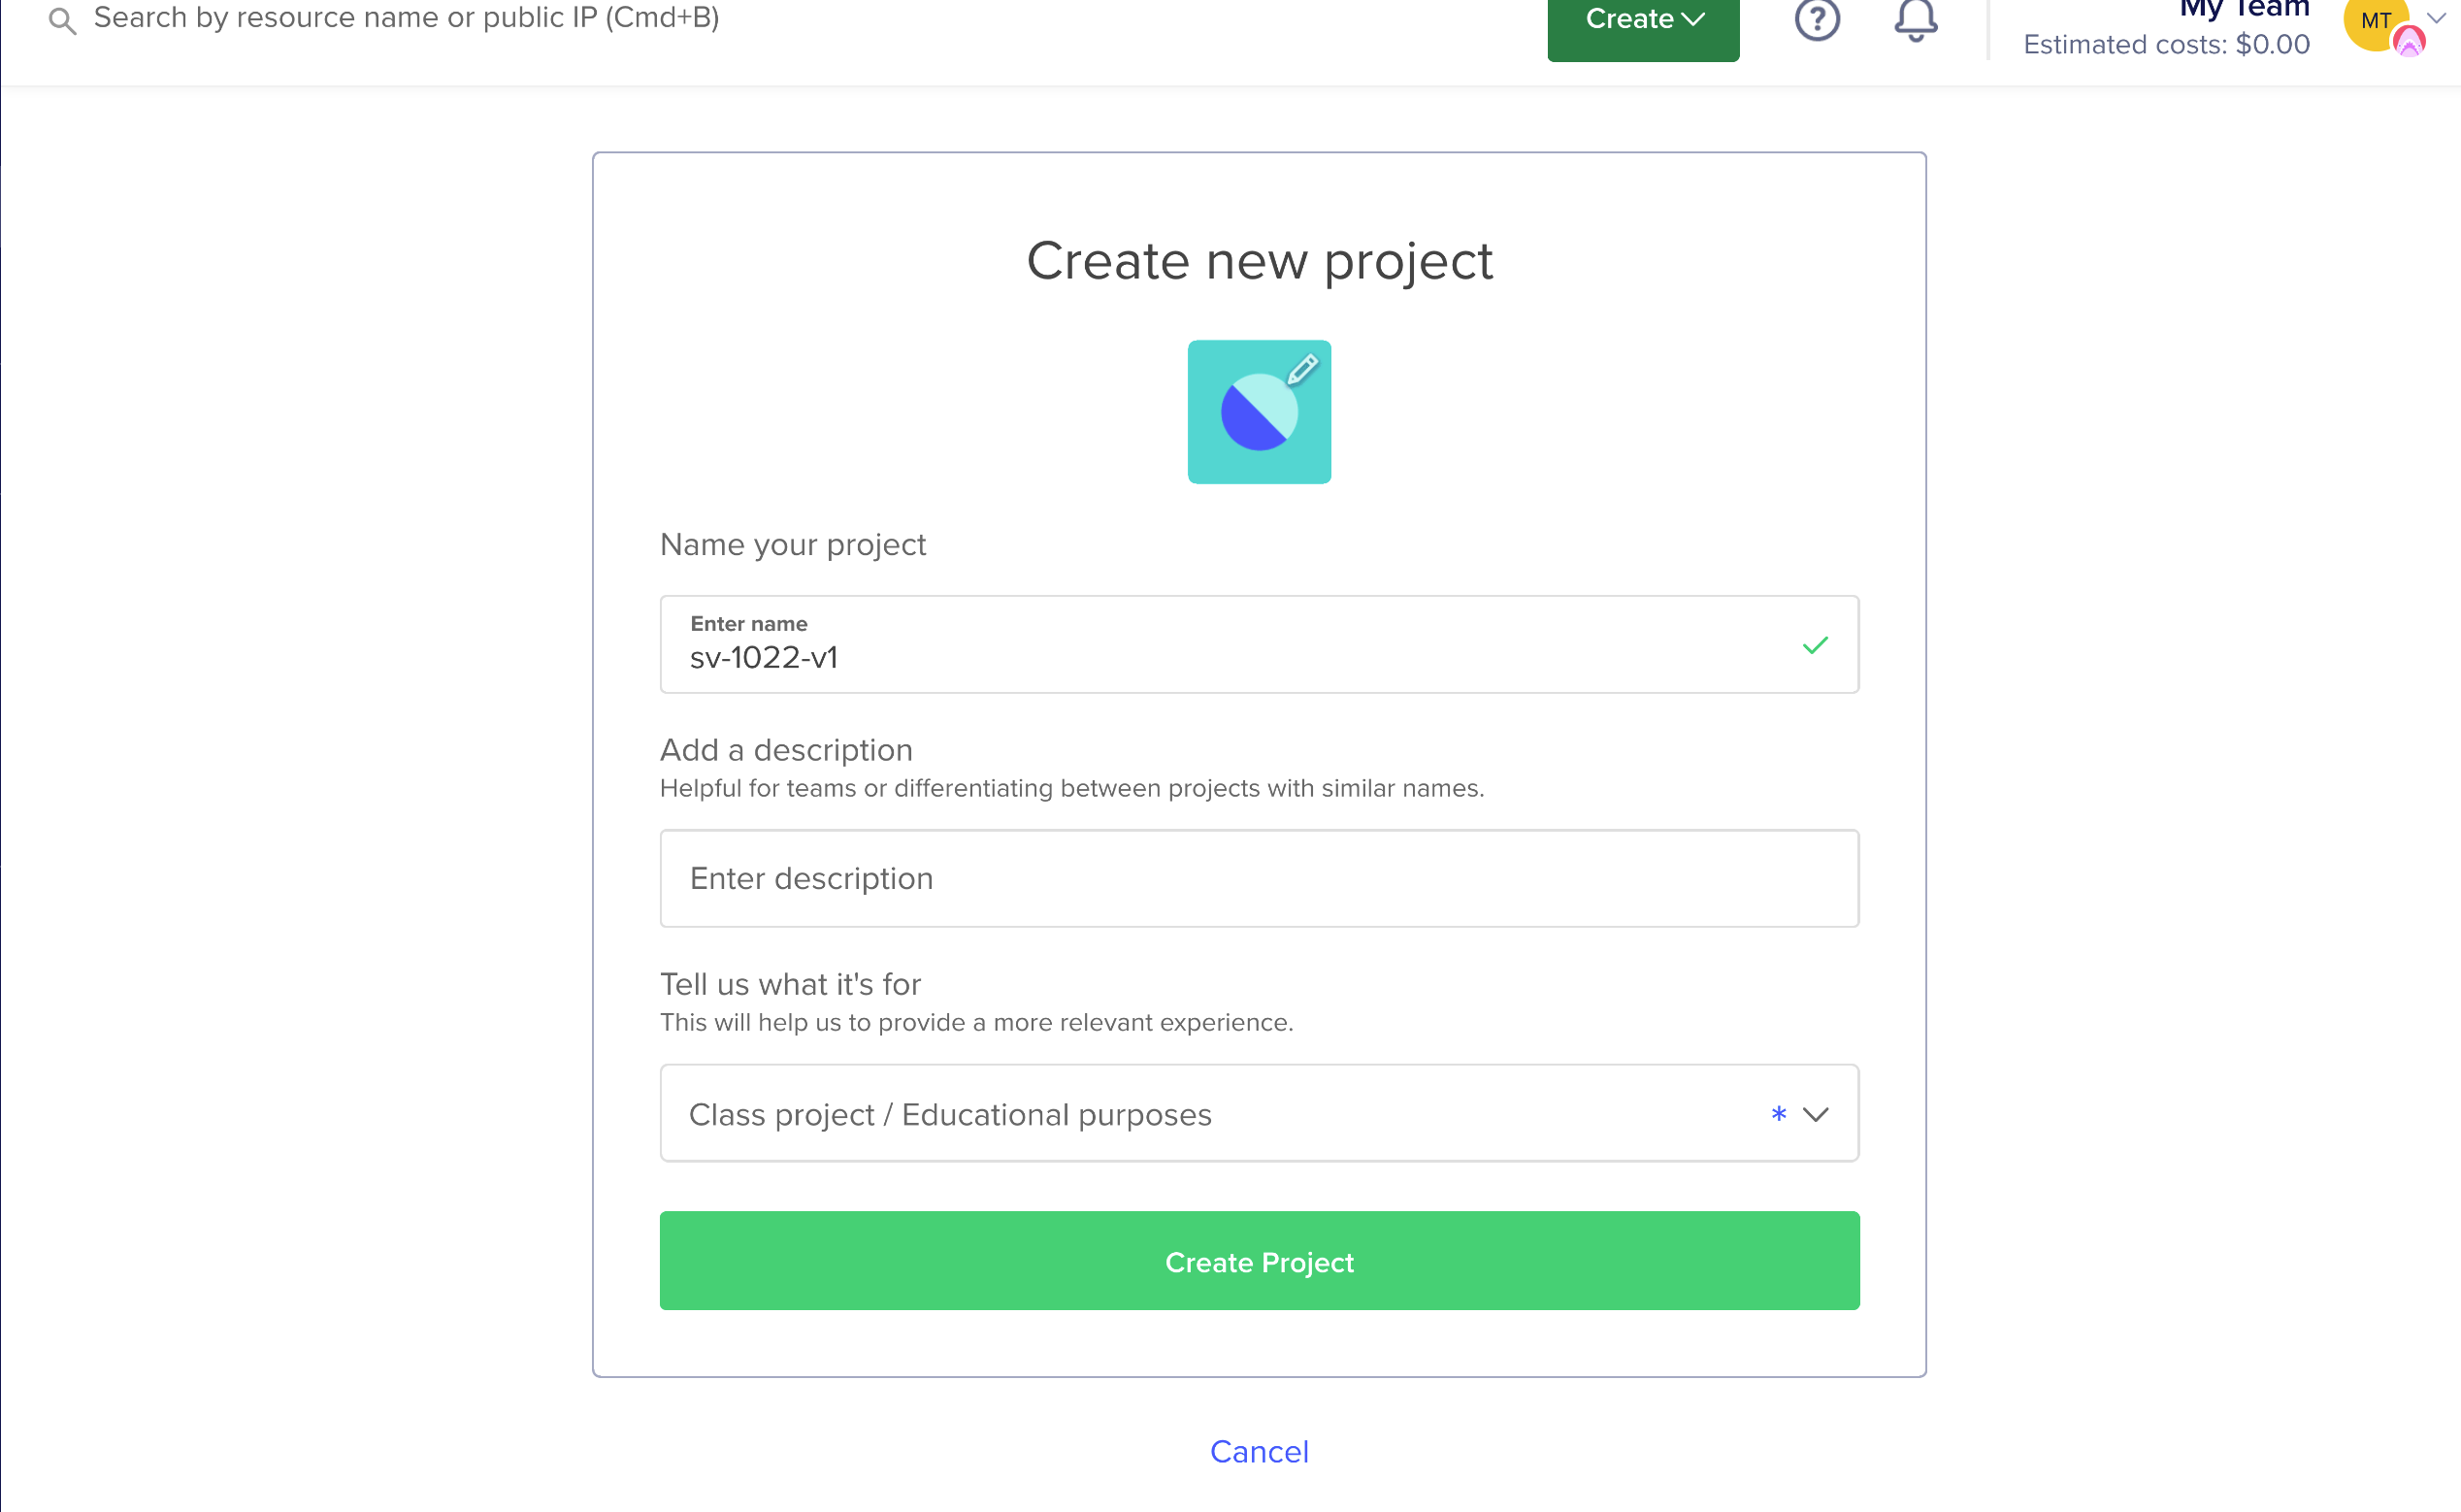
Click on the create button to create a new project :
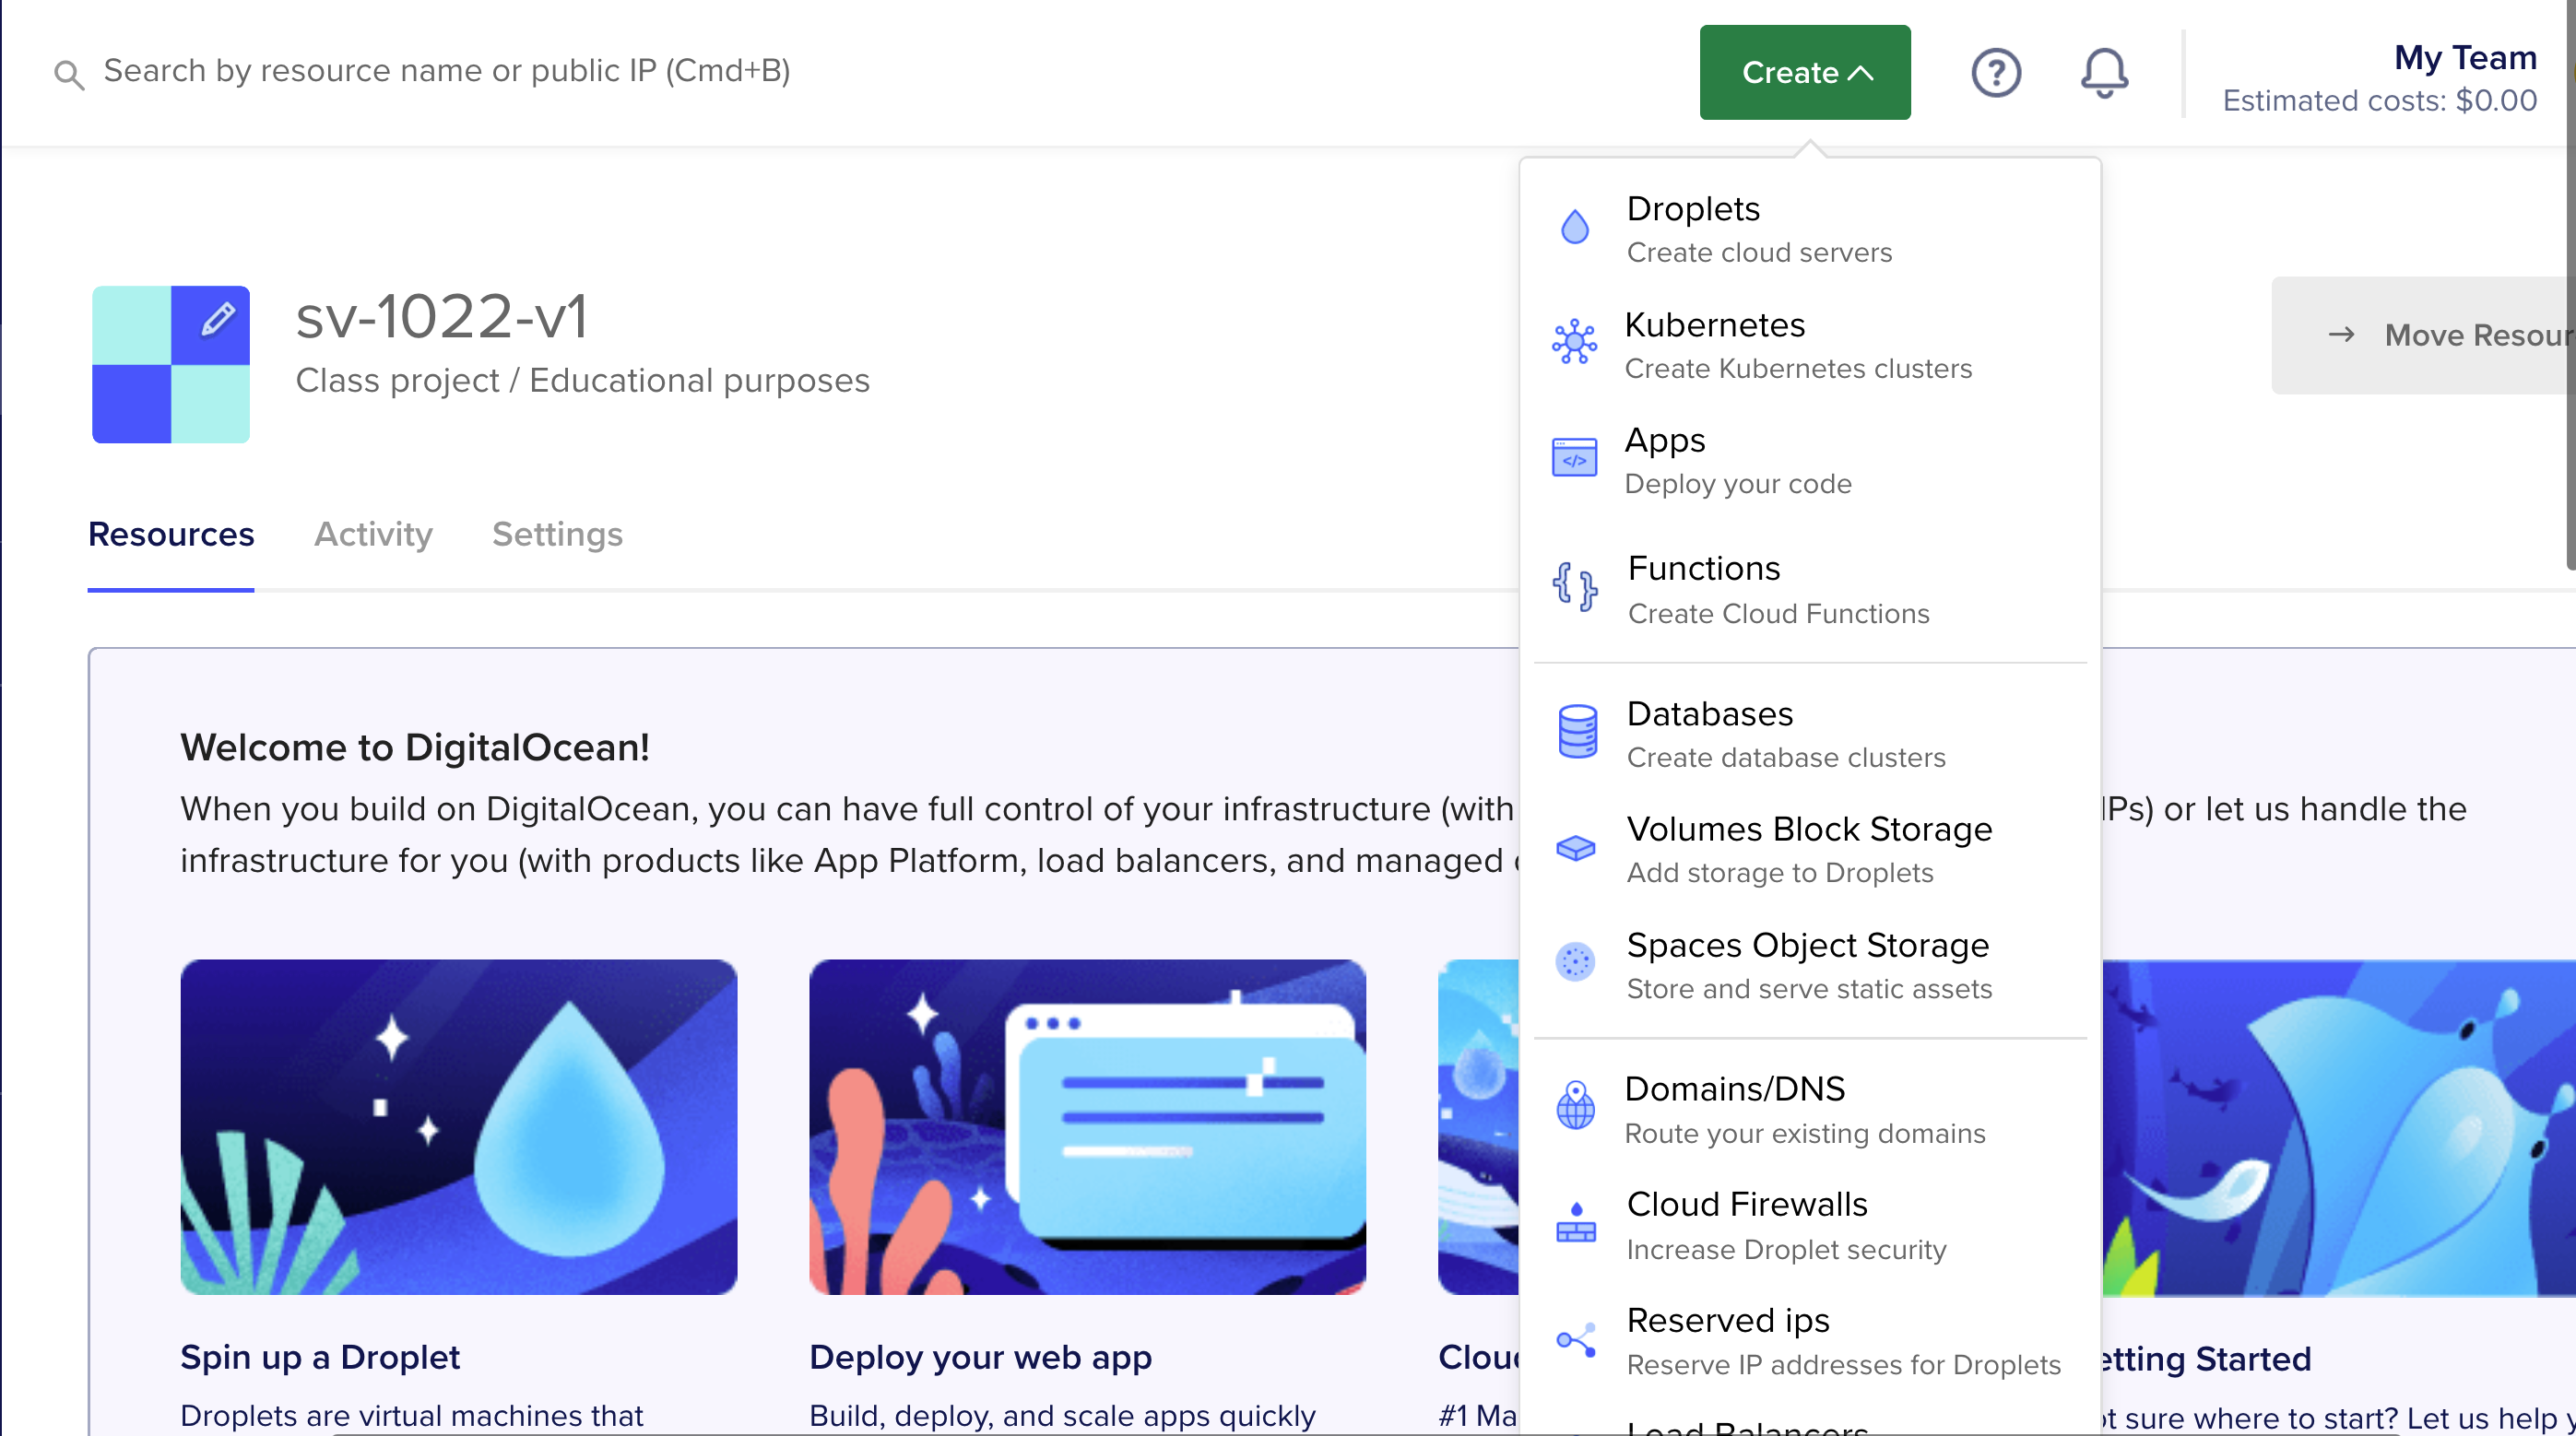
Digital ocean servers are called droplets. Click on droplets to create a new droplet:
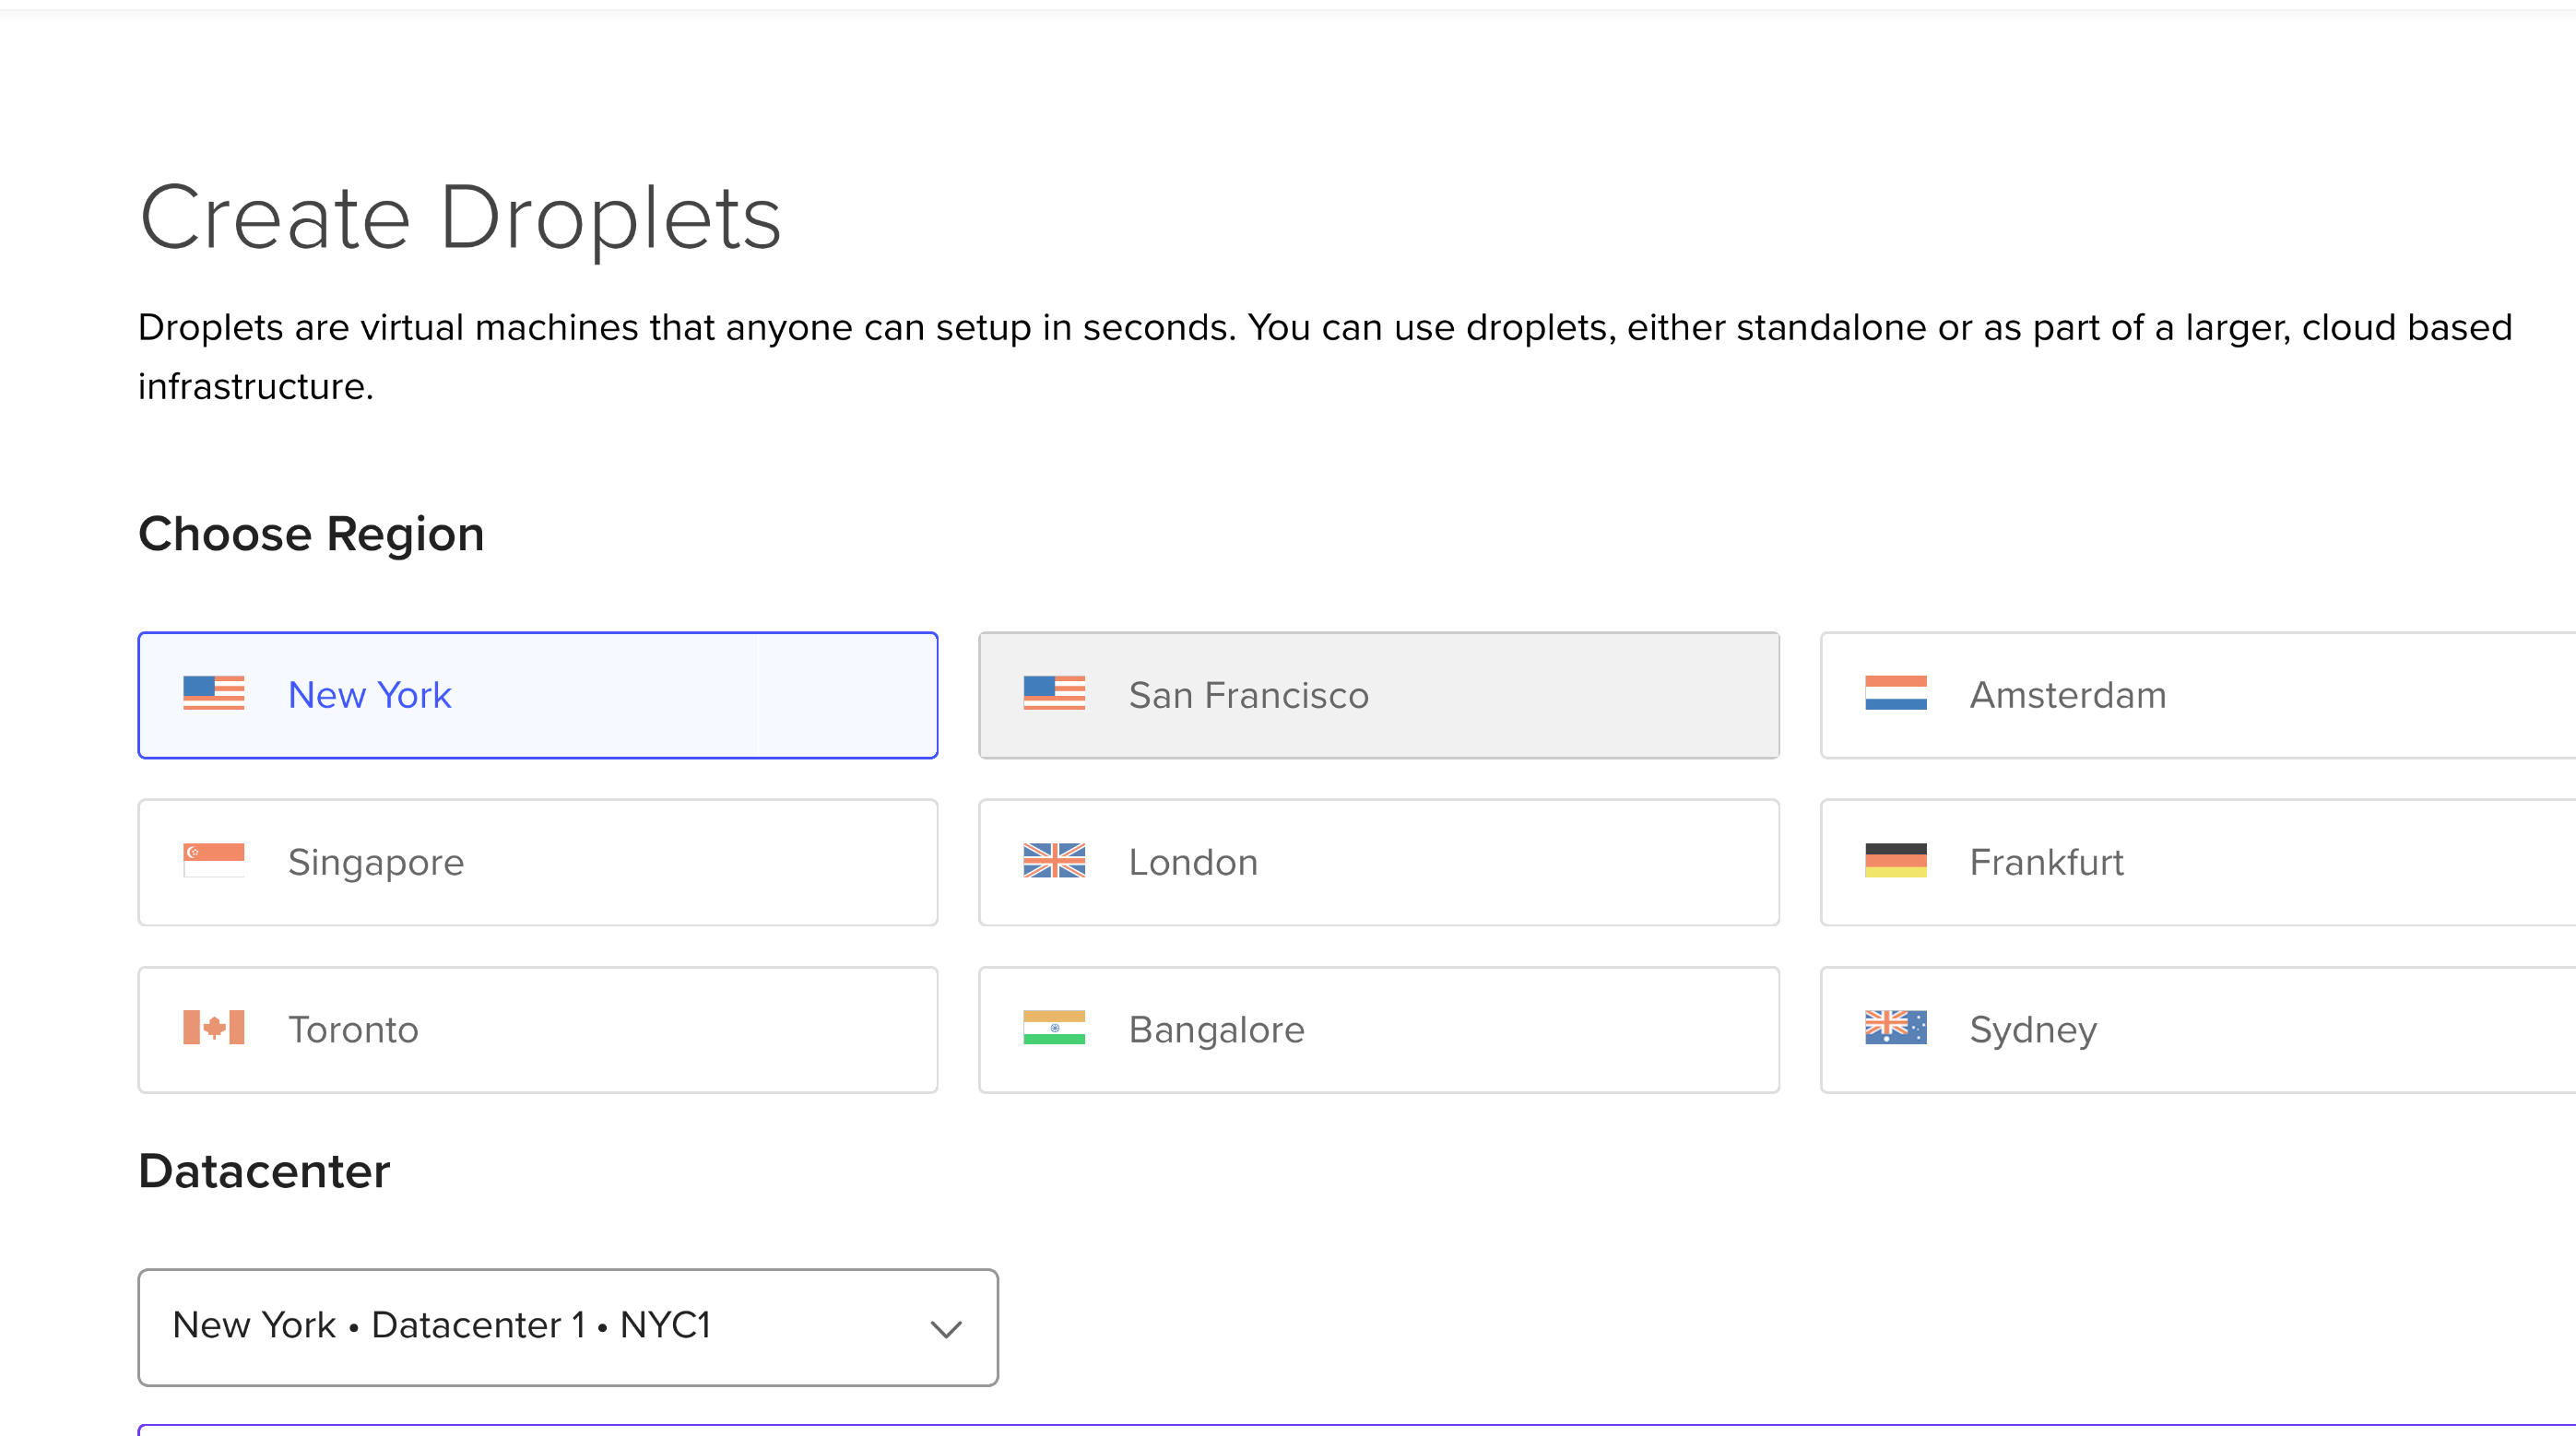
The region and the operating system
We want to choose the closest region to our potential users. We are going to choose New York.
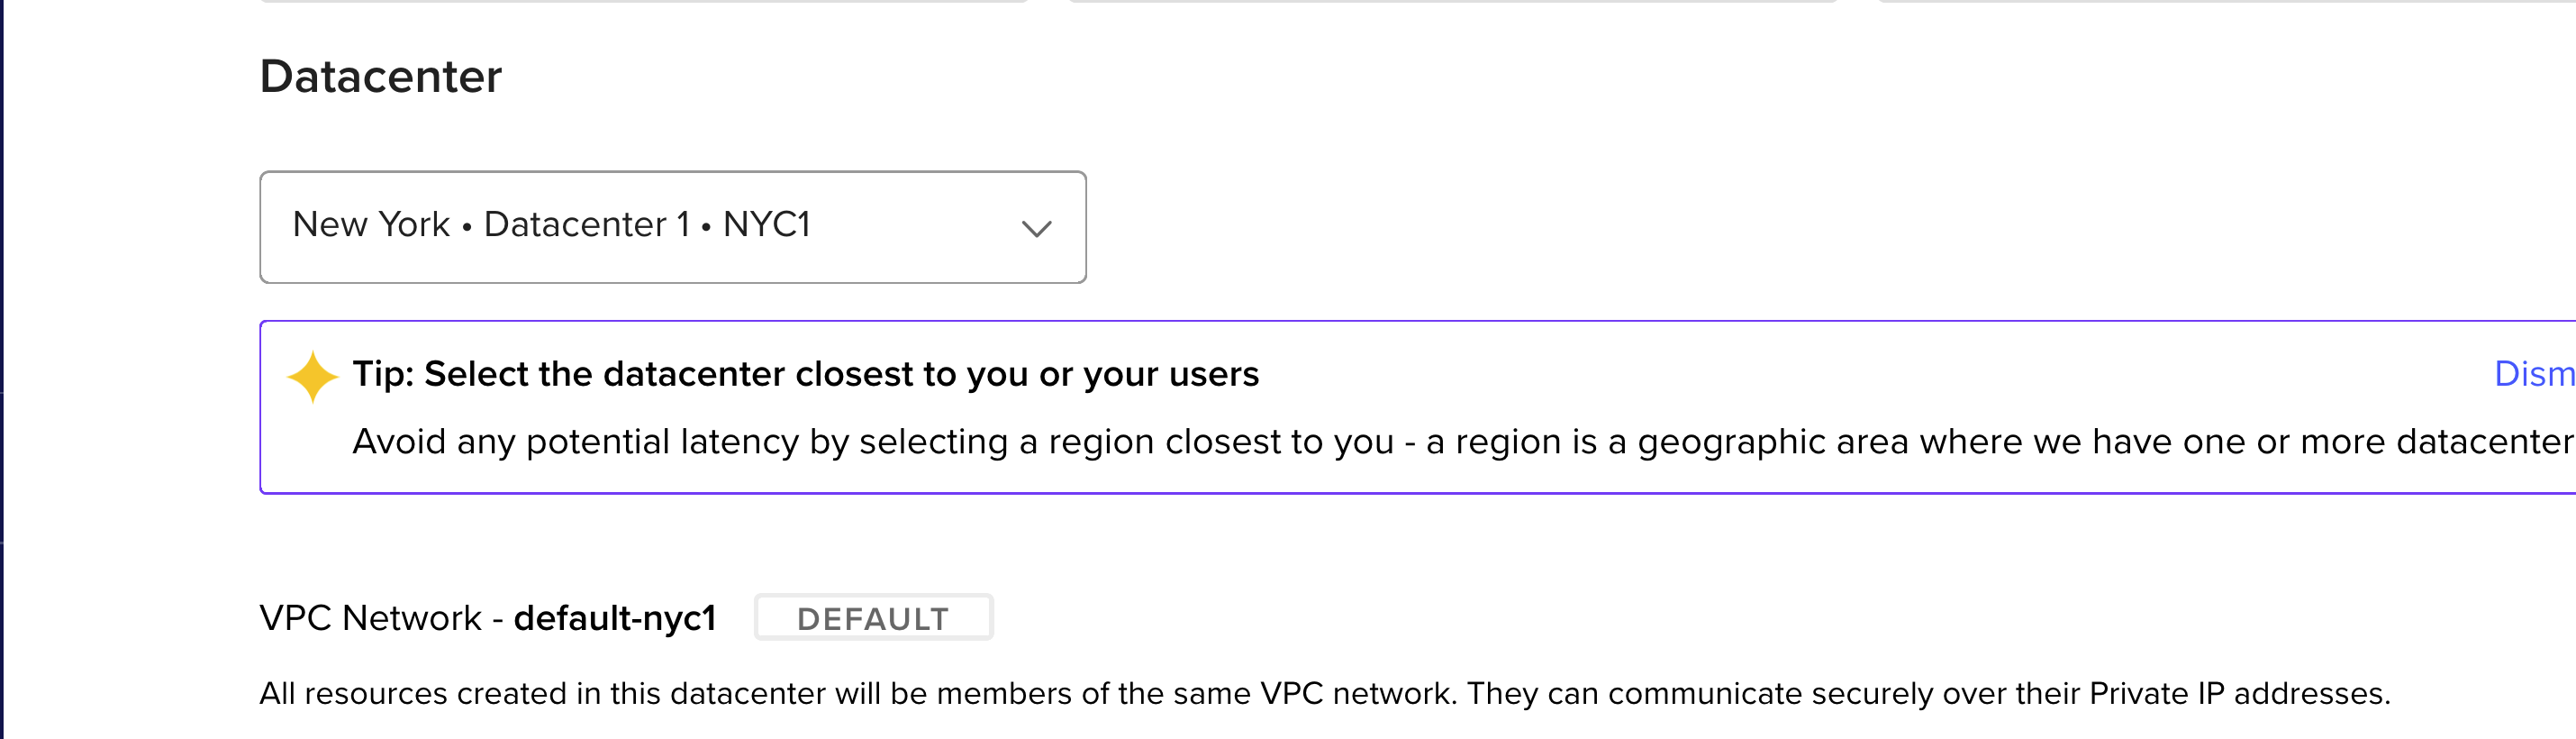
Next we choose the data center :
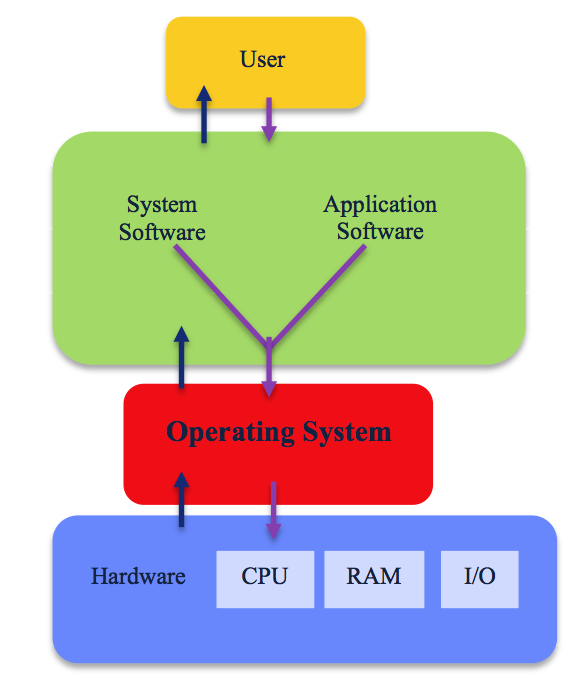
Next, the operating system :
The operating system, also known as an "OS," interfaces with the computer's hardware and provides services that applications can use. It sits in between the applications you run and the hardware :
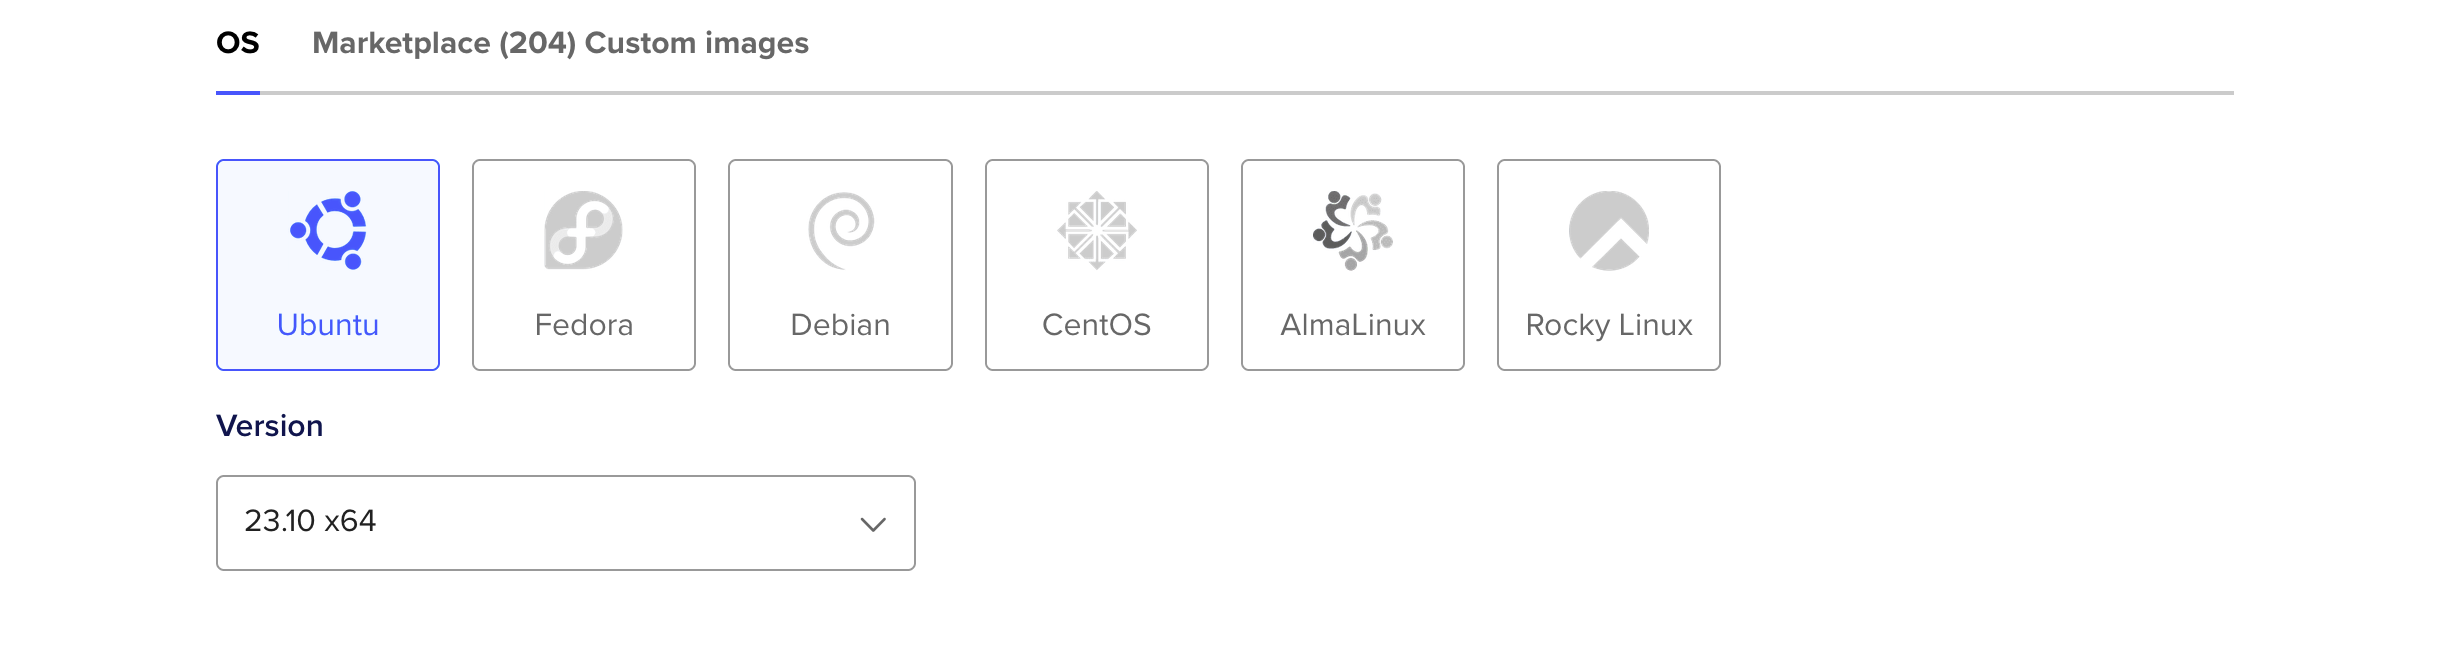
For our example, we are going to choose Ubuntu , the LTS (LTS stands for long term support) version in 64 bit.
As you probably know, there are two types of operating systems :
- Windows-based systems
- Unix-based systems
Unlike windows-based systems, Unix-based systems comes with multiple flavors. The main subsets are :
- Solaris
- Linux
- BSD
Linux is arguably the most popular. It's user-friendly, more accessible with a lot of built-in commands and highly customizable. Operating systems based on Linux are known as Linux distributions or Linux distros. Examples include Debian, Ubuntu, Fedora, CentOS, Gentoo, Arch Linux, etc...
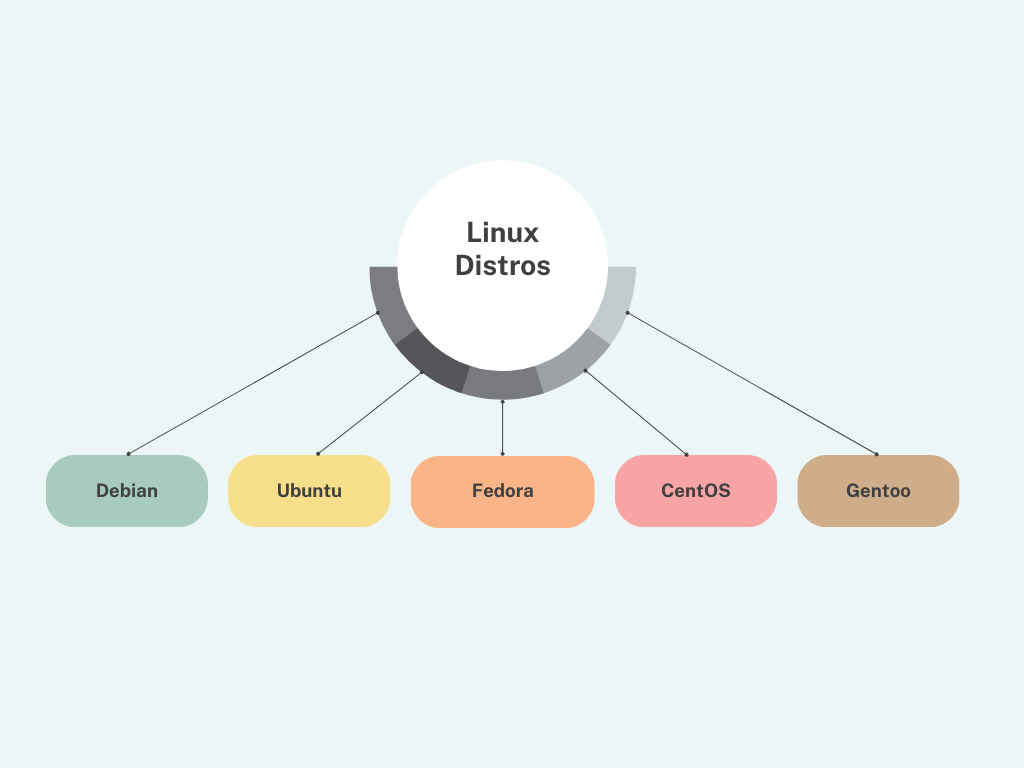
I recommend this very useful introduction to Linux distributions.
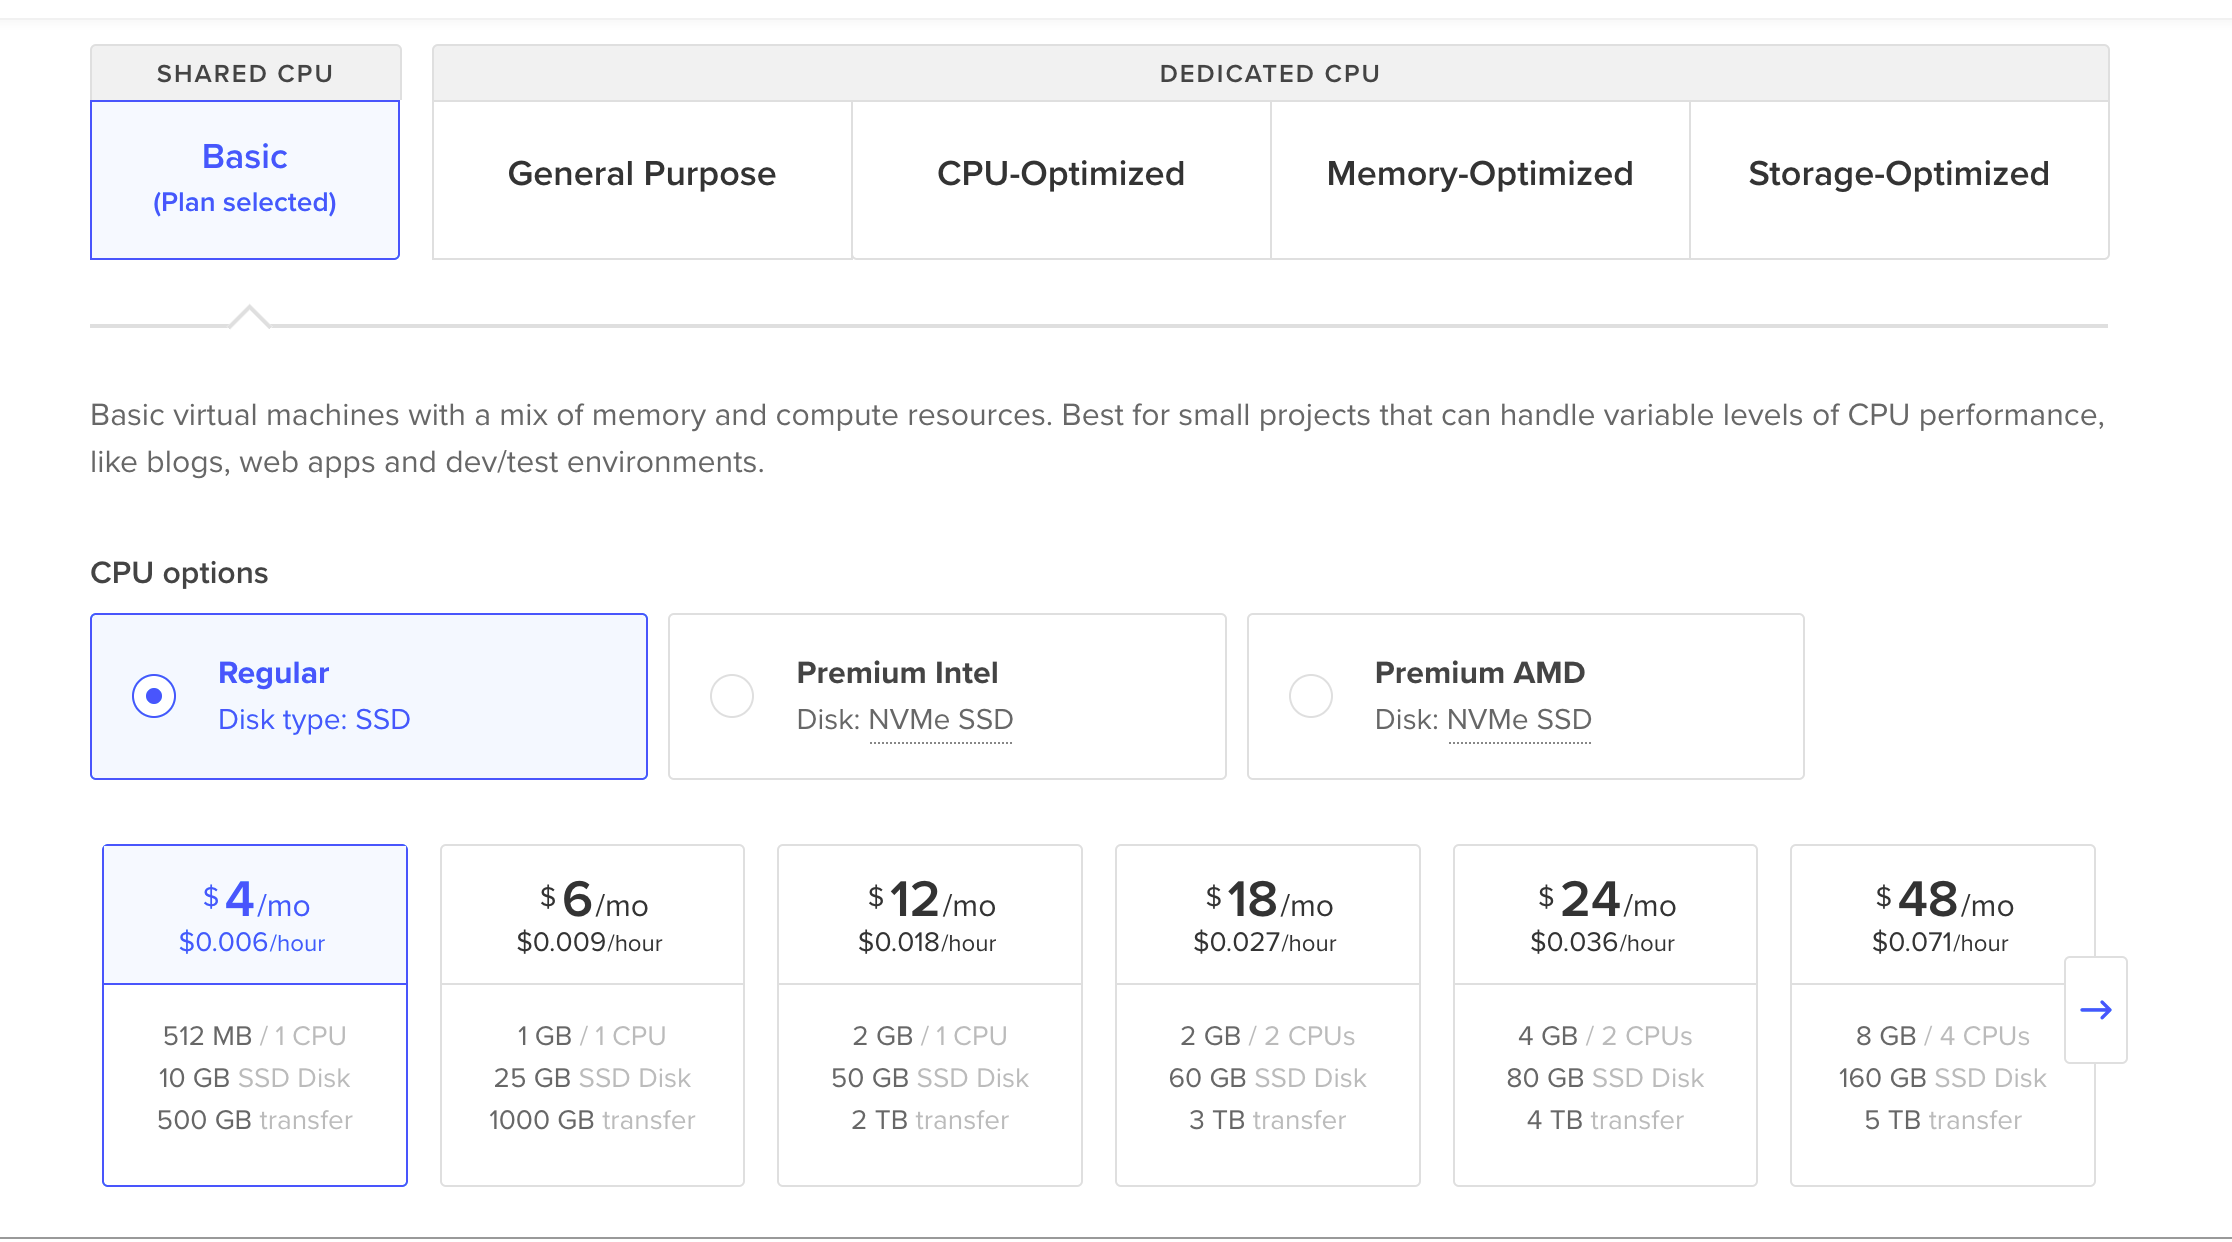
For the the size of the cpu and the cpu options (computer power), we will choose basic and regular at $4/mo.
The authentication method.
The next step is deciding how to get into the server? There are two options available on digital ocean :
- Password
- SSH keys.

SSH is one of the most secure option when it comes to server authentication.
A username and a password can be stolen and lost very easily, they can also be forgotten etc...
This is not a safe option, that is why we will choose SSH keys.
How does SSH Work?
SSH (Secure Socket Shell) is a network protocol that provides a secure way for two computers to connect remotely (client and a server).
There are two parts to an SSH key :
-
Public key: can be shared with others. It's analogous to locks that the corresponding private key can open. -
Private key: must be confidential. The private key is analogous to physical keys that can open one or more locks.
-
First step, the server uses the public key as the authentication method.
-
The client (your computer) compares the server’s public key to the stored private key stored in its system. If the keys match, the client and the server agree to use encryption to communicate during the SSH session. This means that for the duration of your SSH session, any commands that you type into your local terminal are sent through an encrypted SSH tunnel and executed on your server. SSH employs encryption to ensure that hackers cannot interpret the traffic between two connected devices.
How to use ssh keys to connect to the server?
First, run this command on your computer to create an ssh key :
$ cd ~/.ssh
$ ssh-keygen
Generating public/private rsa key pair.
The key fingerprint is: SHA256:S8lk7SSEVK5s2v8EDbJpFR5ezLVixOt9hWz4xATZlmg
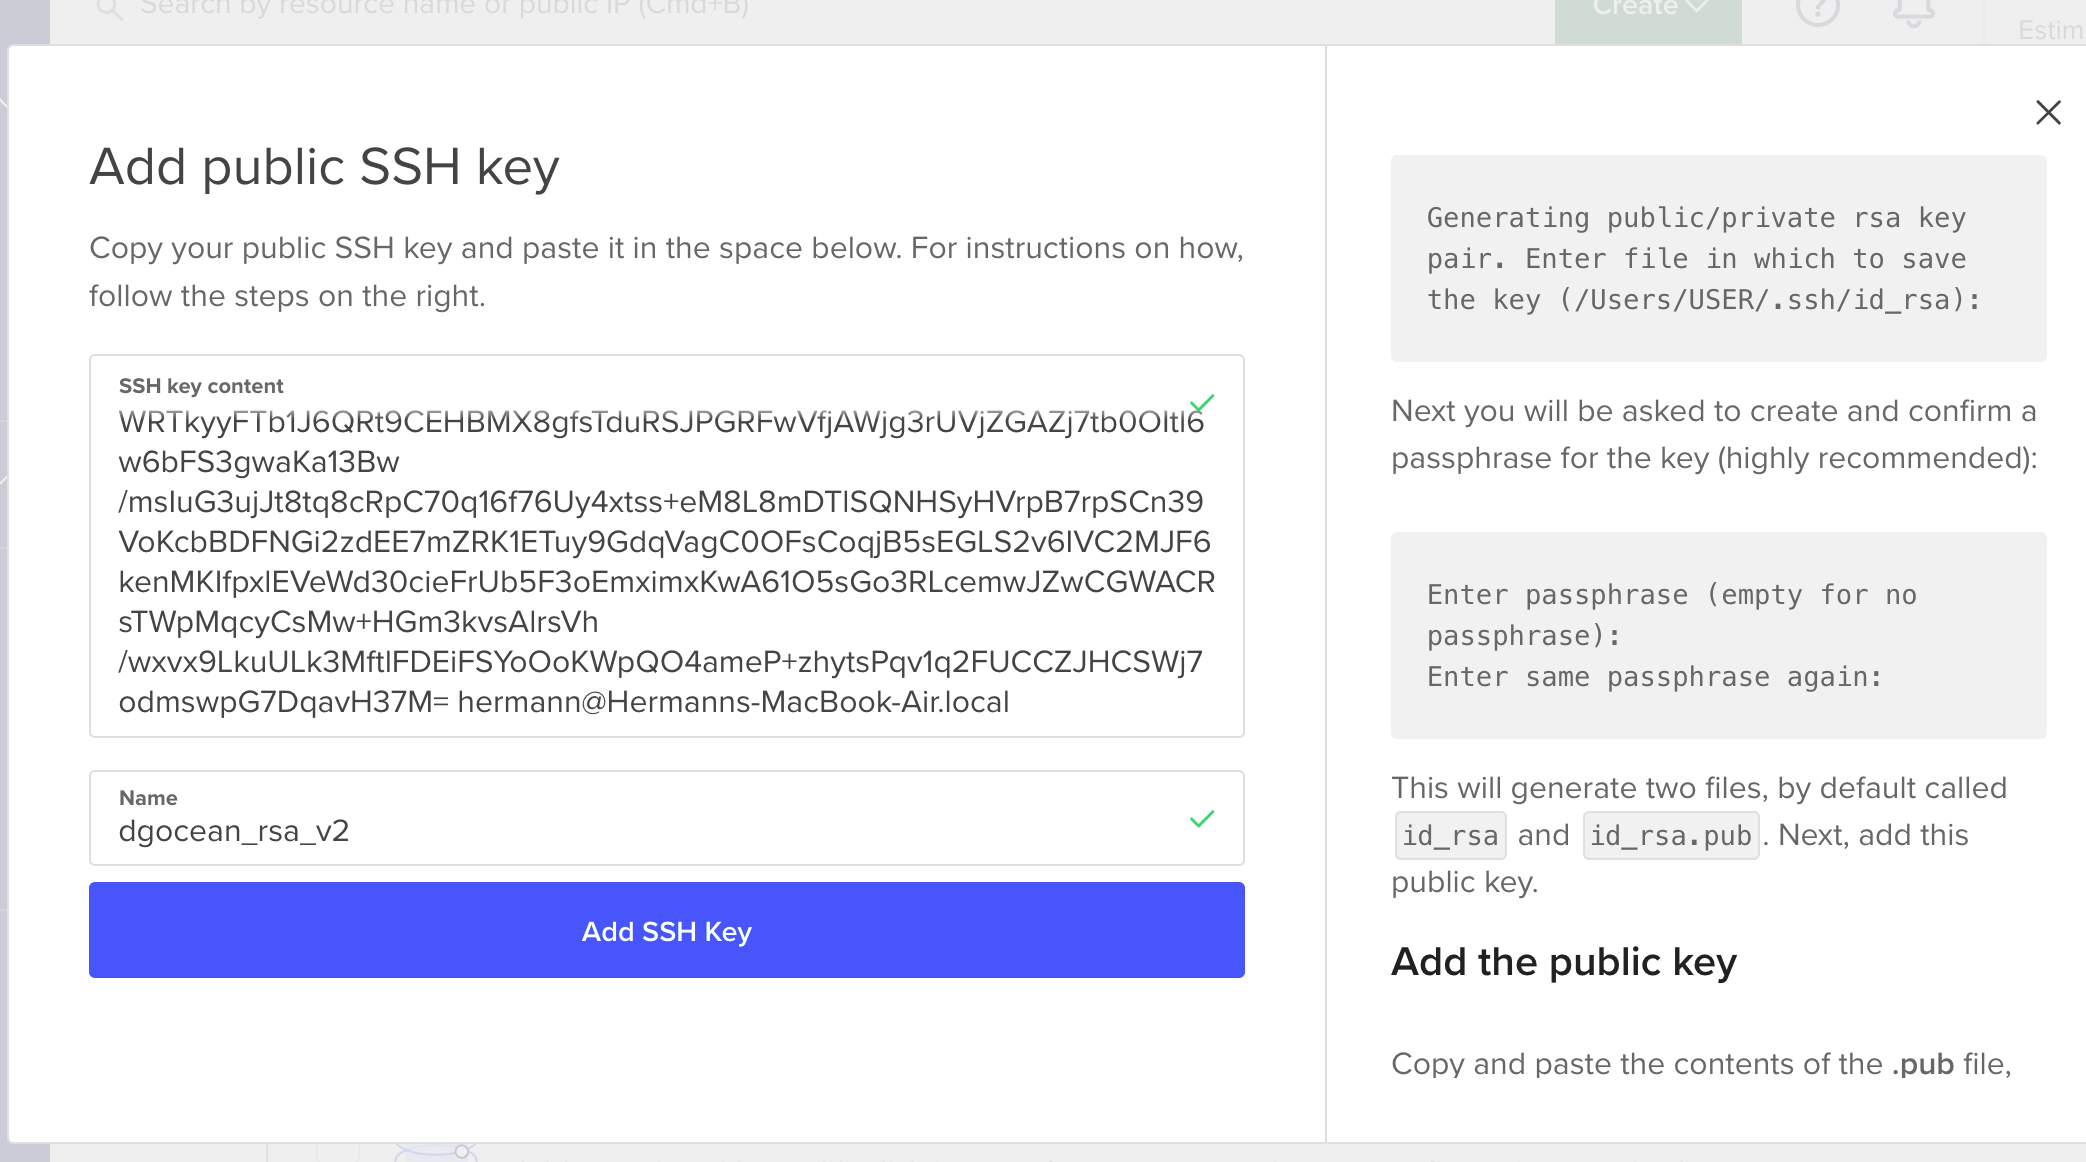
Once the key has been generated, we can open the the public key like this (I renamed mine dgocean_rsa_v2 ) :
$ cat dgocean_rsa_v2.pub
N83sYz0Ll5mM5BZ915IXgjA5erYtqGNuJ9cNaf0z8z7fKh90Xd6fWRTkyyFTb1J6QRt9CEHBMX8gfsTduRSJPGRFwVfjAWjg3rUVjZGAZj7tb0OItl6w6bFS3gwaKa13Bw/msIuG3ujJt8tq8cRpC70q16f76U
Copy it and head back to digitalocean.com.
Paste the public key, click on "add ssh key"
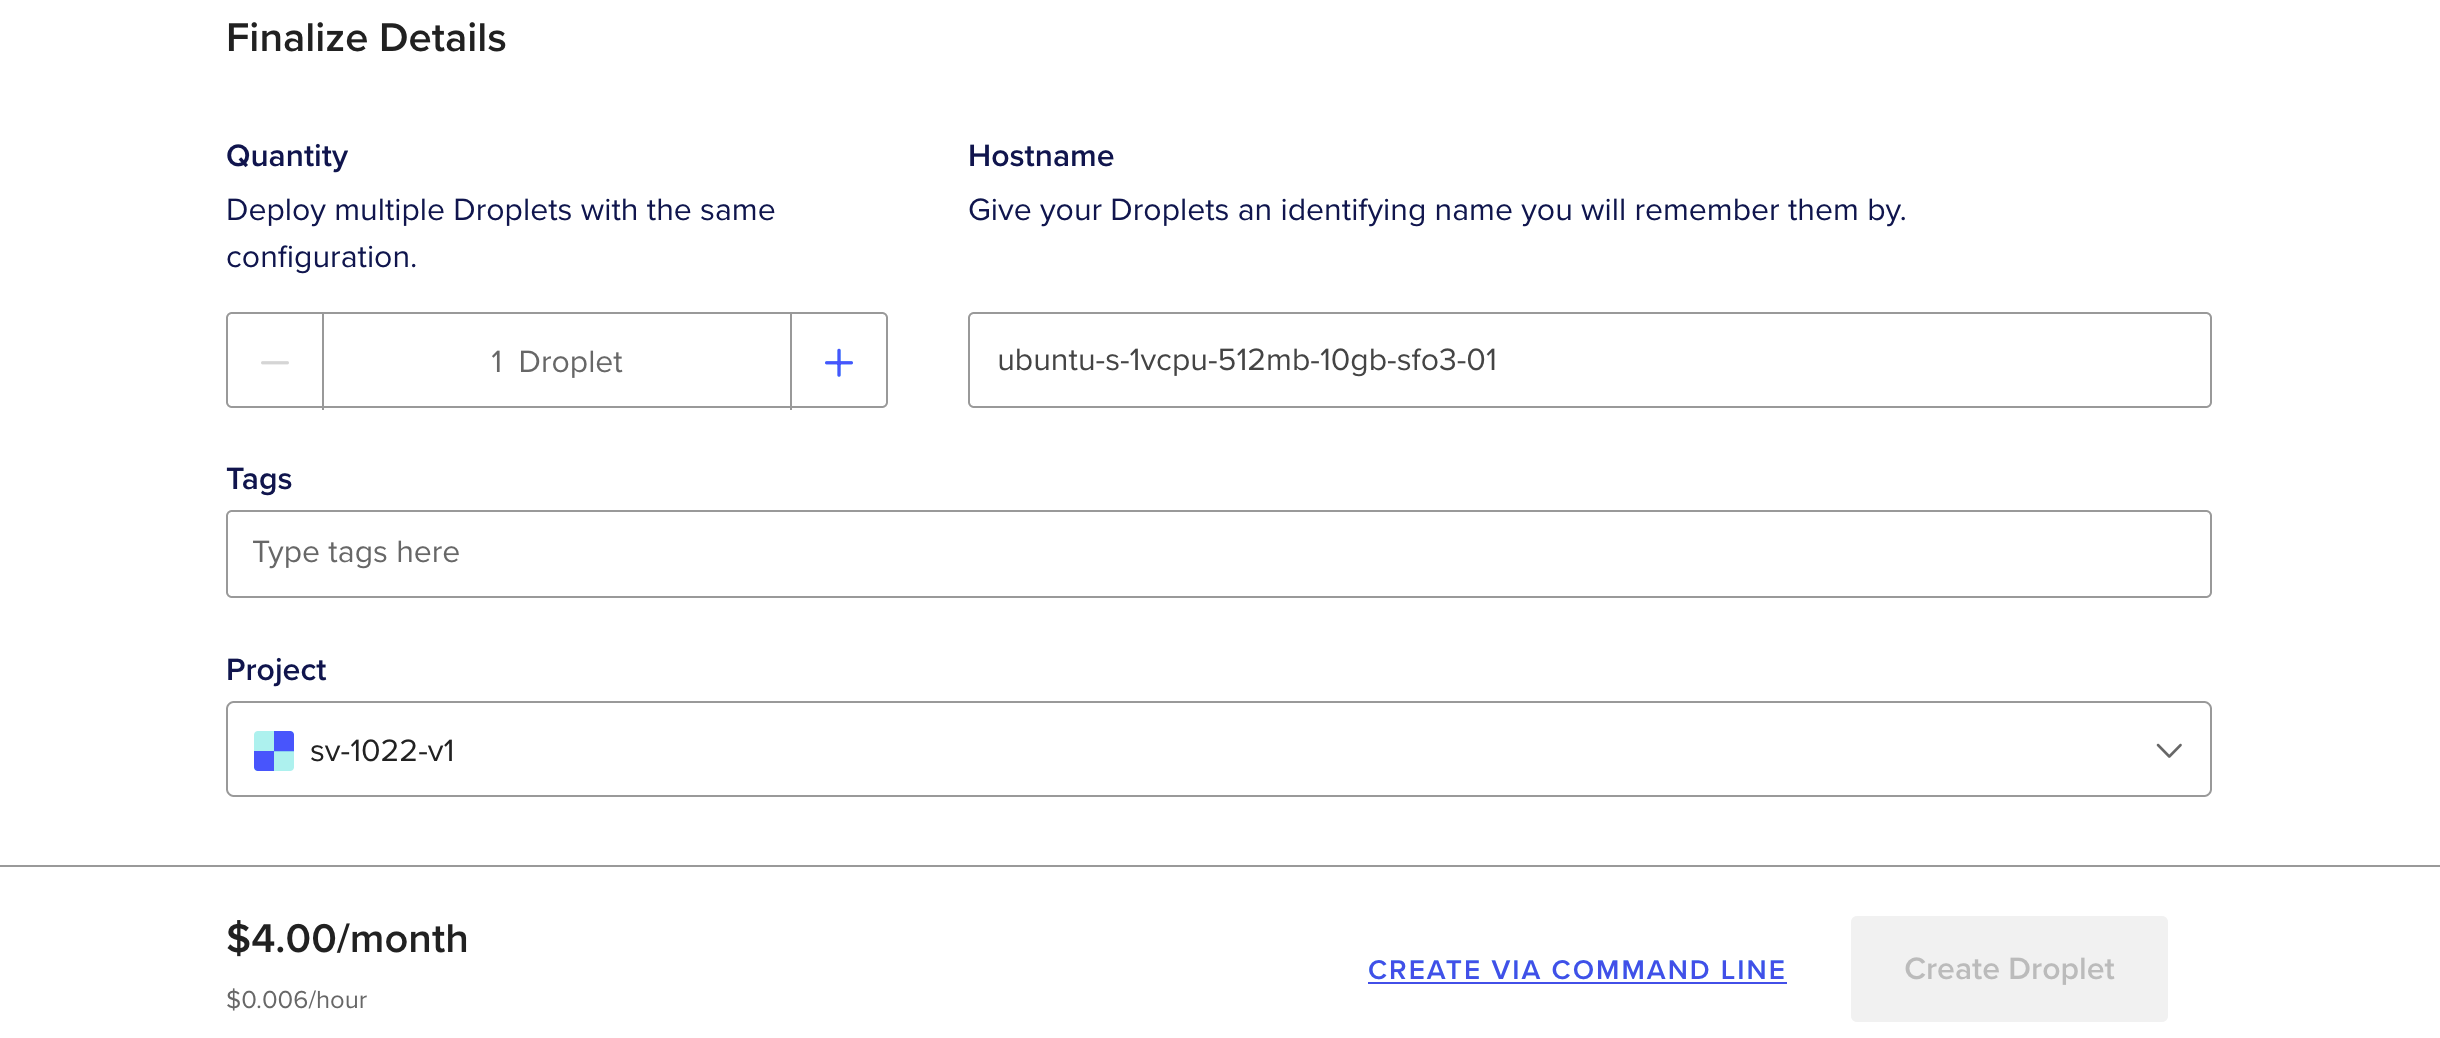
Choose a hostname and click on "create droplet" :
And that's it, we created a server to host our application.
Once the server is online, we will be assigned an IP address that we will use to log in to the server.

Here are the most commonly used commands:
- To SSH into the server :
$ ssh root@<your_IP_address>
- To SSH into your server with the private key :
$ ssh -i ~/.ssh/<your_private_key> root@<your_IP_address>
2.Exit your server
$ exit
If you did everything correctly, you can log in to the server using the command above. Once you have logged in, you should see something like this:
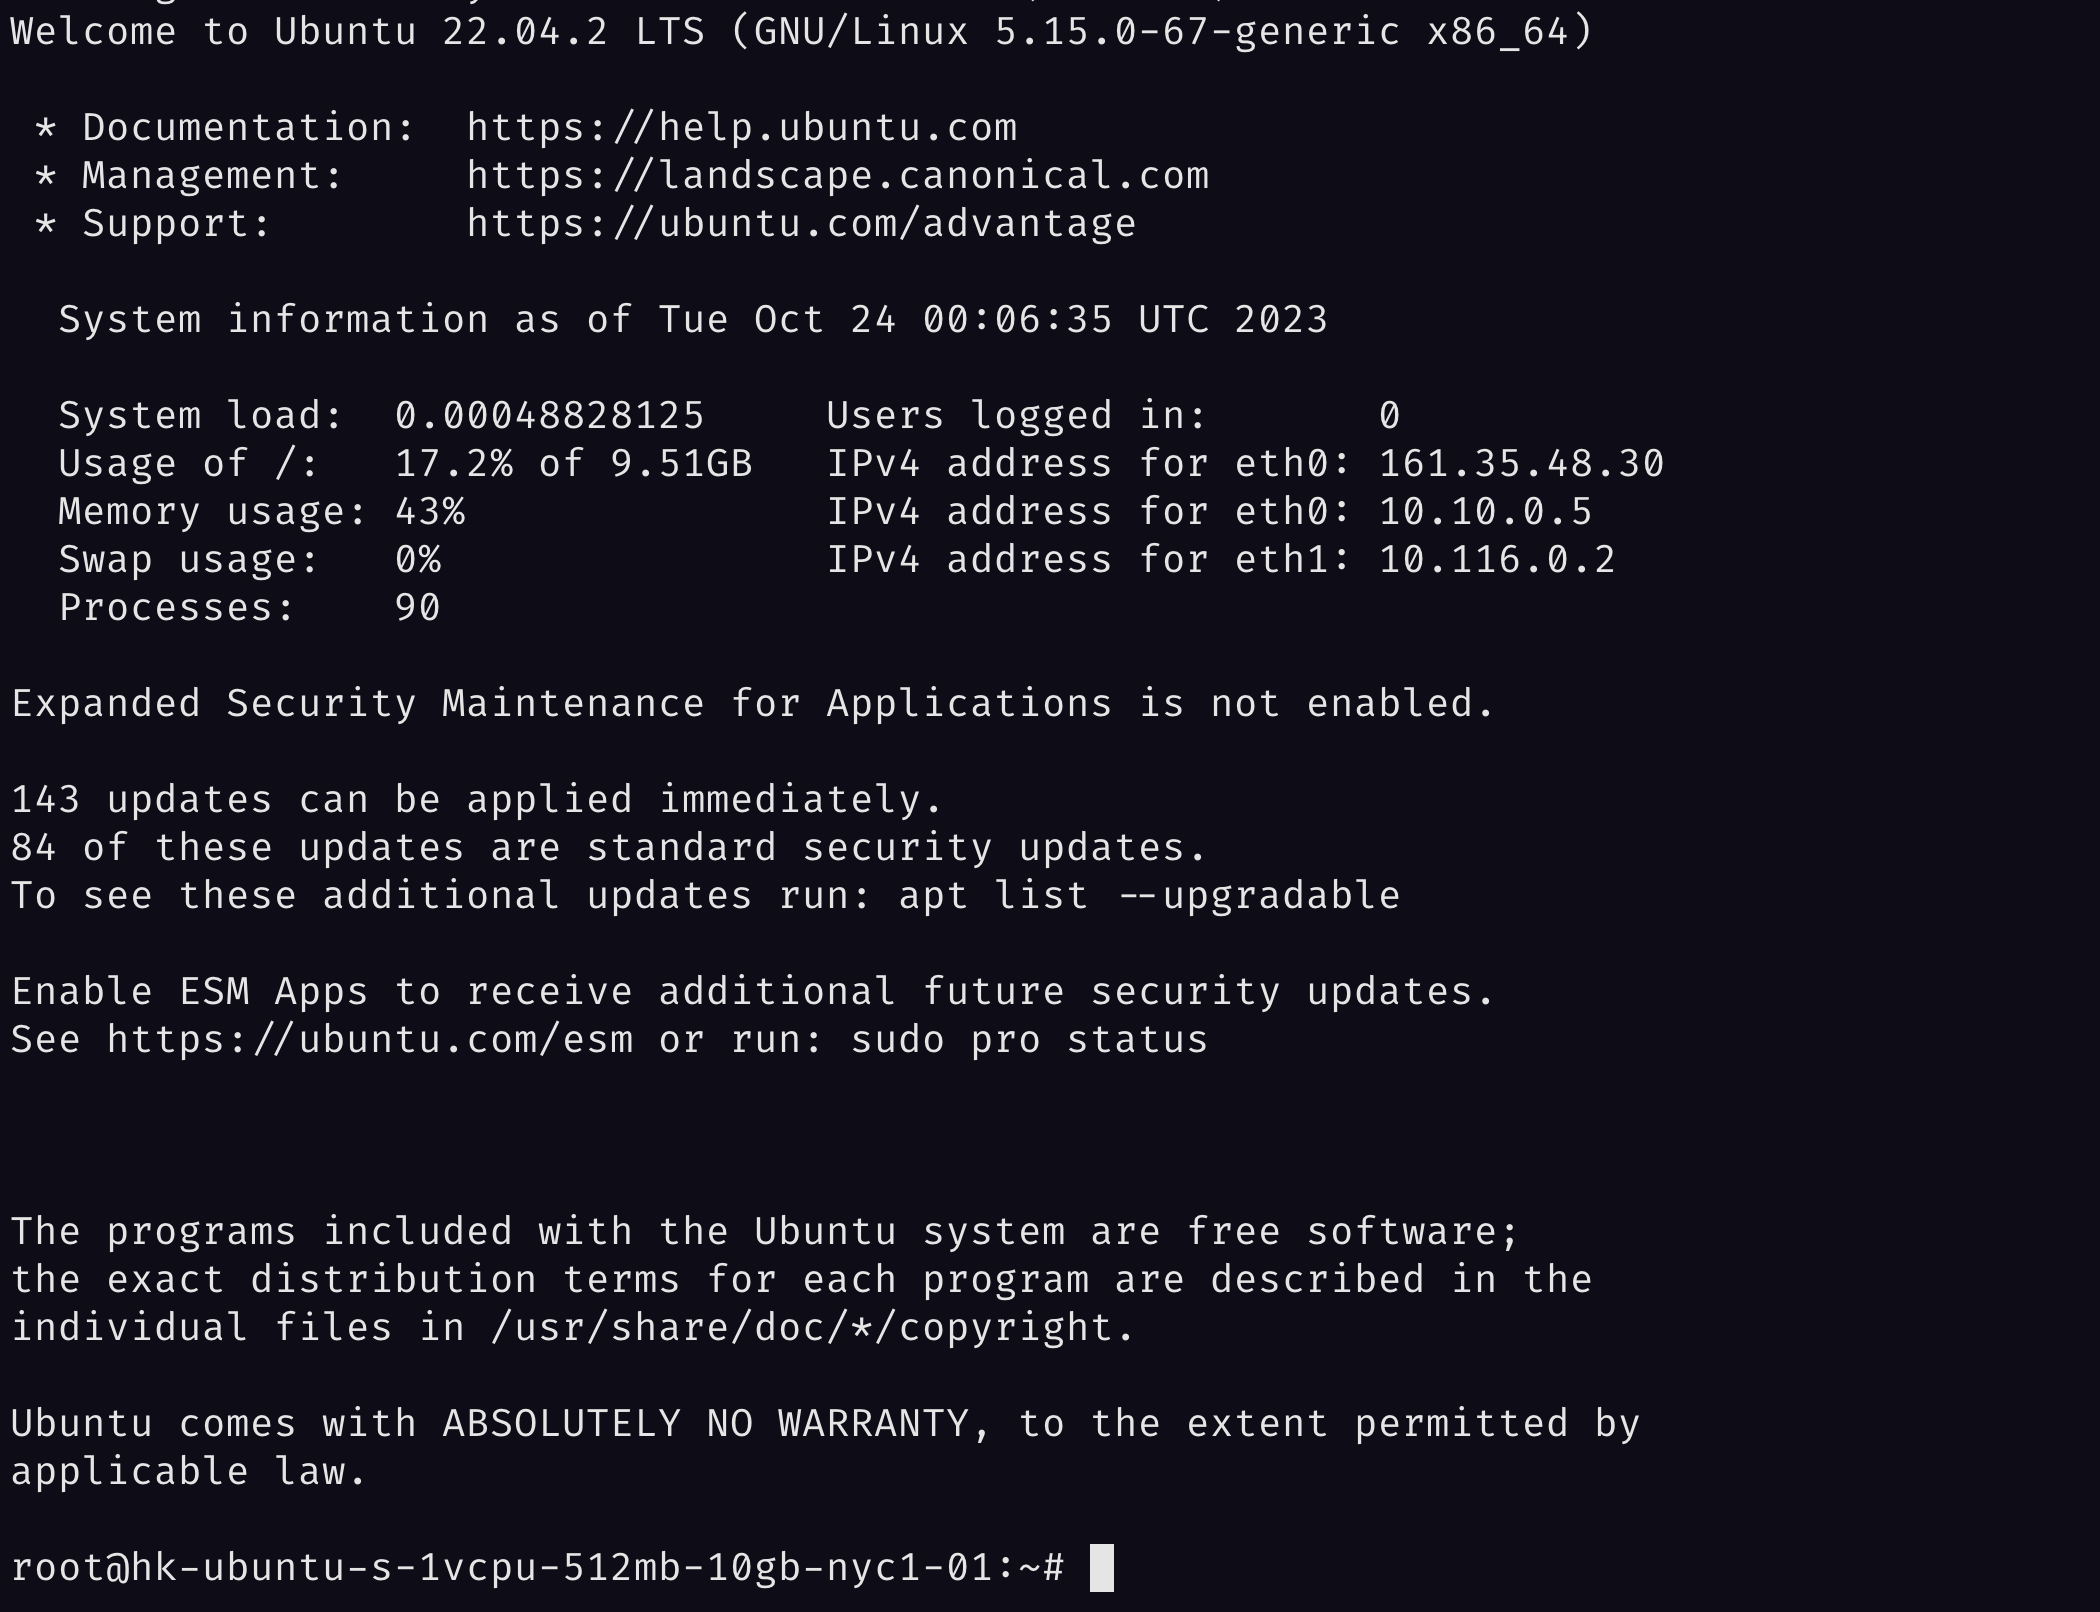
Congrats, we are in!.
The Internet
We have a server and we logged into it with our ssh key, in this section we are going to buy a domain and connect it to the server. But before we jump into it, let's go over some important internet concepts.
Terminology
Internet: network of networksIntranet: private networkLAN: local area networkWAN: wide area networkIP: Internet protocolIP Address: Numeric label assigned to a device connected to the internetTCP: Transmission control protocolUDP: User datagram protocolICMP: Internet control message protocolPacket: Unit of data transmitted over a network
How does the internet work?
The core of the internet is built on cooperation and rules. Take a look at this diagram :

This is very simplified version version of how an internet request works :
- Your computer has a network card
- The network card talk to a router which enables you to have an I.P address
- The router is connected to a modem that is also connected to your ISP (the organisation paid to provide internet access)
- The ISP is eventually going to connect to a Tier One ISP, known as the backbone of the internet
- The Tier one ISP will likely connect to a data center somewhere in the world
- The data center will have a server cluster that can be owned by anybody
- The server cluster will likely have a load balancer to distribute the request load among the servers
- The load balancer is ultimately connected to your own server.
Network Commands
Chech the status of a network host: is the host up or down?
$ ping google.com
Follow the path of your request: From the router all the way up to the load balancer that serves the request
$ ping google.com
Show network status
$ netstat -lt | less
DNS and URLS
Domain name system
A domain name system (DNS) is comparable to a phone book. Instead of memorizing an IP address like 127.0.0.1, you can remember google.com, netflix.com etc..
Nameservers holds DNS records to translate domain name into IP addresses and here's how it works:
- We use the browser on our computer to browse "google.com"
- The browser send the request to nameservers
- Nameservers translate "google.com" into an IP address and the request is sent to google servers
- Google servers respond with some data
There are two type of records :
- DNS record, maps a name to an IP address
- CNAME record, maps a name to another name
To lookup the nameservers for a domain :
$ ns lookup google.com
To lookup the DNS record for a domain :
$ dig frontendmasters.com
The anatomy of a URL
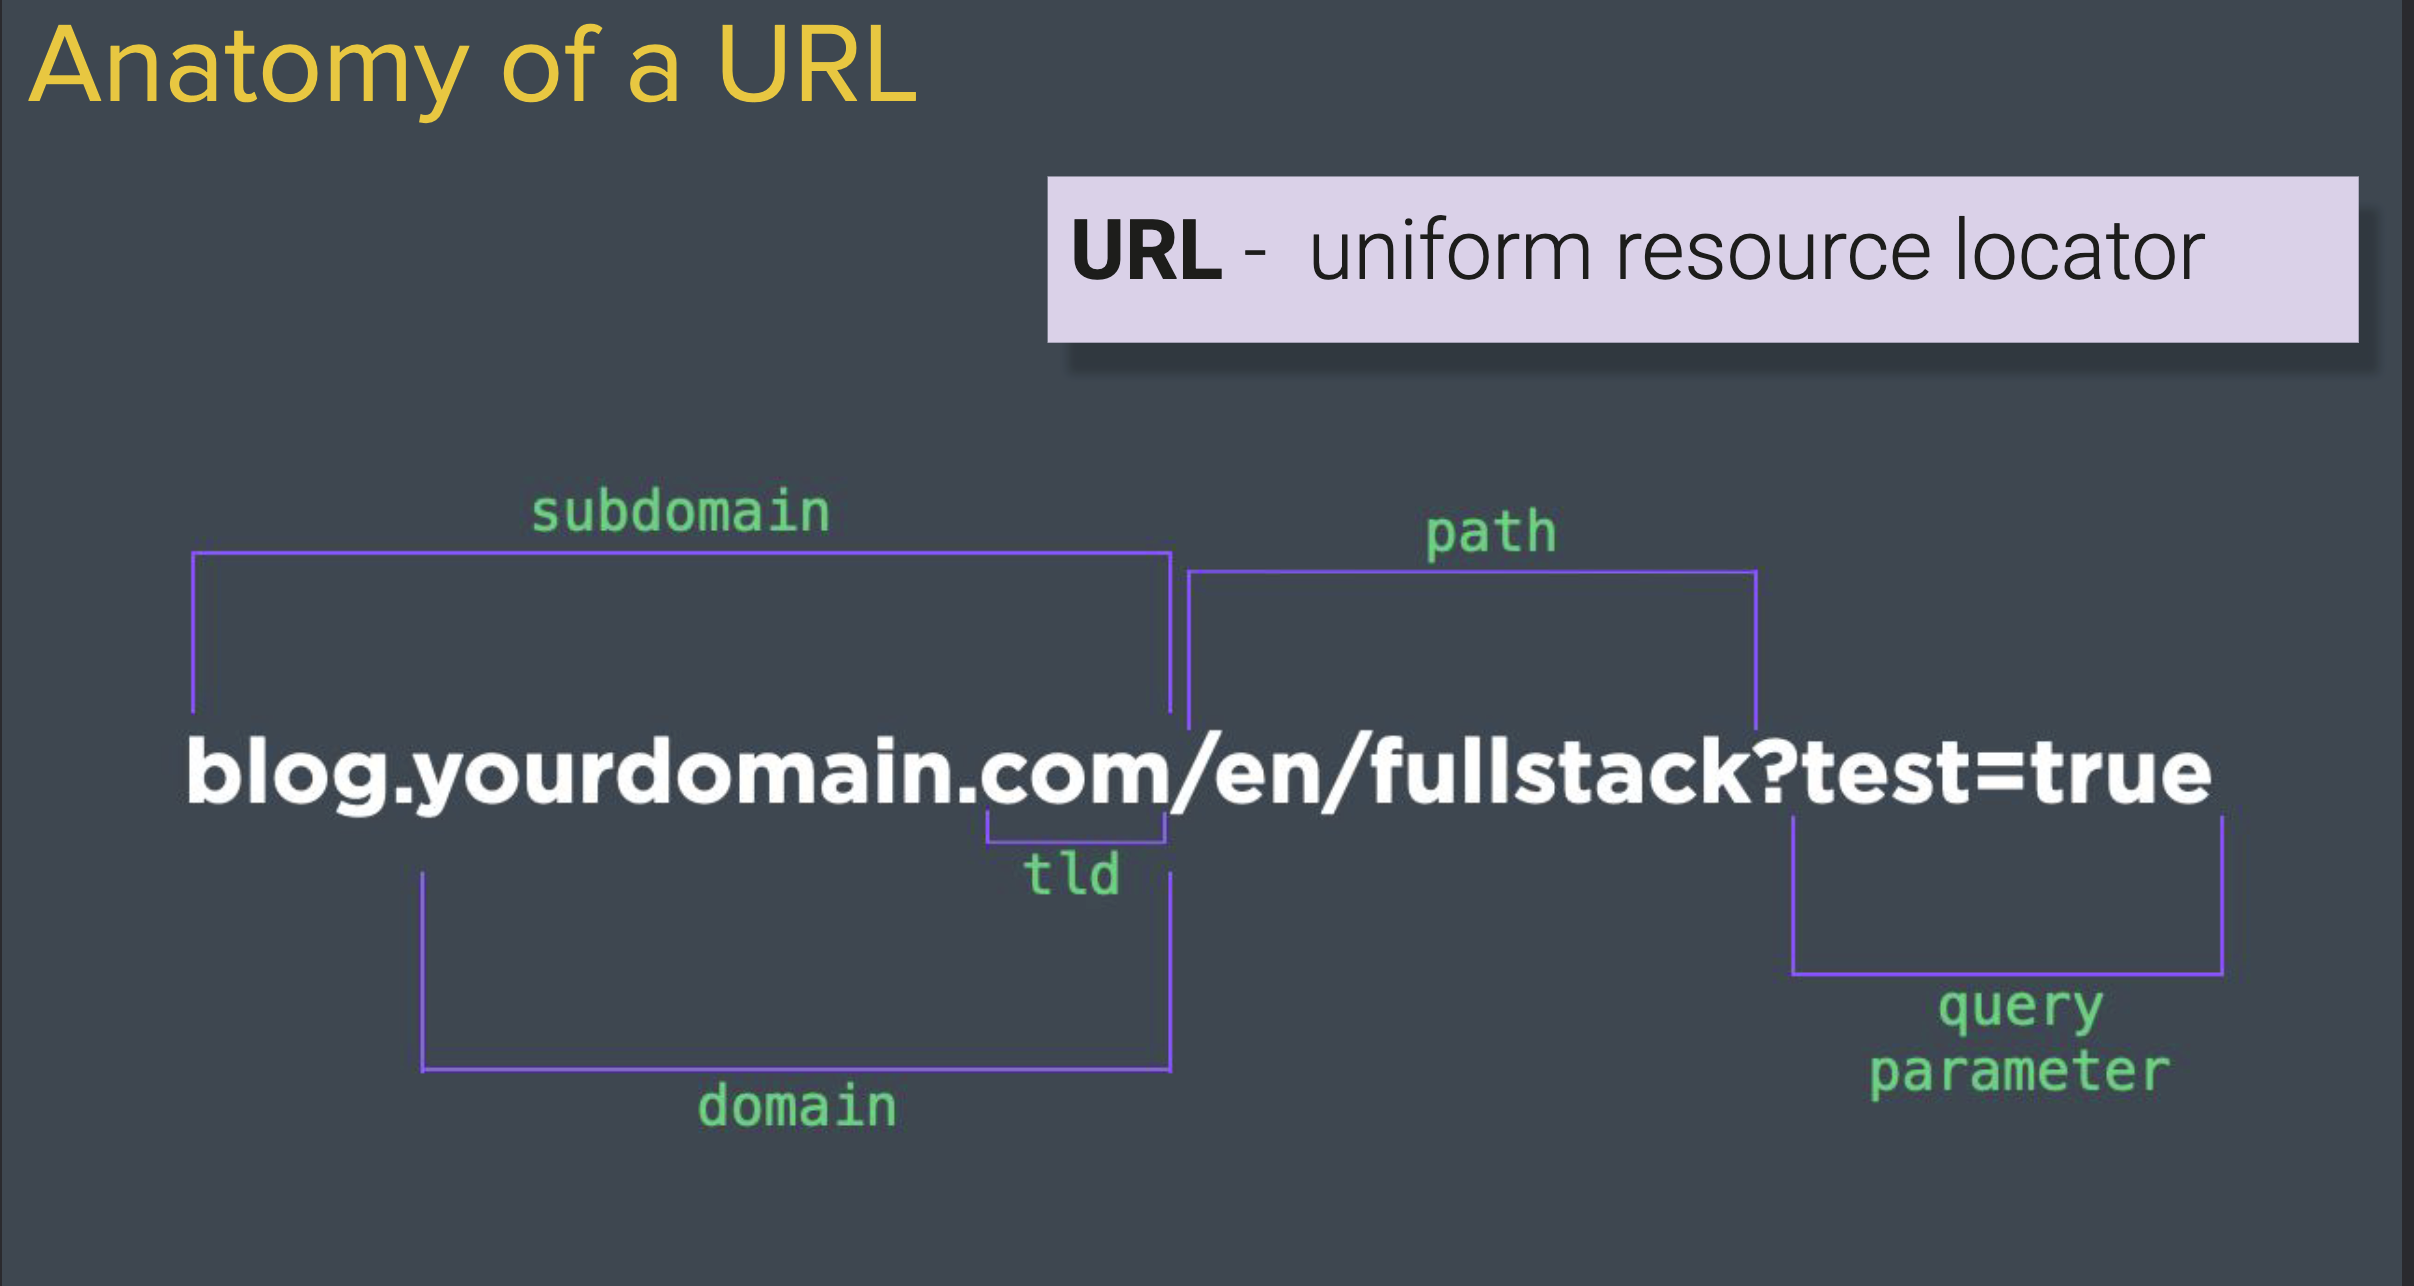
We can break an URL down into three parts :
- A subdomain : prefix the domain
- A domain : yourdomain.com
- TLD : top level domain, owned by organisation like ICAAN
- A path : anything after the domain is called the path
- Query parameters : anything after the path followed by a question mark
Buying a domain
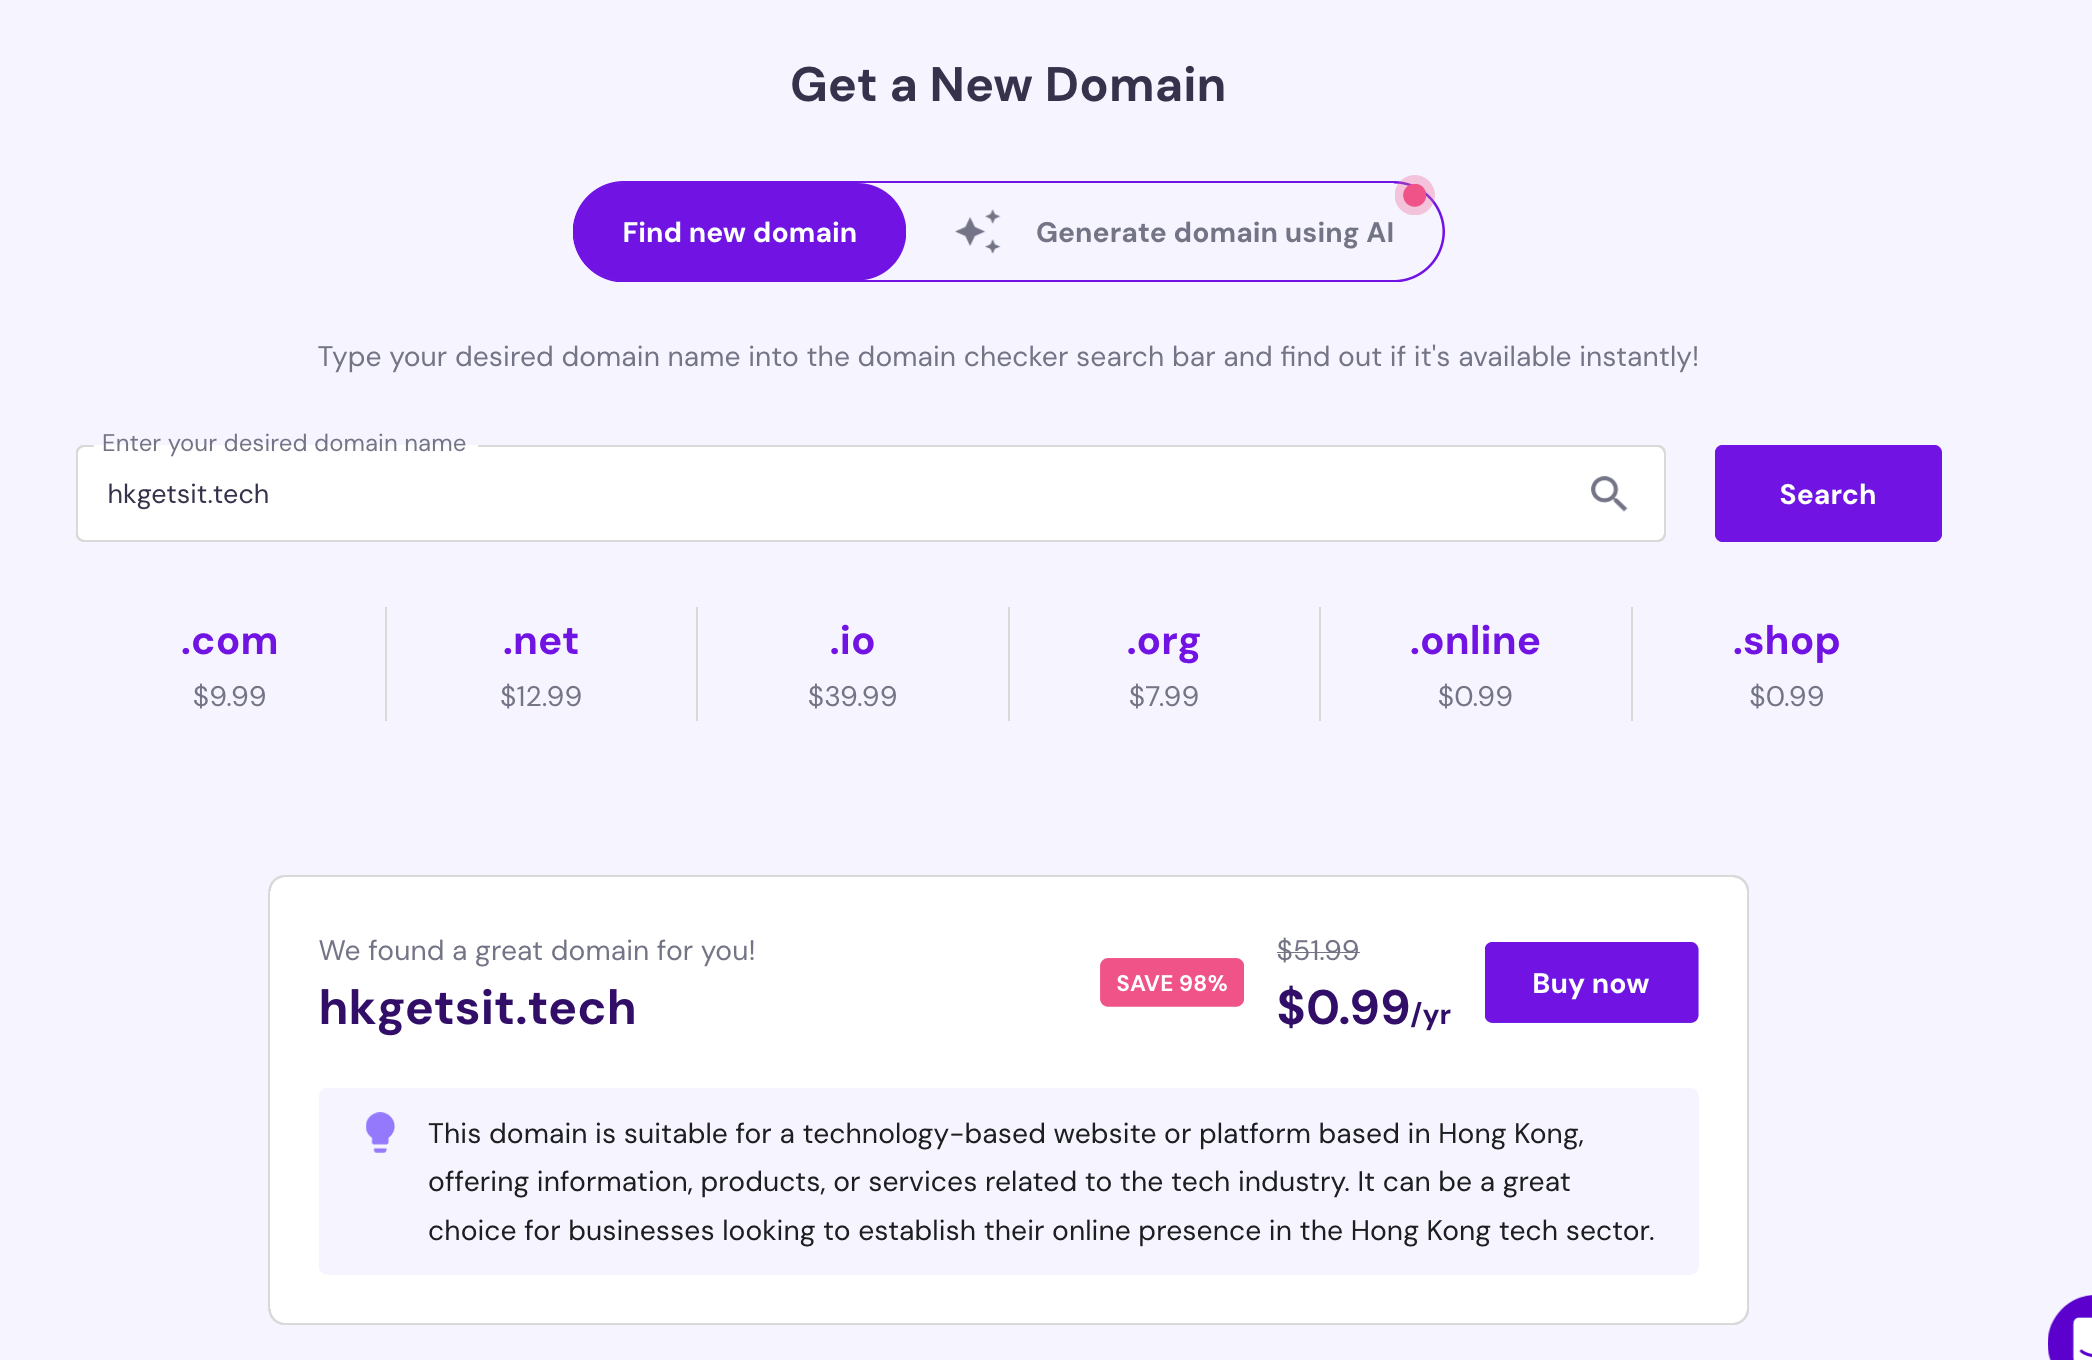
- Go on hostinger.com, create an account and search for a domain. We are going to purchase "hkgetsit.tech" :
Once you purchase your domain, you should be redirected to a dashboard like this:
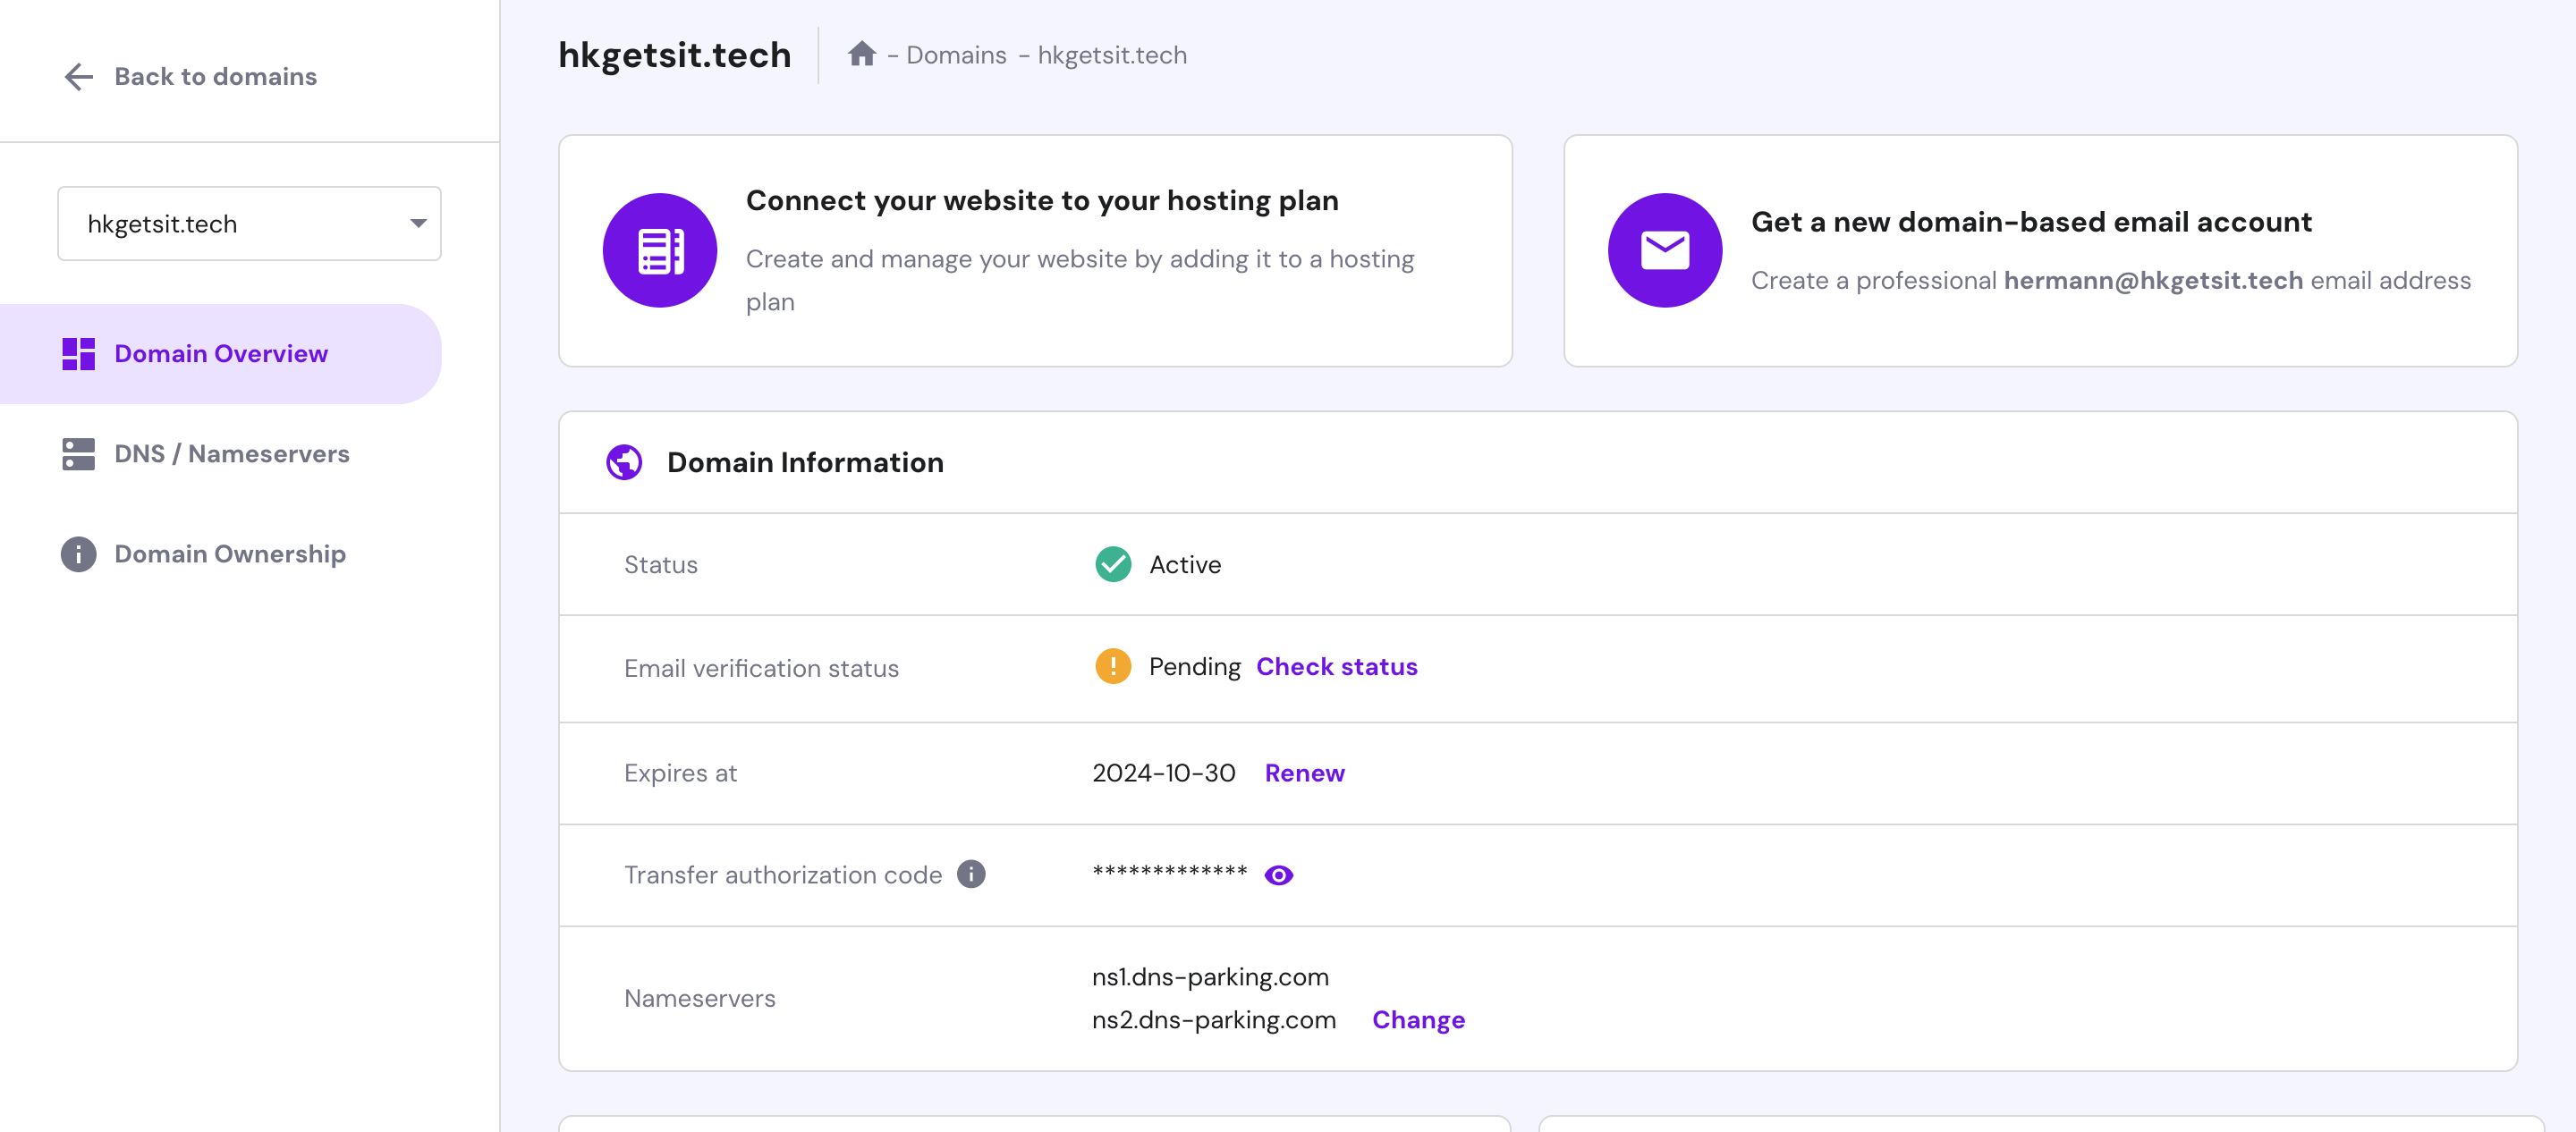
- We're going to update our nameservers to connect our server's ip address to our domain name.
Click on DNS/nameservers and change the nameservers to :
- ns1.digitalocean.com
- ns2.digitalocean.com
- ns3.digitalocean.com
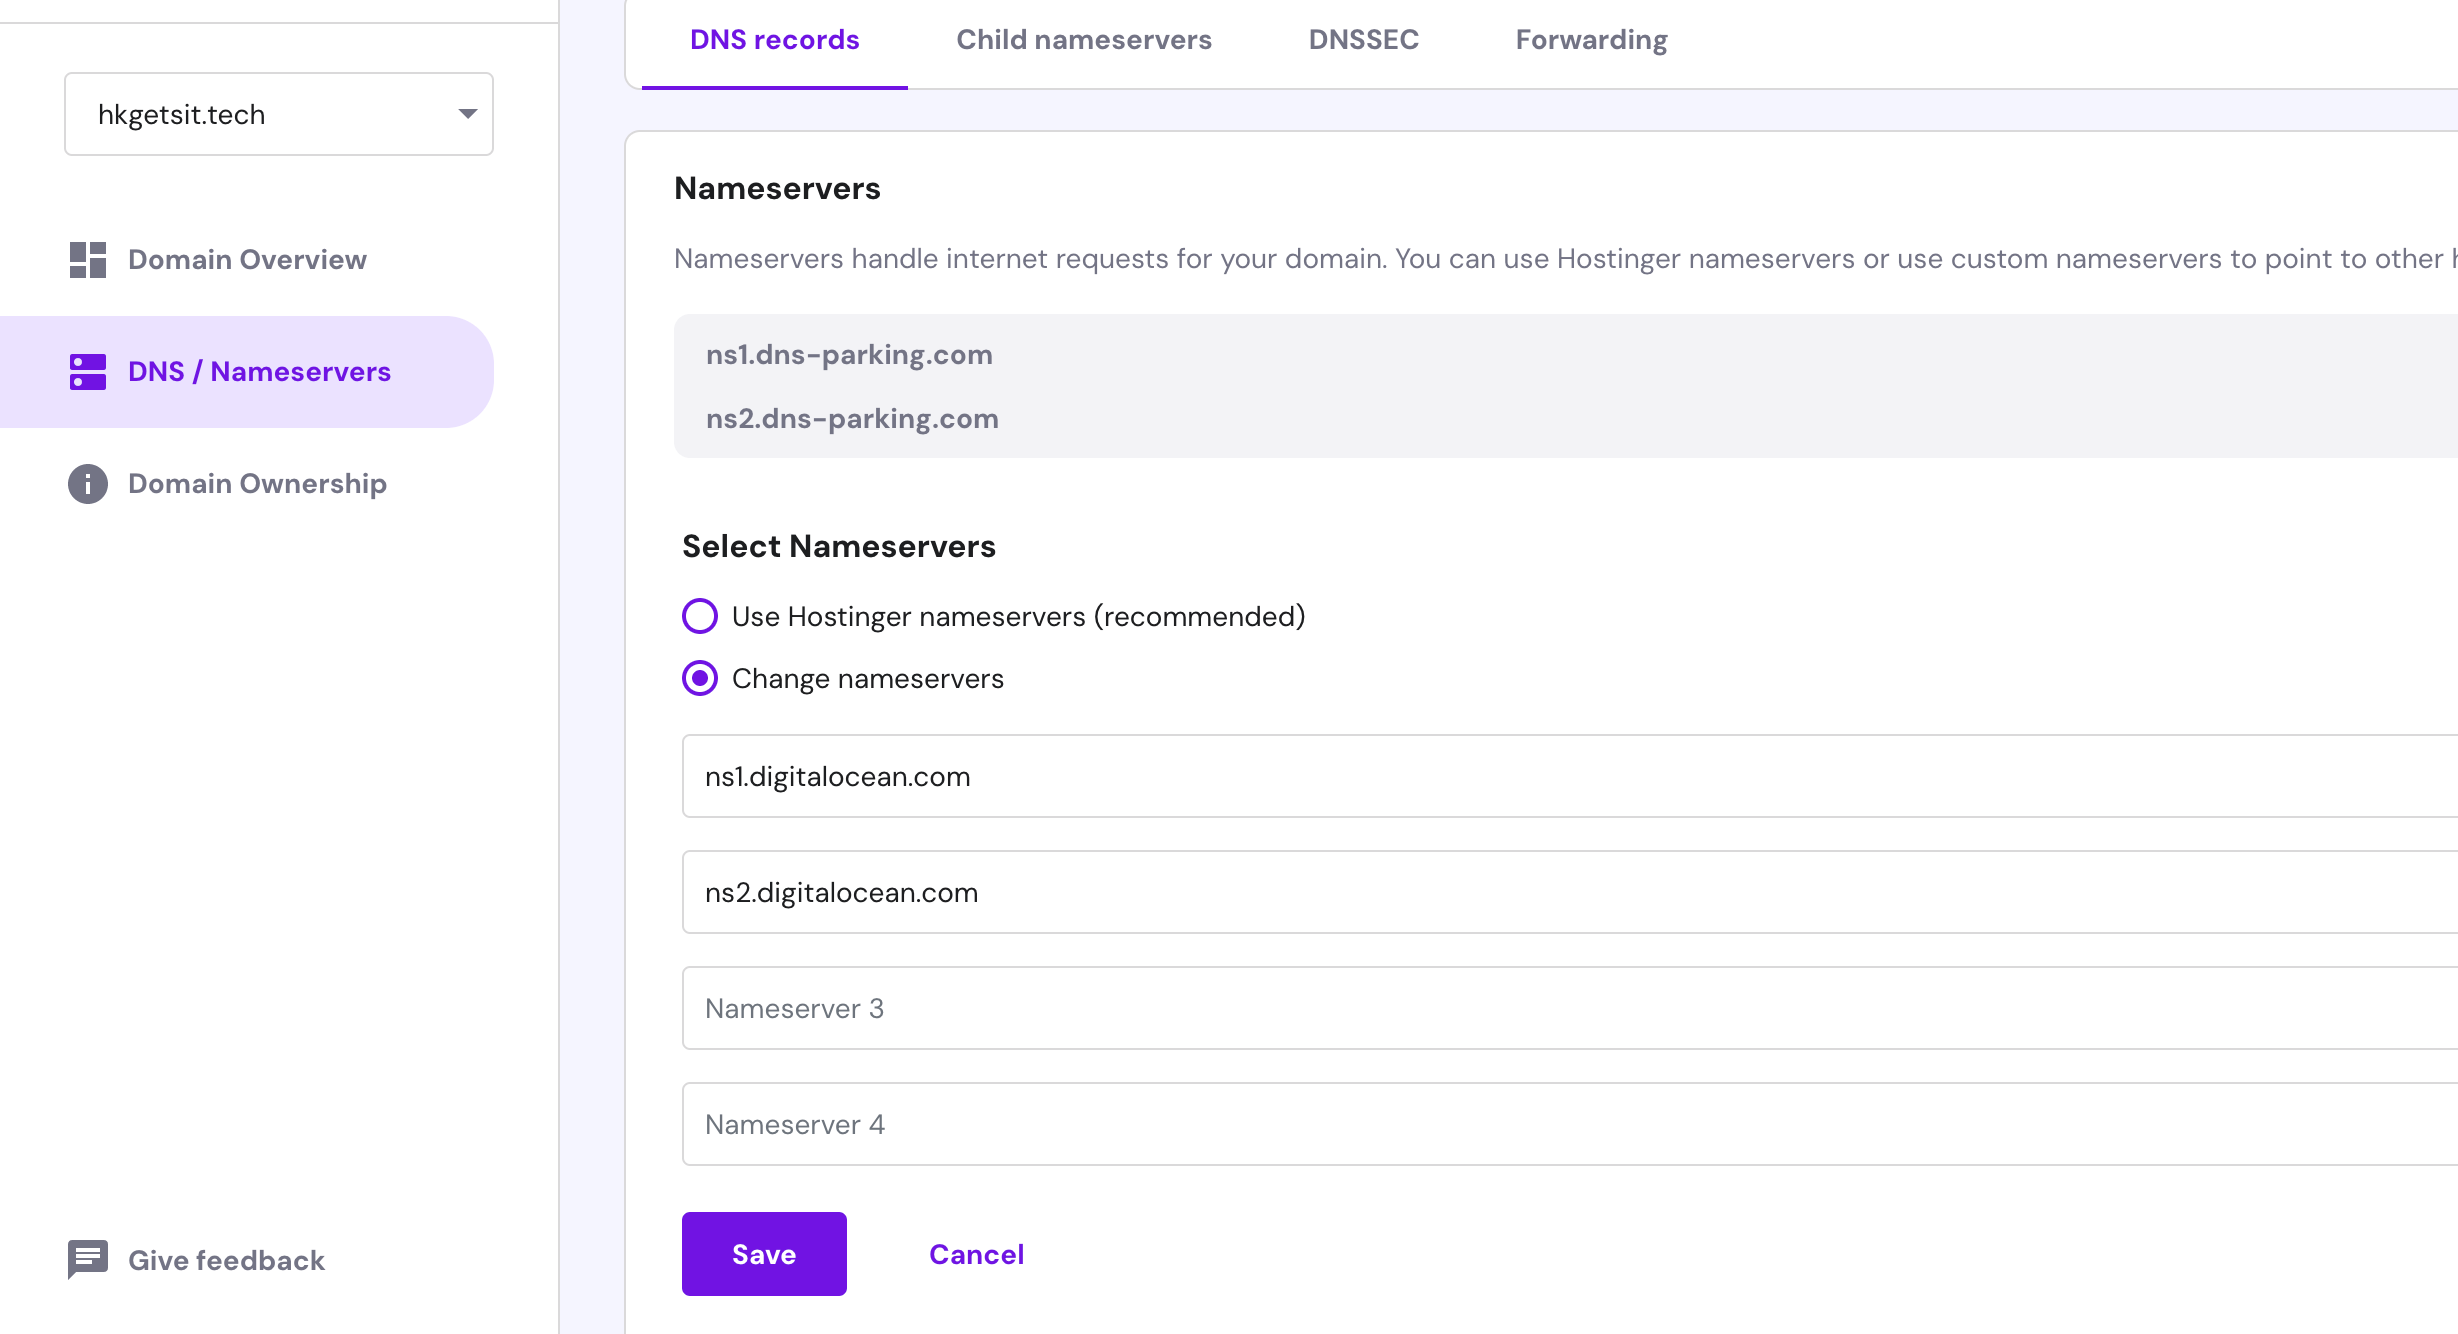
Digital ocean will be the authoritative answer as far as where the domain actually goes.
Save it!
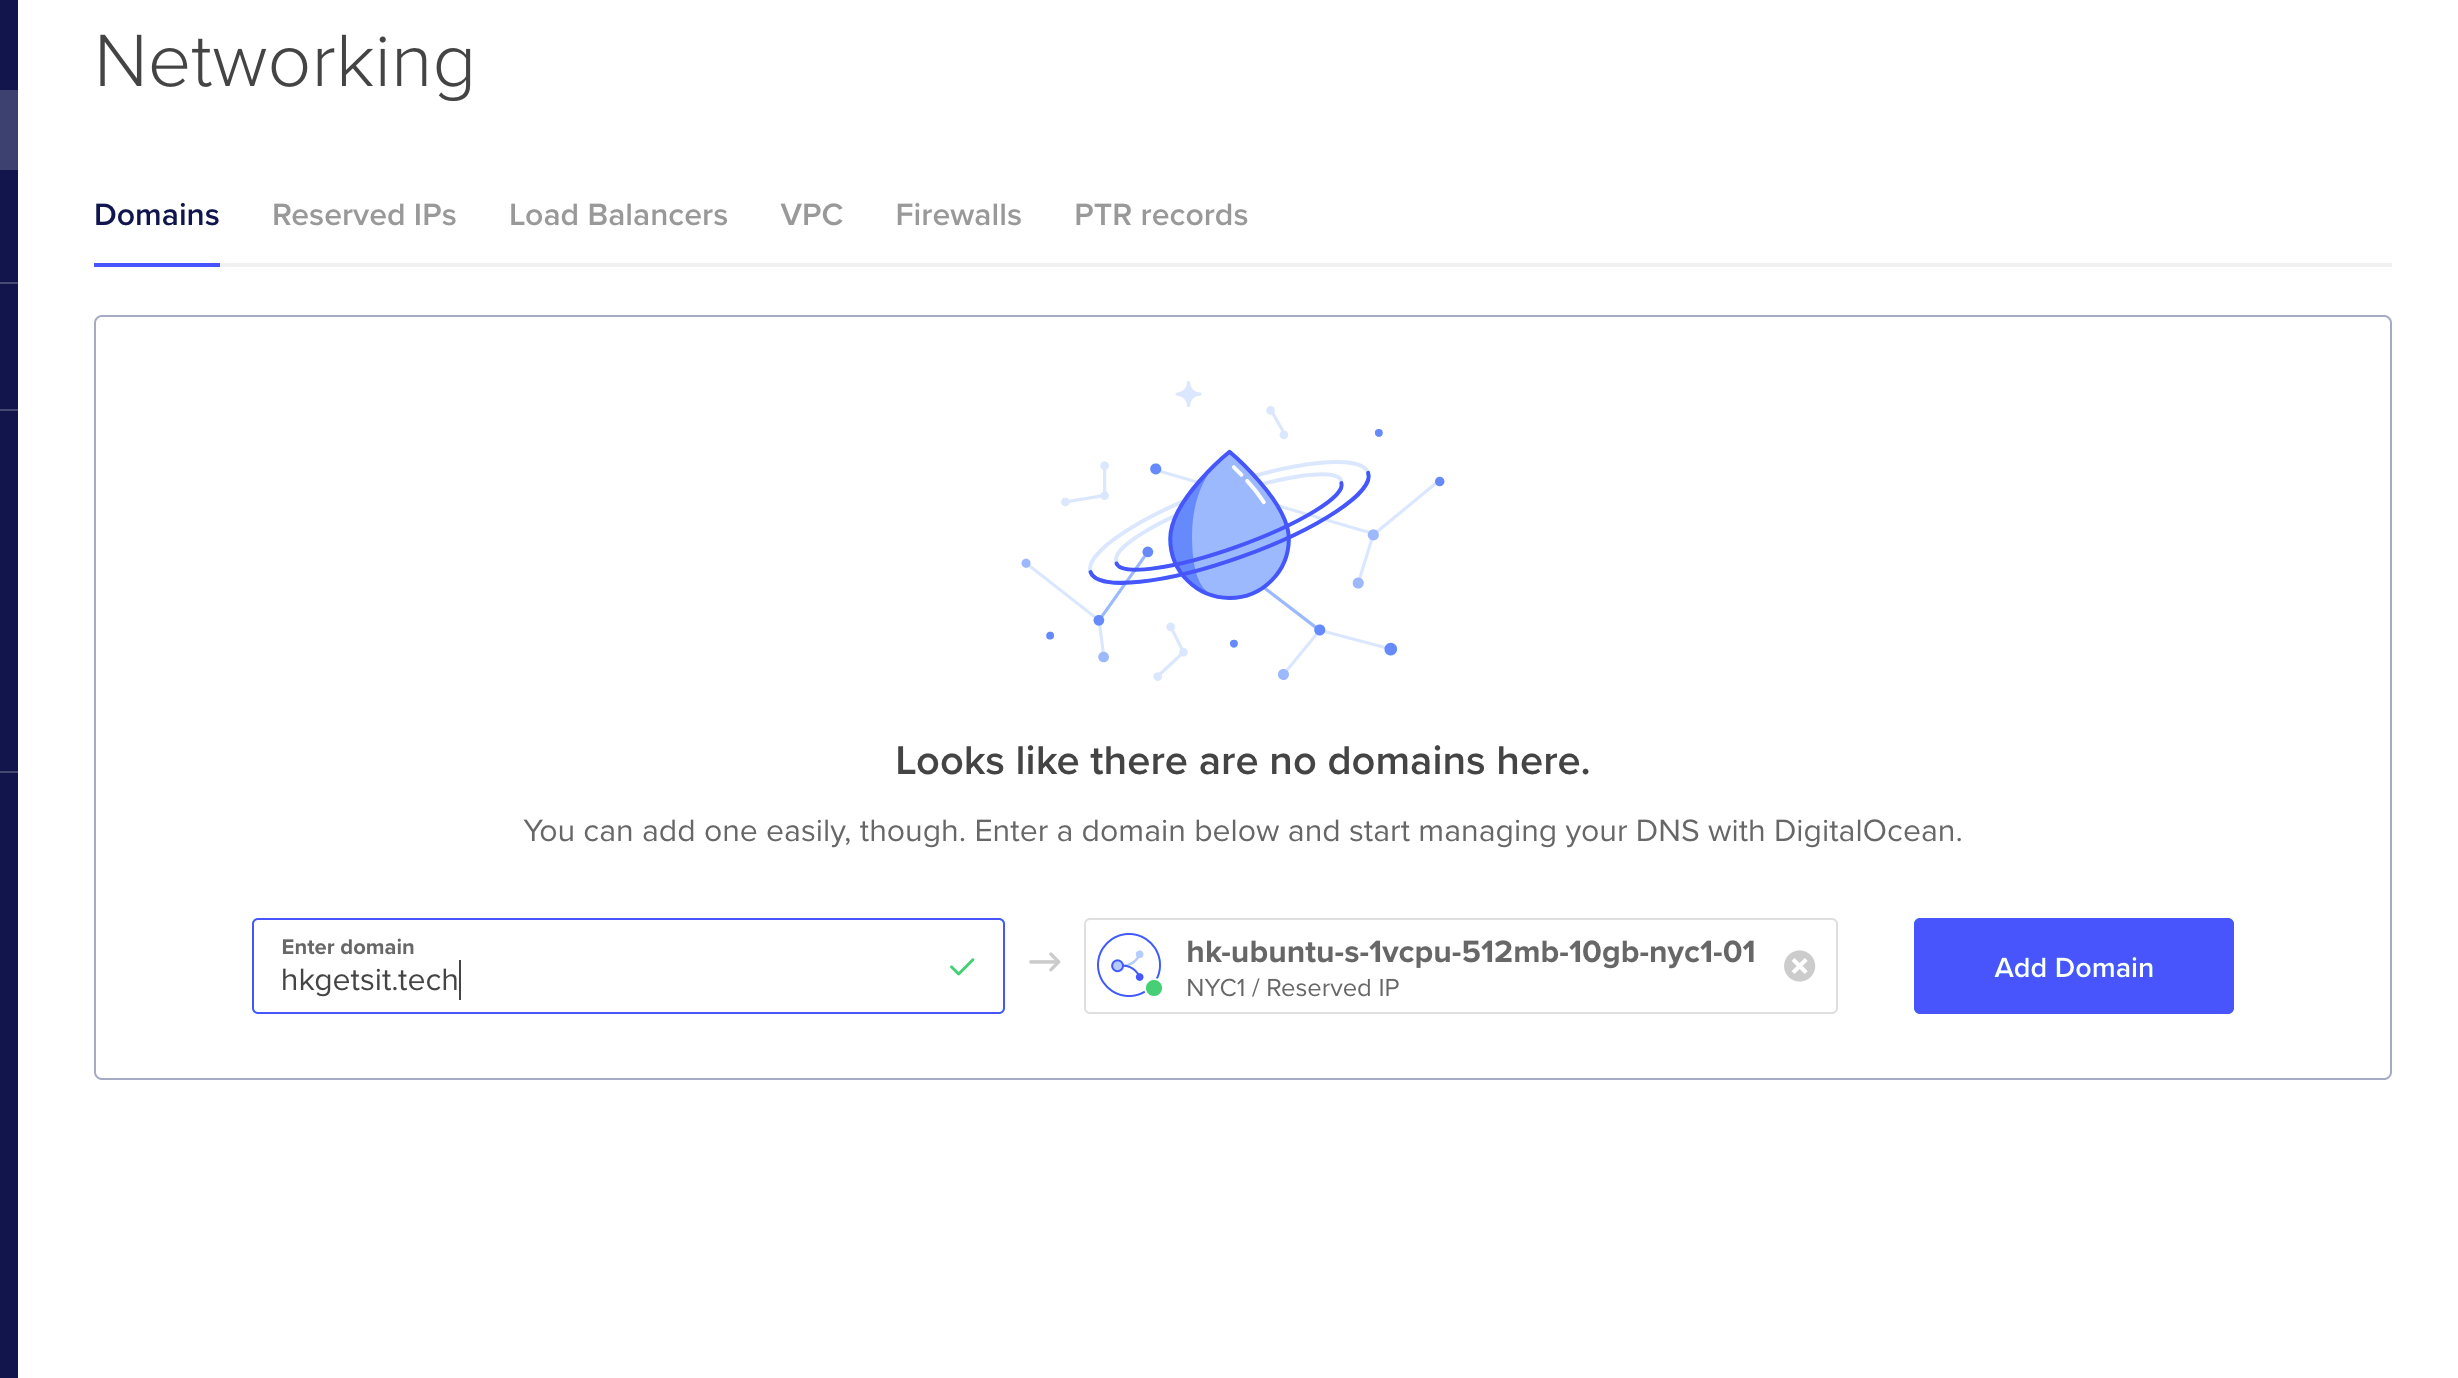
Back on digitalocean.com :
Click on the droplet, add domain, and add your domain.
We are going to add "hkgetsit.tech" :
You should be redirected to a page like this :
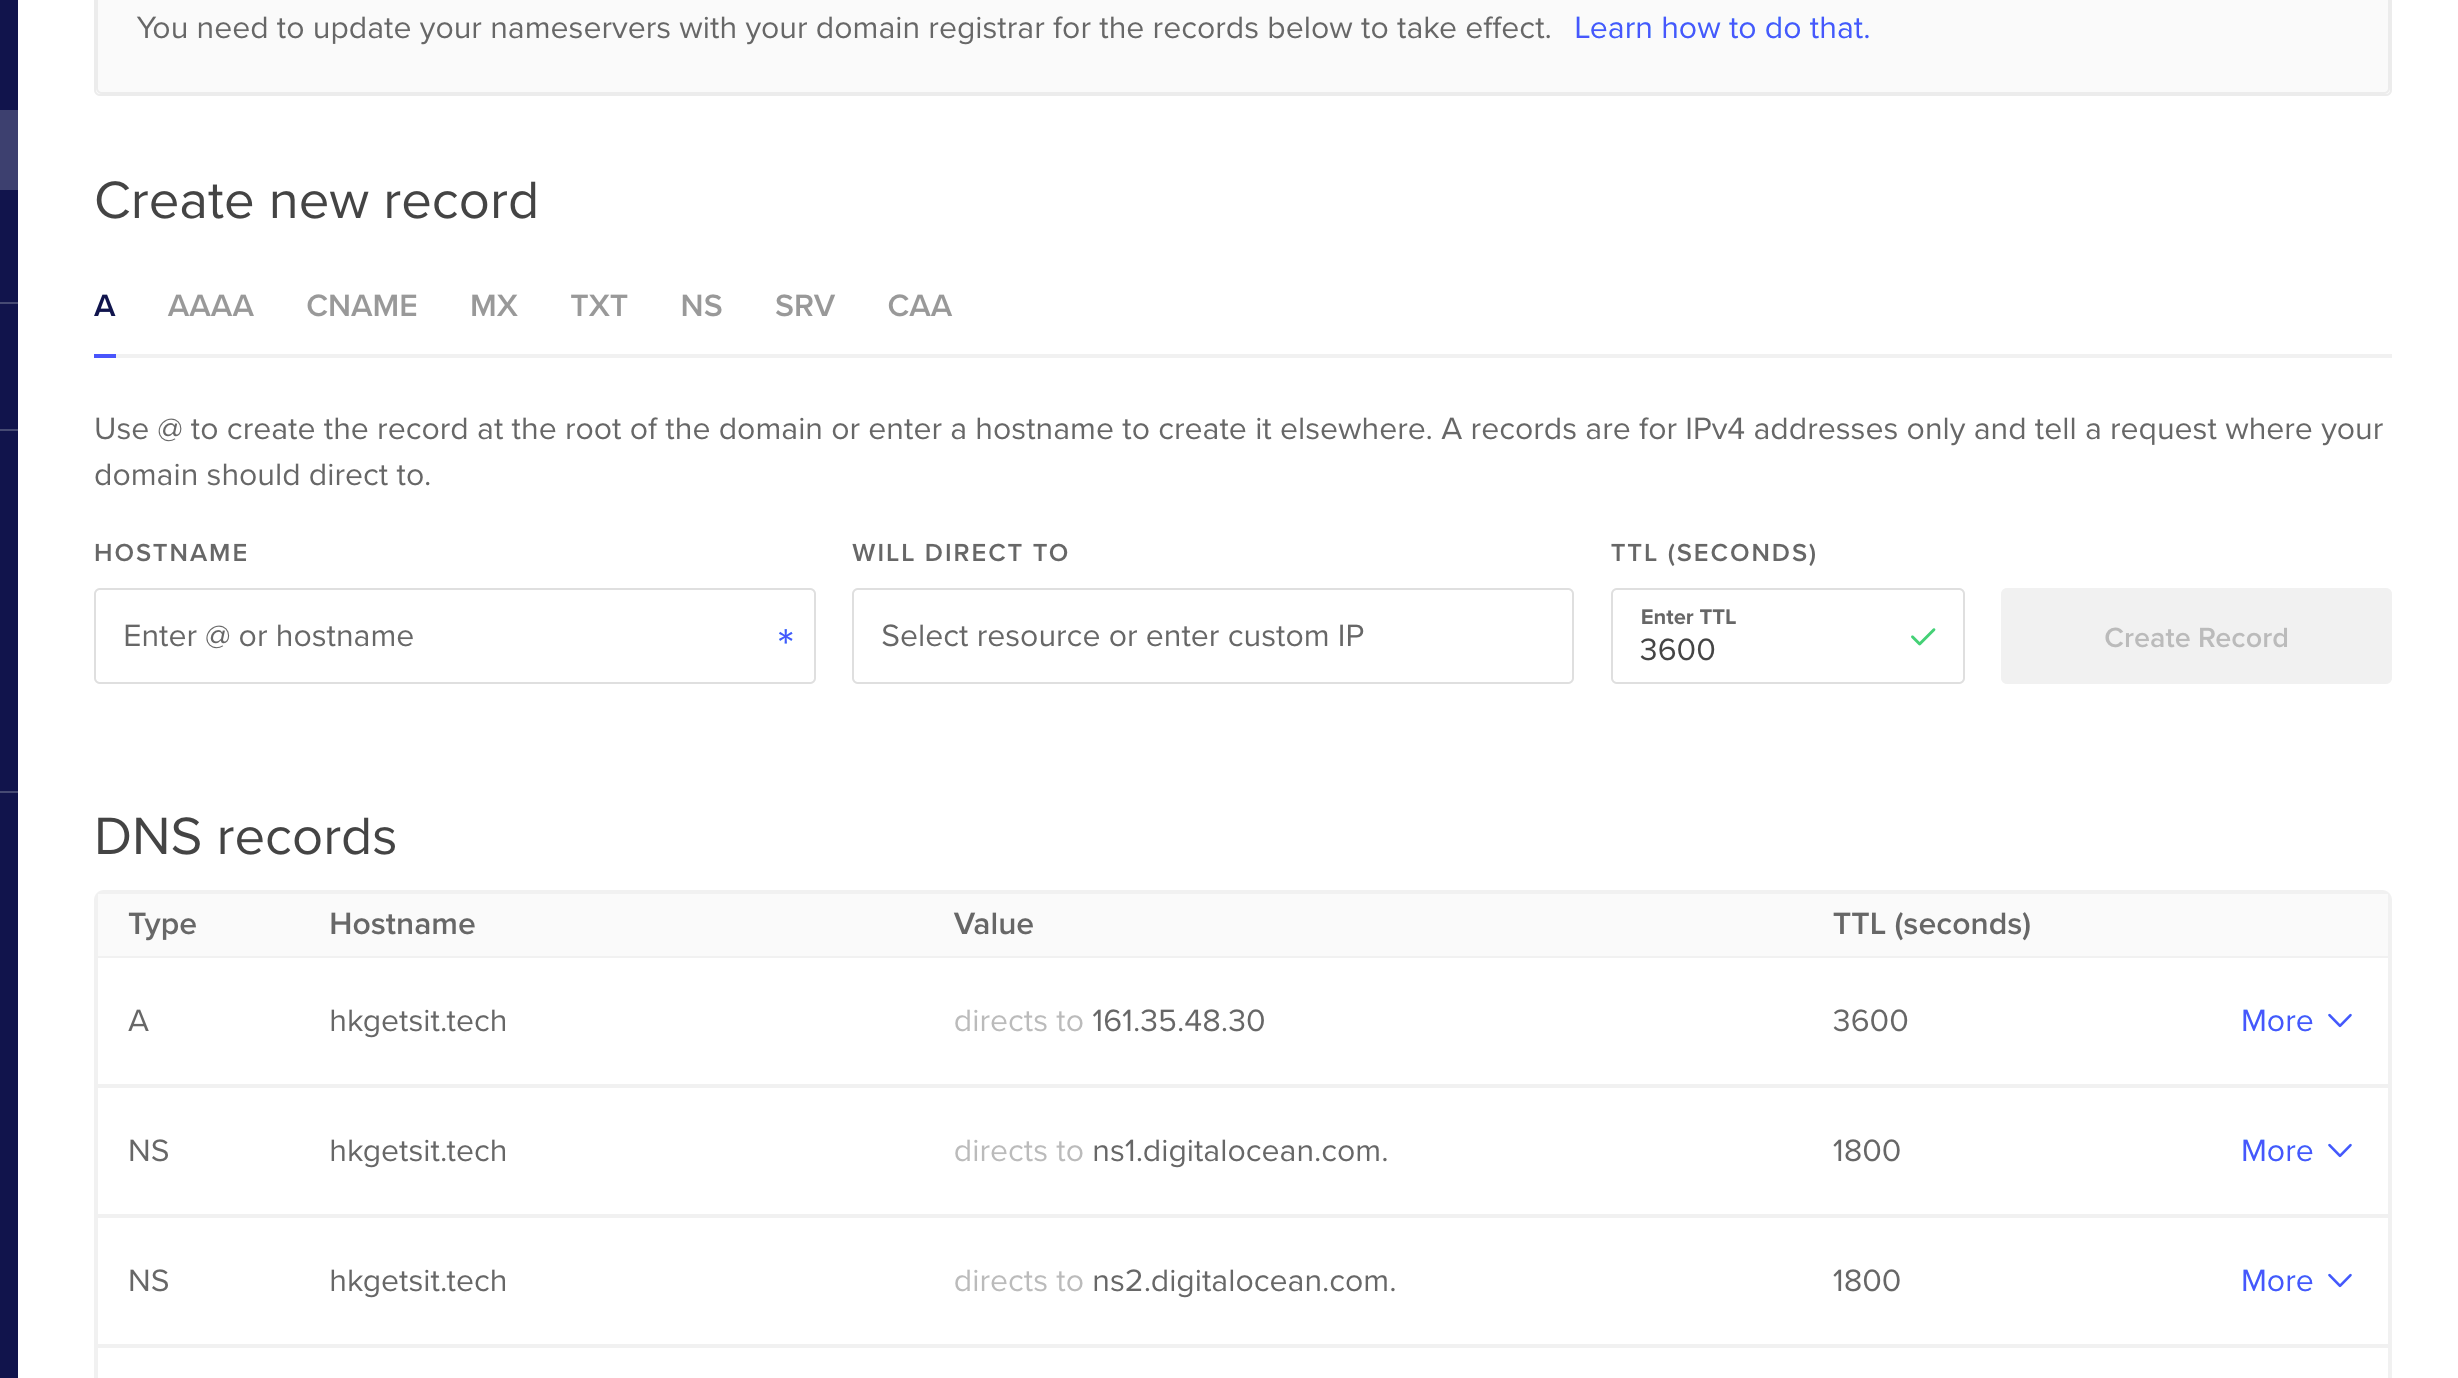
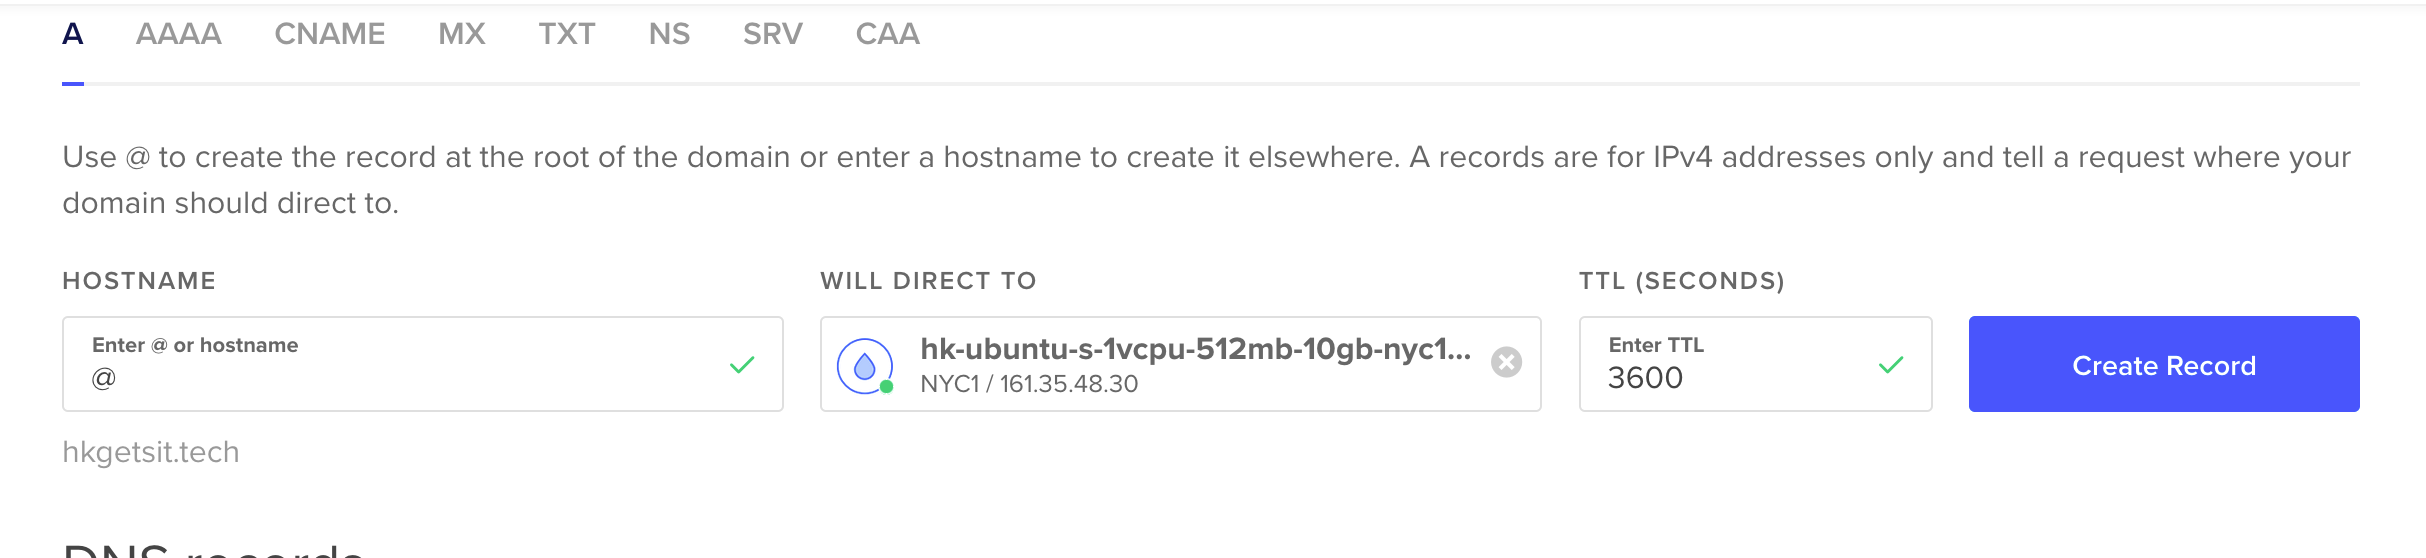
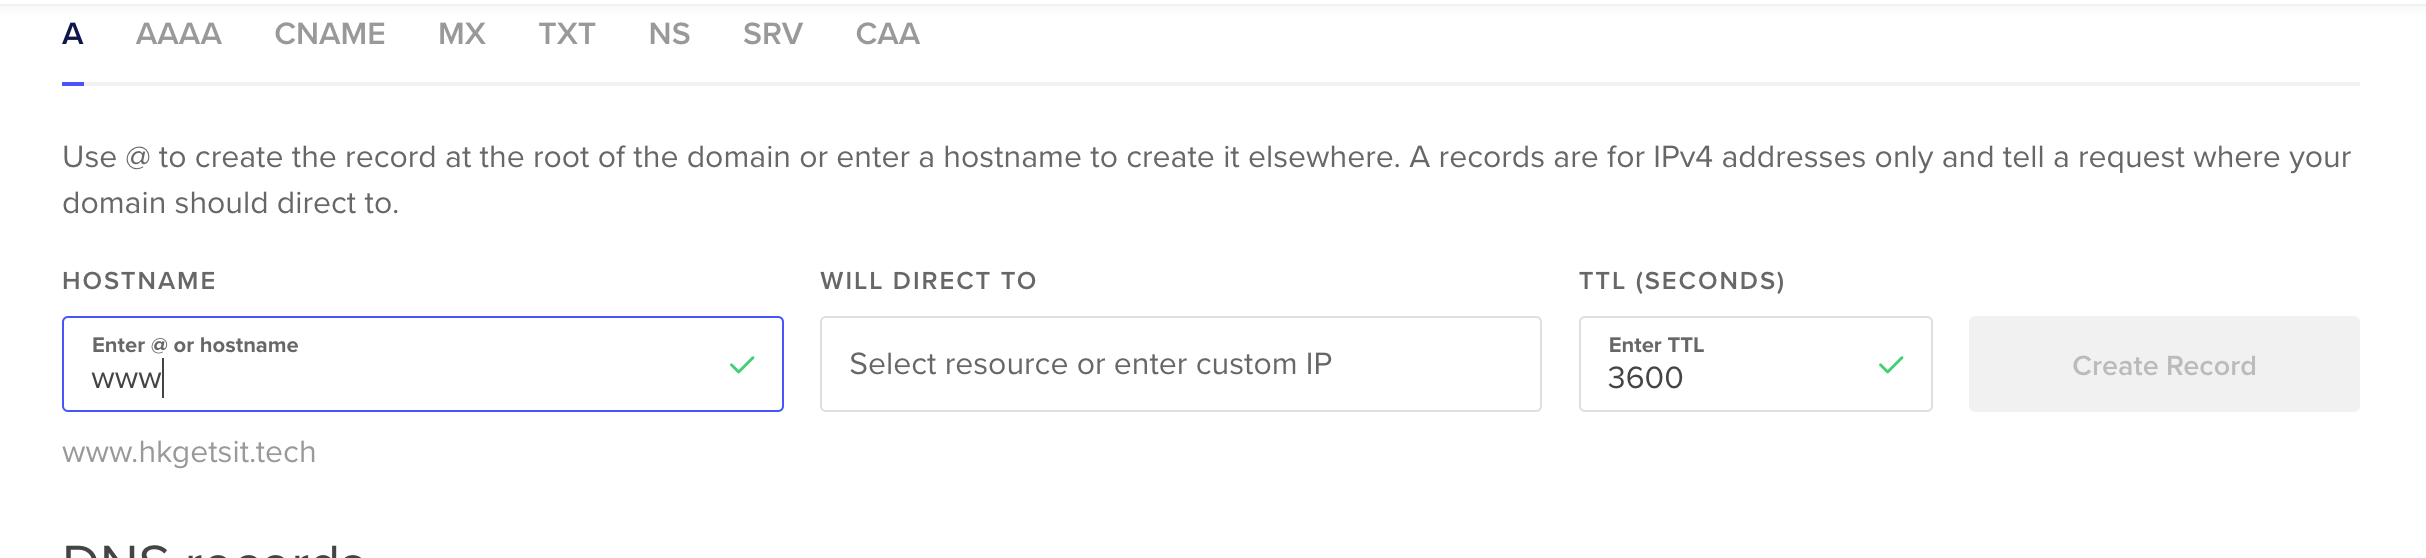
- add two "A" records with your IP address :
- @ : just the domain (i.e hkgetsit.tech)
- www :
The server should now be connected to our domain. We can verify it using the command we learnt earlier :
$ dig hkgetsit.tech
You should see a result similar to this with the server's IP address at the bottom:
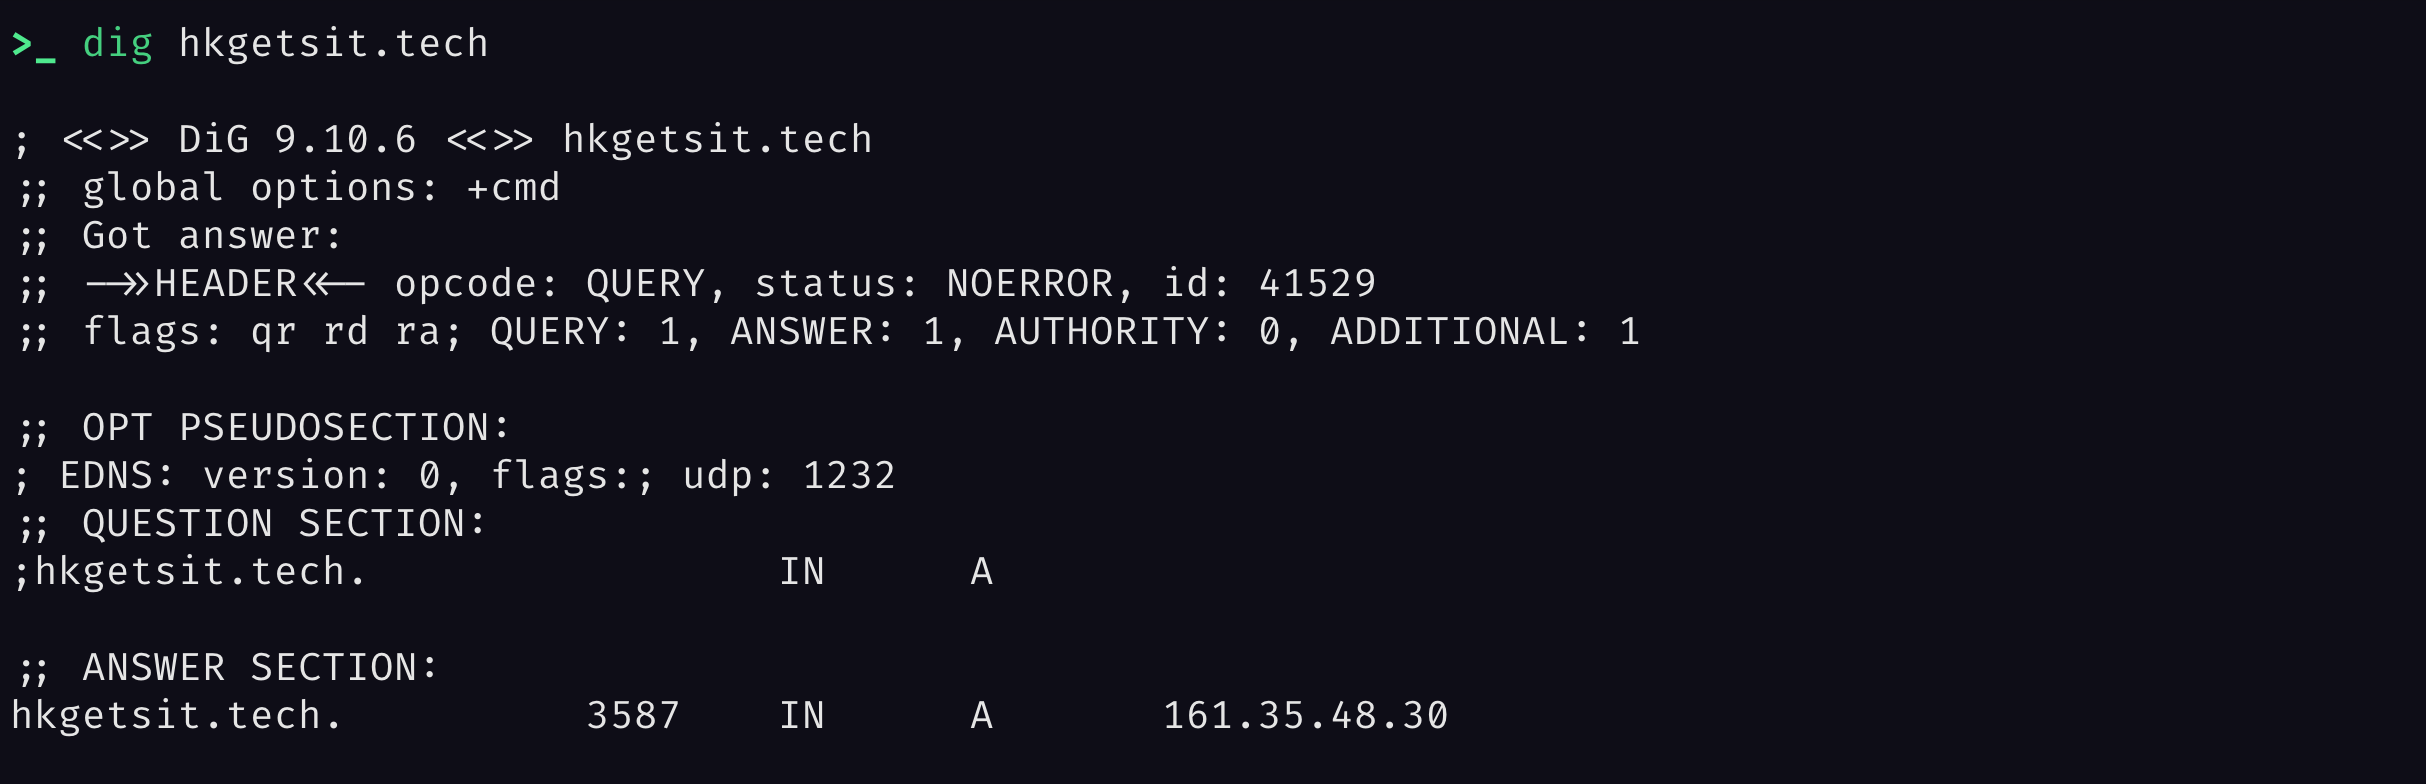
If you don't see it, it means that the changes have not been propagated yet, wait until it does.
Managing server access
We have a couple of things to do to get our server up and running.
We need to :
- Update the server
- Restart the server
- Create a new user
- Make that user a superuser
- Enable login for the new user
- Disable root login
Update and restart the server
- Run this command to SSH into the server :
$ ssh root@<your_IP_address>
- Update the software by running the following command :
apt update
apt upgrade
Hopefully all your upgrades ran fine.
- Restart the server
shutdown now -r
Once it's done, SSH back into your server.
Create a new user
There are two types of users :
root user: has the highest permission level. The root user has unrestricted access to the operating system.sudo user: Super User Do. The superuser is allowed to run commands and programs as root
We don't want to run as root because we want to keep the permissions as minimal as possible, to avoid deleting important programs accidentally for example. These are the steps to follow to create a new user :
- Create a new user :
adduser <your_username>
- Add user to 'sudo' group:
usermod -aG sudo <your_username>
- Switch user :
su <your_username>
- Check sudo access :
sudo cat /var/log/auth.log
Disable root access
These are the steps to follow to disable root access:
- Create authorized_keys file : An authorized_keys file is where our key is stored. Whenever we log in as a user the public key will be checked and authenticated against the private key
cd ~
mkdir .ssh
touch authorized_keys
-
Paste your public key
-
Exit :
exit
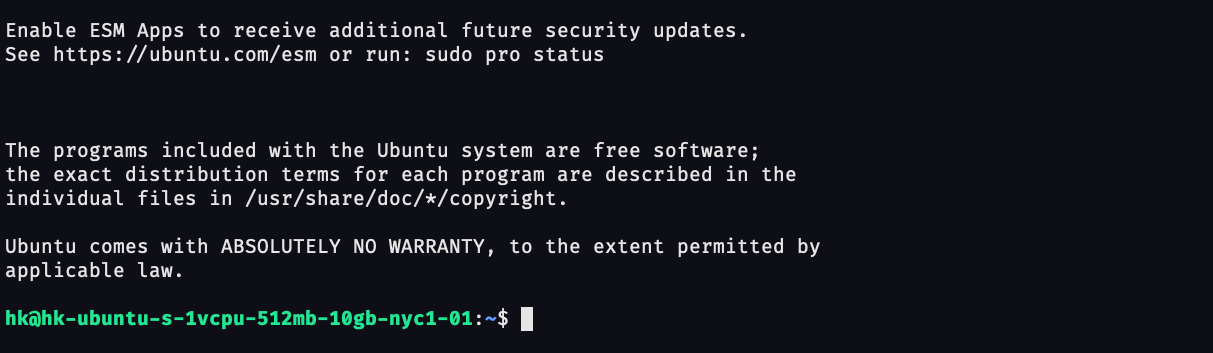
- Login with new user :
ssh <your_username>@<your_ip>
if you have successfully logged in, you should see a prompt that looks like this:
File permissions
The next thing we need to do is to change the file permission.
Check out this article for more information about file permissions
These are the steps to follow :
- Change file permissions
chmod 644 ~/.ssh/authorized_keys
- Disable root login by running the following command and
sudo vi /etc/ssh/sshd_config
- Restart ssh daemon :
sudo service sshd restart
We've setup our server and connected it to our domain.
In the second part, we will setup our server to respond to HTTP requests and discuss other full stack topics, such as database, security, containers etc..
Check Part II here.